Hackvision Is Build-your-own Retro Game

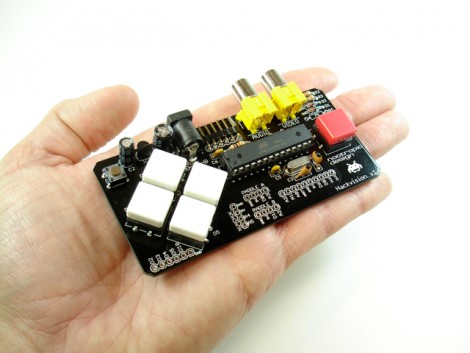
If you wanted to try your hand at programming some retro games Hackvision can jump-start the process. It is an Arduino-based game console in a controller format. You get four directional buttons and one function button. It has two RCA jacks for mono audio, and black and white video.

We’re happy to find that there’s information about game development that will help you follow along with the Space Invaders and Pong examples. The system uses the Arduino TVout library for video, which is robust and fairly easy to interact with. But once you see the game play in the video after the break it’ll be hard to resist building one of these. Don’t forget, this is Arduino based. If you already have an Arduino that uses an ATmega328 you just need to build the audio, video, and button circuits. Continue reading “Hackvision Is Build-your-own Retro Game”

Lightsaber Color Selector

[George Hadley] developed a nice setup to control the color of a replica Lightsaber. A small PCB houses a PIC 18F2221 and three switching transistors for the colors. A powerful LED resides in the tip of the handle, lighting up the diffuser that makes up the blade. But our favorite part is the control scheme. He’s embedded a small RGB LED in the handle, giving feedback as to which color of light can currently be adjusted (red, green, or blue). One button scrolls through the colors and a slide potentiometer adjusts that them.

We wouldn’t go as far as calling this a Halloween prop, we think it’s better suited for serious replica builds. But it would make an amazing addition to the little one’s costume. See it in action after the break.

Continue reading “Lightsaber Color Selector”

IM-ME USB Dongle Hacking

This circuit board is from the USB dongle of a Girl Tech IM-ME. [Joby Taffey] took it apart and poked around to learn its secrets. These dongles come along with the pink pager that has become a popular low-cost hacking platform. But we haven’t seen much done with the dongle itself up until now.

[Joby] used the OpenBench Logic Sniffer to gain some insight on what’s going on here. The board has two chips on it, a Cypress CY7C63803 USB microcontroller which talks to the computer over USB and also communicates over SPI with a Chipcon CC1110 SoC radio. It looks like reprogramming the Cypress chip is a no-go, so he went to work on the CC1110. The inter-chip communications data that he acquired by sniffing the SPI lines gave him all he needed to reimplement the protocol using his own firmware. As a proof of concept he to reflashed the CC1110 and can now send and receive arbitrary commands from the dongle. There’s a tiny video after the break showing a script on the computer turning the dongle’s LED on and off.

Continue reading “IM-ME USB Dongle Hacking”

EvalBot: Arrival And Assembly

[Chris Muncy] just received his EvalBot from TI and took some pictures of the assembly process. He was one of the lucky folks that picked up the kit for just $25 using a short-lived coupon code. Seeing the kit makes us wish we had ordered one. There is some assembly required but as you can see, it’s pretty much just mechanical assembly of the wheels and the front bumper arms.

We think the wheel design is quite good. It consists of two small gearhead motors mounted on the rectangular PCB parts that you can see on the right portion of the image above. Those mount to the circular mainboard using metal L brackets. The wheels themselves are three circular pieces of PCB, one with a smaller diameter sandwiched in between its two larger cousins. This creates a channel that is perfect for a neoprene O-ring to give the wheel traction. The main board uses an optical sensors and a hole through all three parts to function as a rotation counter.

It’s a fancy piece of hardware and we can’t wait to see what you can do with it! If you’ve got one, we want to hear about your adventures.

AVR Programming 01: Introduction

We love looking at hardcore electronics projects with a beefy microcontroller and hundreds, if not thousands, of lines of code at its center. But everyone needs to get there somehow.

This tutorial series aims to make you comfortable programming the Atmel AVR line of microcontrollers. Whether you’ve never touched a microcontroller before, or you’ve cut your teeth with dozens of Arduino projects, this will help you get right down to the hardware and give you the confidence to build anything.

Series roadmap:

Continue reading “AVR Programming 01: Introduction”

Halloween Props: Pumpkin In Standby-mode

Evil Mad Scientist Laboratories is preparing for Halloween with this standby-mode pumpkin. Inside there’s an LED plugging a hole that is drilled just to the skin of the gourd-like vegetable. It fades in and out similar to a sleeping Mac, using what we think is a vastly over-powered circuit based on an ATtiny2313 (1k  of programming space for this?). But we still like the idea and we’d enjoy seeing it scaled up to a full LED matrix.

We’ve come to expect pumpkin hacks from EMSL and they don’t disappoint. Last year was a mechanized version, and the year before an LED schematic symbol. So what about your creation? With about one week left, take a look around and see if you can’t create something as wonderful as the Pie of Sauron.

FM Bug Using Salvaged SMD Parts

If you’re a soldering ninja this FM transmitter bug is for you. It’s quite similar to the one we looked at yesterday, but this uses 100% salvaged parts. Two phones donated components; a Nokia 3210 for its voltage-controlled oscillator and a Nokia 1611 for the rest of the parts. The bad news is that mobile technology like cellphones use some of the smallest surface mount packages known to man. That’s where the soldering skill come into play. The good news is that if you’ve been scavenging for discarded phones in order to reuse their LCD screens you already have these parts on hand.

[Thanks George]