DIY Racing Sim Shift Box

diy_pc_racing_shiftbox

Ask anyone who has ever owned a car with a manual gearbox – in real life and in video games, nothing beats stick shift. Rather than shell out gobs of money to purchase a pre-made shift box, forum member [nikescar] built his own for about $20.

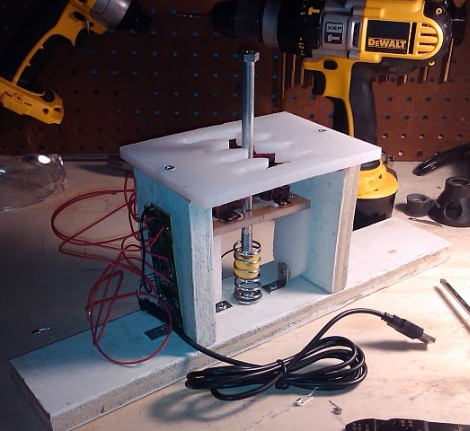
Using some scrap wood and a plastic cutting board, he went to work building a prototype. The “H” shift pattern was designed in CAD and laid over the cutting board, which was hand-cut with a Dremel. Using some tips found online, he constructed a simple shifting mechanism, then wired in a cheap USB game pad found on Ebay. Using safety pins as temporary micro switches, he ran a few laps, and was quite happy with the results. Once the switches arrived, they were fitted to the shift box and it was off to the races.

[nikescar] reports that the shifter works extremely well, allowing him to row through the gears with the greatest of ease, sans any fear of breaking things. Keep reading to get a better look at the shift box internals.

Continue reading “DIY Racing Sim Shift Box”

ITalkman Refrigerated Franken-phone

italkman_frankenphone

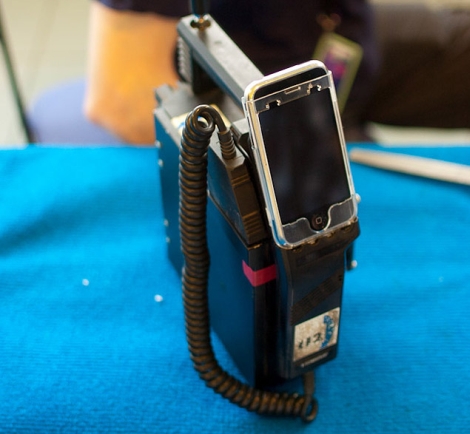
[Jani] over at MetkuMods was commissioned to build a prize for an on-air contest held by MTV3 in Finland. Well known for some of his previous work, he was a natural choice for this project. The only stipulation for the build was that it contain three specific items: a Mobira mobile phone, an Apple iPhone, and a refrigerator. For those of you who don’t know, a Mobira Talkman is an old-school “mobile” phone built by Nokia in the 80’s that weighed in at 11 pounds, and was far from convenient to use. In this case however, the size of the phone is an advantage since he was able to gut it and use the frame to make up the body of the refrigerated compartment. He sacrificed a soft-side portable heater/cooler bag, removing the built-in peltier cooler and associated components, later grafting them onto his Talkman case.

The next task was to add the iPhone to the Talkman. Rather than have the old handset sit there uselessly, [Jani] decided to mount a small Bluetooth hands-free module inside the handset, allowing it to answer calls, adjust the volume, and change music tracks on the iPhone. The iPhone was put in a hard plastic case, then mounted to the Talkman handset where the keypad and display used to reside.

All in all, the iTalkman is a pretty cool looking device, though we wouldn’t want to be tasked with lugging that thing around all day!

Amazing Backyard Rocket Ship Tree House

Ravenna_Ultra-Low-Altitude_Vehicle

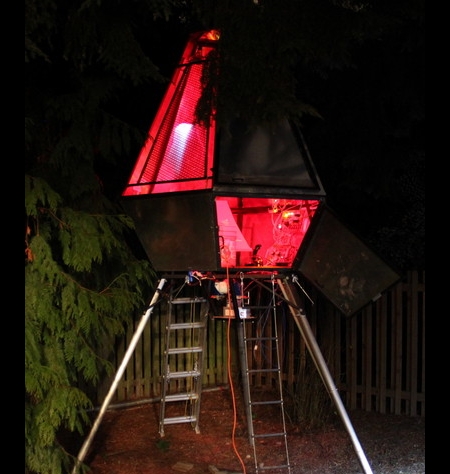
If you thought you had a cool tree house as a kid, think again. Tasked with landscaping his back yard and building a tree house for his son, [Jon] decided to go all out and build him a rocket ship instead.

Rising 15 feet into the Seattle skyline, the tree house known as the Ravenna Ultra-Low-Altitude Vehicle (RULAV), is sure to be the envy of every kid in the neighborhood. [Jon] and a friend worked for well over a year on their creation, welding, grinding, painting, and riveting their way along. After the structure was built, they fabricated some custom PCBs, using them to build the ship’s 14 control panels. The entire operation is controlled by a custom OS built to run on the three ATmega MCUs that manage operations.

Not content with just a handful of knobs and switches, the ship contains over 800 LEDs among its laundry list of electronics goodies. Compressed air is used to shoot water from positioning “thrusters”, while a paint mixer spins under the ship to simulate the rough and bumpy nature of space travel. The simulated launches are capped off with plenty of authentic NASA-style audio and a sub woofer that gives everything a deep, resonating rumble.

The project is truly amazing, and a ton of work went into every little detail in order to make this the most spectacular tree house ever seen. [Jon] definitely takes the award for “Coolest Dad Ever” for this build, even we’re jealous!

The pictures certainly don’t do it justice, so be sure to check out the video below for a quick introduction and demo of this awesome project.

Thanks to [Jeremy Elson] for the tip.

Continue reading “Amazing Backyard Rocket Ship Tree House”

Interfacing An Arduino With A TFT LCD

tft_lcd

Seven-segment displays and monochrome LCDs are fine for most projects, but some things simply look better in color. [John] over at the Little Bird Electronics blog recently wrote up a tutorial demonstrating the use of a TFT LCD panel with an Arduino. The specific panel he chose was a 4D Systems 1.44” TFT LCD that happened to feature a dedicated graphics processor, which should allow for some fantastic visuals when used to its fullest potential.

The LCD takes its commands over a serial interface, making it a simple five-wire display solution for your projects. The display can be programmed manually by sending hex commands over the serial interface, but there are also some user-developed libraries available that will allow you to use the majority of the most popular functions without the learning curve. One thing to note is that the LCD must be flashed with a particular flavor of firmware before it can communicate over the serial interface, a process for which [John] provides a walk through.

The LCD panel can be used with any Arduino-compatible board, so it can be useful in a whole host of projects.

Stick around to see a simple demo of the board in use.

Continue reading “Interfacing An Arduino With A TFT LCD”

NES Game Pad Wireless Light Commander

NES_wireless_light_switch

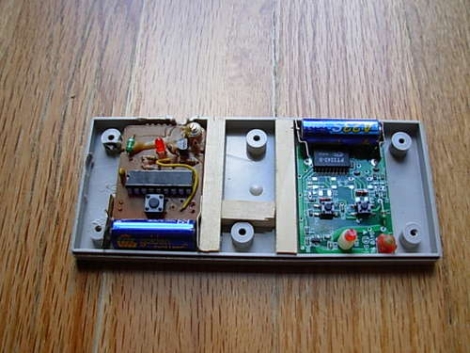
Annoyed that the new lights he bought for his apartment lacked power switches, Instructables user [p.arry.drew] decided to install a pair of wireless light switches. Not content to use the remotes separately, he decided to see if he could cram them both into an old NES controller, making for a nice all-in-one wireless light commander.

He disassembled the light switch remotes, cutting off a bit of the battery contacts to ensure they fit in the game pad. He then pulled apart his NES controller, removing the cord and adding some foam padding to ensure that the buttons fully contacted the wireless switches when pressed. A few bits of wooden dowel were added to keep everything in place, then the controller was reassembled.

His creation makes for a very convenient method of controlling several light switches from once source, plus the packaging is pretty handsome as well. These remote light switching solutions seem to be all the rage lately, so keep them coming!

Read on for a quick video of his remote light switches in action.

Continue reading “NES Game Pad Wireless Light Commander”

DIY Emergency Lighting System

diy_emergency_lighting_system

When the power goes out at home, what do you do? Most of us probably scramble around the house looking for a flashlight. [Gigawatts] wanted a better solution, so he built an emergency lighting system based off a standard household UPS. A while back he had constructed a relay-switched outlet box to help periodically restart his cable modem which would get hung up a little too often for his liking. Since changing Internet providers, he no longer needed the switched outlet box, and was looking for a way to reuse it.

He hooked up the outlet box into the “battery powered” side of the UPS, and inserted a light bub into the normally closed half of the switch box. A 5v power supply was hooked into the “surge protection only” side of the UPS and is used to keep the relay switched. This causes the half of the switch box that is normally closed to remain open, and the light switched off. When power is lost, the 5v supply no longer switches the relay, and the light is turned on – powered by the UPS battery.

This is quite a useful hack if you happen to have a spare UPS sitting around – it sure beats scrambling around searching for a flashlight in the dark!

Blasting Off With GPS

Launching model rockets is a good time, but more often than not, it’s hard to tell how high the rocket went or how fast it moved – both essential facts when bragging about your latest flight. [Chris] recently built a GPS-based altimeter for the USC Rocket Propulsion Lab, so that they could track the performance of their latest project. The circuit is based off a Picaxe 18x and uses a GPS module to obtain NMEA altitude data. Once the data is obtained, it is stored on an external EEPROM to be read back after the rocket has been recovered.

[Chris] unfortunately does not have any pictures of the board he built, but he has made his circuit diagram and source code available. He reports that the logger worked perfectly aside from a small bit of time where the GPS module temporarily lost its satellite lock.

If you are interested in reading more about flight data recording and telemetry, be sure to check this out.