Chain Cleaner

DIY Automatic Chain Cleaning Machine

Spring is here and it’s time to pull the bikes out of the shed. One think that is often overlooked is bicycle maintenance. No one wants to be that guy walking his bike home after a part failure renders the bike unrideable. One portion of proper bike maintenance is cleaning the chain. A contaminated bike chain can wear quicker, not be as flexible, hinder shifting and increase wear to the drivetrain cogs. Tired of sitting there cleaning his chain with a tooth brush, [Ally] built a washing machine for bike chains.

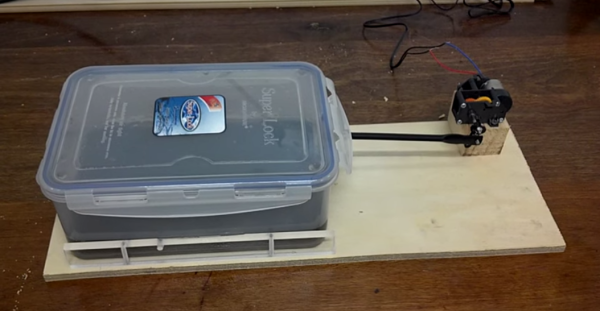
This machine is quite simple, it’s a plastic box full of turpentine and dish detergent. The chain is submerged in the liquid and a lid is put on the box. At the local hobby store, [Ally] purchased a small gearbox and motor assembly. Powered by a 5vdc wall wart, the output shaft of the gearbox spins a crank that in-turn agitates the box, chain and cleaning liquid. After about 5 minutes the chain is free of grit and gunk. Not bad for a few dollars, spare parts and a little bit of time. Check out the video of it in action after the break.

While you’re waiting for your chain to be cleaned you should work on making your bike pedal in both directions.

Continue reading “DIY Automatic Chain Cleaning Machine”

Bike-Powered Everything

It’s hard to argue that bicycles aren’t super handy. They get you from point A to B in a jiffy with little effort. Since these machines are so simple and convenient, why not use them for things other than transportation? Well, [Job] set out to do just that.

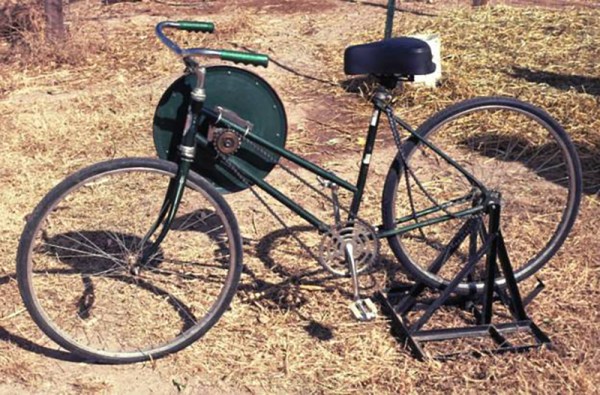
[Job’s] starts with a standard single speed bike and adds a few parts. First, a stand is installed to the back axle. When in the down position, it lifts the rear wheel off of the ground and provides support so the bike does not tip over. When flipped up into the ‘up’ position the stand creates a rack for holding goods and the bike can be pedaled around in a normal manner.

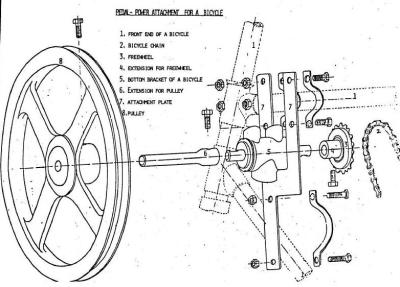
dualpurposebike-midNext, a jack shaft made from a bike bottom bracket and crank is installed up front in between the top tube and down tube of the frame. On one side of the jack shaft is a sprocket and the other side is a large pulley. When converting to what [Job] calls ‘power production mode’, the chain going to the rear wheel is removed from the crank sprocket and replaced with a chain connected to the jack shaft.
With the rear stand down supporting the bike and the pedals now powering the jack shaft and large pulley, it is time to connect the bike to any sort of machine. A belt is slung around the pulley and connected to a matching pulley on a power-hungry machine. This dual-purpose bike has powered a rice thresher, peanut sheller, water pump, table saw and even a wood lathe!

[Job] set out to create a simple and inexpensive way to make a bike even more useful than just riding around town. We think he did just that. For more bike-powered stuff, check out this generator.

electric canoe

Canoeing Sans Paddles. Yes, It Is Possible

Now that Spring is upon us, it’s time to get out the kayaks, canoes and row boats. As fun as paddling around a lake may be, after a long winter of sitting inside our arms are not up to that task. Well, [comsa42] has a solution to that problem. He’s made a quick-attaching trolling motor setup for his canoe and documented the process along the way.

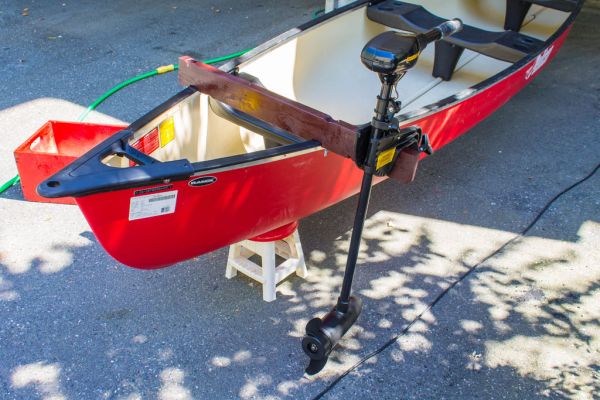
[comsa42] started with a run of the mill canoe. Although he wanted a trolling motor option, he didn’t want to permanently modify the canoe. He started by making a wooden beam that spans the width of the canoe and overhangs on one side. The beam was notched out to securely fit over the lip of the canoe and a couple bolts and washers were used to clamp the beam to the canoe. This beam is just a few inches behind the rear seat so that the motor is at a comfortable position for the person steering.

The electric trolling motor is attached to this beam. To power the trolling motor, [comsa42] wired up two 12v deep cycle marine batteries in parallel. He installed them in a recycled wooden case to protect the batteries from the elements or occasional splash.

Continue reading “Canoeing Sans Paddles. Yes, It Is Possible”

bridge duplicator

Homemade 3D Carving Duplicator

[Frank] is a guitar builder and has to make a quantity of acoustic guitar bridges that wouldn’t make sense to do manually by hand each time. He wanted a way of duplicating bridges quickly and precisely but he didn’t want to go to a CNC machine. Instead, he build a 3D duplicating machine.

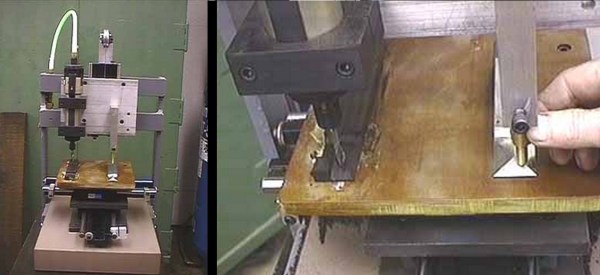
The machine has 3 perpendicular axes, just like a milling machine. Mounted to the Z Axis is an air powered spindle that can reach 40,000 RPM. All 3 axes are moved by the operators hands. Normally, free-hand cutting something like this would be very difficult. [Frank’s] solved this in his machine by using a stylus that is offset from the cutting bit. The stylus is the same effective length and diameter of the cutting bit and is guided over a finished bridge pattern. While the stylus is tracing the pattern, the spindle and bit are removing material from a bridge blank. The stylus is continually moved over the entire pattern bridge until the spindle is finished carving out a new bridge out of the blank.

To aid in lifting the heavy Z Axis and spindle, [Frank] added a counter balance to make tracing the pattern extremely easy. Once the new bridge is carved, it only requires minor sanding to remove the tool marks before being installed on a guitar! [Frank] admits his linear bearings and rails are very rigid but also very expensive. If you’re interested in a less-expensive 3D duplicator, check out this project.

EDF snowboard

EDF Removes Hill Necessity For Snowboarding

Getting stuck on a flat portion of a trail while snowboarding is a major buzz kill. You can either hop yourself to the nearest slight downhill or unstrap your board and take a walk. Neither option is fun. [Jude] was tired of getting stuck on the flats so he strapped an electric ducted fan to the back of his snowboard.

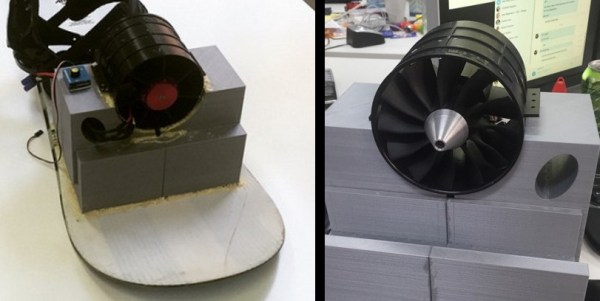
The powerplant is an Electric Ducted Fan (EDF) intended for RC Aircraft. It is supported on the snowboard by a 3D printed mount. [Jude] made his mount design available for anyone interested in following his lead. Good ole glue holds the fan to the mount and the mount to the snowboard.

The battery is a 12S, which means it has 12 LiPo cells, 3.7 vdc each, wired in series to put out 44.4 volts. Inbetween the battery and brushless motor in the EDF is an Electronic Speed Control (ESC) that is normally used for RC vehicles. [Jude] purchased an ultra-cheap RC transmitter and receiver setup to give him one-handed wireless control of the fan’s speed. He estimates he can hit 15 mph on flat ground. If nothing else, it looks darn fun to ride!

Continue reading “EDF Removes Hill Necessity For Snowboarding”

Camera Slider

Camera Slider Utilizes Skateboard Trucks

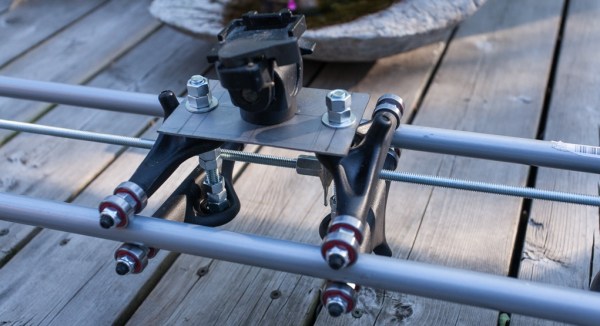
[Peter] wanted a camera slider and found some inspiration on the good ole ‘net. He then gathered some parts and came up with his own design. We’ve seen camera sliders made from roller blade wheels before but never one that uses skateboard trucks as the carriage! On each truck axle are 2 bearings spaced apart without the skate wheels. Each pair of bearings rides on one of two 48 inch long closet rods supported between two push-up stands. The top portion from an old camera tripod makes a handy mount that allows adjustment of the camera’s aim.

Some camera sliders are manual operated. This one, however, is lead screw driven with a goal of keeping the camera moving at a constant rate. A disassembled hand drill provides the motor, gearbox and speed control necessary to turn the lead screw. Although it works well at slow speeds, [Peter] admits that it becomes less usable as the speed increases. This is mainly due to the 5/16 inch threaded rod lead screw oscillating and whipping around after reaching a certain RPM. If you stick with a straight run, a belt-driven system might make those faster movements more smoothly.

Bar Top MAME Cabinet

Scratch-Built Bar Top MAME Cabinet

Video game enthusiast [Mike] is all about the journey and not necessarily the destination. That is why he likes working on projects and documenting their progress with great detail. His bar top MAME machine is certainly no exception.

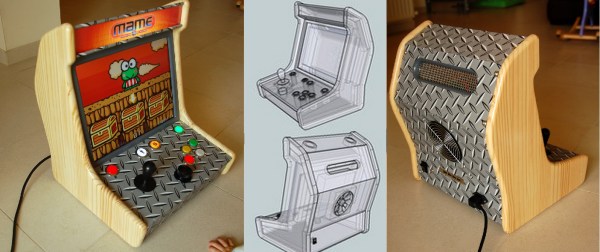
One of [Mike’s] goals was to see if he could keep the look and feel of a large arcade cabinet but scale it down so that it was portable. He started with drawing up a model in Sketchup. Once satisfied with the layout and making sure everything would fit, the side panels were cut out of pine boards and will only be clear-coated. The remaining panels are cut from MDF as they will be covered in a matching decorative vinyl wrap.

The control panel may look simple but a lot of thought went into it. Of course, there is a joystick but [Mike] chose to only use 4 game-play buttons. He did this to save space and estimates he’ll still be able to play 90% of the available MAME games. Those 4 buttons are illuminated and the MAME front end, Mala, was configured to light up only the functional buttons for the particular game being played. Front and center on the control board is a rotary encoder for playing games like Arkanoid or games requiring a steering wheel.

In the end this build came out pretty nice looking. His build log is a great reference to hit before starting your next arcade cabinet project.

Although [Mike] calls his MAME cabinet ‘mini’, it’s not the most mini we’ve seen here on Hackaday.