Automated Weatherproof Timelapse System With DSLR And Raspberry Pi

[madis] has been working on time lapse rigs for a while now, and has gotten to the point where he has very specific requirements to fill that can’t be done with just any hardware. Recently, he was asked to take time lapse footage of a construction site and, due to the specifics of this project, used a Raspberry Pi and a DSLR camera to take high quality time lapse photography of a construction site during very specific times.

One of his earlier rigs involved using a GoPro, but he found that while the weatherproofing built into the camera was nice, the picture quality wasn’t very good and the GoPro had a wide-angle lens that wouldn’t suit him for this project. Luckily he had a DSLR sitting around, so he was able to wire it up to a Raspberry Pi and put it all into a weatherproof case.

thumbOnce the Pi was outfitted with a 3G modem, [madis] can log in and change the camera settings from anywhere. It’s normally set up to take a picture once every fifteen minutes, but ONLY during working hours. Presumably this saves a bunch of video editing later whereas a normal timelapse camera would require cutting out a bunch of nights and weekends.

The project is very well constructed as well, and [madis] goes into great detail on his project site about how he was able to build everything and configure the software, and even goes as far as to linking to the sites that helped him figure out how to do everything. If you’ve ever wanted to build a time lapse rig, this is probably the guide to follow. It might even be a good start for building a year-long time lapse video. If you want to take it a step further and add motion to it, check out this time lapse motion rig too!

Even More Emulated Microcomputers: 8080 On A Stellaris Launchpad

[Steeeve] just sent us his work on emulating a handful of 8080-based microcomputers on a Stellaris Launchpad, including the bare-metal to run Space Invaders. We know what you’re thinking: Is that all you folks are doing these days?!?!? There must be something in the water.

[Steeeve]’s build is based on the Launchpad with an external 64kB of SPI RAM, a nice little TFT display, and a built-in SD card for all of your storage needs. Add in an 8080 emulator and a keyboard and you’ve got a tiny microcomputer. (Is that redundant?)

What’s really neat about [Steeeve]’s project is that he’s cloned not just one target computer, but a whole bunch of computers including (GitHub links follow) the 8080-based UK101/Superboard, the CPM/80, and the machine that ran Space Invaders, as well as the 6502-based Commodore PET and Apple-1.  And as a bonus, you can save the state onto the built-in SD card so that you can hibernate the microcomputer and pick up right back where you left off at a later date. Snazzy.

He’s also built a library which provides an emulation framework if you want to build on this work yourself. And did we mention he can play Space Invaders? Bravo [Steeeve]!

Review: Re:load Pro

About a year ago, [Nick Johnson] over at Arachnid Labs sent a tip in about Re:load Pro, his digital constant current load design. [Nick] was running a crowdfunding campaign, which always makes me think twice about posting. However in this case, I had no qualms writing a feature here on the blog (and backing the campaign with my own cash). Re:load Pro is actually [Nick’s] third generation current load. Having purchased and used the original Re:load, I knew [Nick] was capable of fulfilling all the promises in the campaign. Turns out I was right – [Nick] and the Arachnid Labs team had a very successful crowdfunding campaign. All the kickstarter backers have been enjoying their units for months now. When it came time to stock up the Hackaday Store, the Re:load Pro was a no-brainer.

What does one need a digital constant current load for? Plenty of jobs could benefit from it! From testing batteries to verifying power supplies, to tests of many driver circuits, a digital load is a great tool to have in your arsenal.

Like many electronic devices, our first step with the Re:load Pro was to upgrade the firmware. Since the Re:load Pro is operated by a Cypress Semiconductor PSOC 4,  firmware updates are handled by the cyflash python package. For now this means heading to the command line and installing pip and cyflash. Those who aren’t familiar with a command line prompt will find a step by step guide on the firmware update page.

I should note that the Re:load Pro is powered by the USB input. I connected it up to my lab PC, which had no problem supplying the necessary power.

Calibration

The next step is calibrating the Re:load Pro. This requires an adjustable power supply capable of supplying at least 10 volts at 2amps, a decent multimeter, and of course some test leads. If you don’t have a reliable adjustable supply ask around; it should be easy to find someone who does.

The calibration is performed in three steps – first with nothing connected to the Re:load Pro. Then a power supply set to approximately 9.99 volts is connected. The voltage displayed on the Re:load Pro is tweaked with the rotary encoder to display the same value as that of the power supply. My power supply has a rather cheap internal voltmeter, so I used a multimeter in parallel with the setup. With voltage done, the Re:load Pro will draw 2 amps from the power supply. You need to adjust the current displayed on the Re:load Pro such that it matches the voltage displayed on your power supply current meter. Again, since my supply doesn’t have the most accurate meter, I used a multimeter – this time in series with the Re:load and the power supply.

Taking Measurements

reload-pro-review-thumb
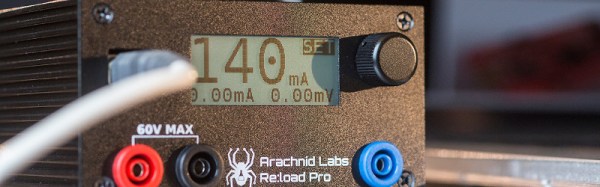
With all the preliminary work done, it’s time to make some measurements! Re:load pro has a simple user interface. everything is accessed with the rotary encoder on the front panel. Turn the dial to your desired value, and press to select. In my case, I wanted to check the voltage drop of a LiPo battery under various loads. I simply hooked up the battery and dialed 350ma on the encoder. The Re:load Pro showed me that the battery was holding at 12.1 volts, and a display on the lower left side showed me how many milli amp hours I had pulled from the battery.

The Re:load Pro’s USB connector isn’t just for power. It will show up on your PC as a serial device. Just open your favorite terminal emulator, set the port to 115200 baud 8/N/1, and you’re good to go. The Re:load Pro uses a simple text based command/response protocol, all the commands are outlined on the Arachnid labs page.

Conclusion:

Re:load Pro is one of the first of new breed of open source tools. Like the closed source Rigol Oscilloscope, it replaces tools which cost several times more. [Nick] and Arachnid Labs aren’t just resting on their success though – they’ve just finished up a kickstarter for their latest open source tool. Tsunami is an open source signal generator based upon the Arduino platform. Tools enable projects, and open source tools are the best way to push the entire ecosystem forward.


Editor’s Note: We are reviving the concept of “Reviews” on Hackaday. These were pioneered long long ago by Hackaday Alum [Ian Lesnet] with his post on smart tweezers but little has been done since. We see a lot of tools, parts, raw materials, and equipment flow through our inbox. We plan to post reviews as a new Hackaday Column. These reviews are not paid placement, they are chosen by editors and writers based on our own interest. This particular example is available in the Hackaday Store and we started with it because we already have the hardware in-hand. However, we will be reviewing items we do not sell and have already put out requests for review units. If you know of something you think worthy of a review, please let us know by submitting it to the tips line. Thanks!

-Mike Szczys, Managing Editor
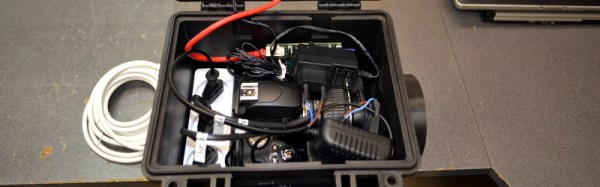
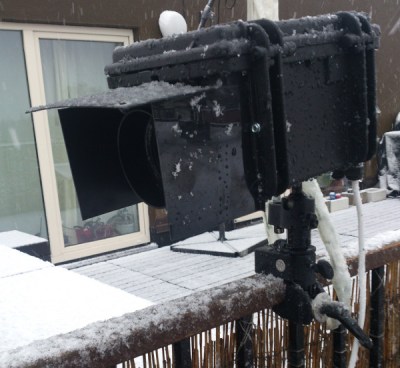
Demoing An 8088

The demoscene usually revolves around the Commodore 64, and when you compare the C64 hardware to other computers of a similar vintage, it’s easy to see why. There’s a complete three-voice synthesizer on a chip, the hardware allows for sprites, a ton of video pages, and there are an astounding sixteen colors, most of which look good. You’re not going to find many demos for the Apple II, because the graphics and sound are terrible. You’re also not going to find many demos for an original IBM PC from 1981, because for thirty years, the graphics and audio have been terrible.

8088 MPH by [Hornet], [CRTC], and [DESire], the winner of the recent 2015 Revision Demo compo just turned conventional wisdom on its head. It ran on a 4.77 MHz 8088 CPU – the same found in the original IBM PC. Graphics were provided via composite output by a particular IBM CGA card, and sound was a PC speaker beeper, beeping sixty times a second. Here’s a capture of the video.

Because of the extreme nature of this demo, it is unable to run on any emulator. While the initial development happened on modern machines with DOSbox, finishing the demo needed to happen on an IBM 5160, equivalent to the 5150, but much easier to find.

Despite the meager hardware and a CPU that reads a single byte in four cycles, effectively making this a 1.19 MHz CPU, the team produced all the usual demoscene visuals. There are moire patterns, bobbing text, rotated and scaled bitmaps, and an astonishing 1024-color mode that’s an amazing abuse of 80×25 text mode with NTSC colorburst turned on.

Below you can find a video of the demo, and another video of the audience reaction at the Revision compo.

Continue reading “Demoing An 8088”

Hacklet 42 – Mouse Projects

Ever since [Douglas Engelbart] and his team came up with the computer mouse, hackers, makers, and engineers have been creating ways to change and improve the design. Even the original mouse was something of a hack, built form a block of wood, a button, and two encoder wheels. The wire exited toward the user’s wrist, making the device look like it had a tail. Even after all these years, folks are still working to make the perfect pointing device. This week’s Hacklet highlights some of the best mouse projects on Hackaday.io!

mouseballzWe start with [s_sudhar] and ORB – A 3D gaming mouse. Orb uses accelerometers and gyros to track its location in 3D space. The popular MPU-6050 chip provides all the sensors to create an Inertial Measurement Unit (IMU). The controller is an Arduino Micro, which provides the USB interface to a PC with the help of Arduino’s MouseKeyboard library. Two micro switches handle button duties. The original Orb was built up in a cardboard box. [S_sudhar] created a more advanced version housed in a 3D printed sphere with two buttons. The translucent joint between the two halves of the sphere is just begging for some RGB LEDs. We can already see them flashing red when you’re getting shot in Team Fortress 2!

mouse-wheelAnyone who has used X-Windows with a three button mouse knows how maddening the modern clickable center scroll wheel can be. You can’t click the wheel without it rolling, and causing all sorts of mayhem. There are plenty of software solutions and window manager mods to work around this, but [mclien] wanted a real three button mouse with a side scroll wheel. He didn’t want just any mouse though – it had to be a Silicon Graphics International (SGI) 3 button unit. His project 3-buttonmouse with seperate wheel used a dremel, drill press, and glue to transplant the electronics of a 3 button scrolling mouse into the classic SGI plastics. The final wheel placement did work – but it didn’t quite fit [mclien’s] hand. It did fit one of his friends hands perfectly though. So well in fact that the friend borrowed [mclien’s] creation. Neither the mouse nor the friend have been seen since!

jimmy[Jay-t] decided that mice are for more than pointing, so he built Jimmy the mouse bot. Jimmy is a robot built from an old Commodore Amiga two button mouse. His brain is a Parallax Propeller processor. Two outrigger mounted gear motors help Jimmy drive around. Jimmy has plenty of sensors, including infrared object detectors, switches, and a GPS module from Adafruit. Jimmy may be the world’s first homing mousebot. [Jay-t] does all his interactive testing with Tachyon Forth on the Prop. The great thing about having an 8 core processor is that there is plenty of room for expansion. Even with all these sensors, Jimmy is still only using 3 cores!


clovis

Finally we at [Clovis Fritzen] and the Wireless Batteryless Mouse. This is our favorite type of project – the kind that has just been uploaded. [Clovis] plans to use a movement based system to charge up a supercapacitor – eliminating the need for batteries or wires. He’s also hoping to use an accelerometer to detect the mouse’s position rather than a power-hungry optical system. The details are still sparse, because he’s just started the project! These are exactly the type of projects that get us thinking. How will [Clovis] translate movement to energy? Will it be weights, like a self-winding watch? Maybe pizeo elements in the buttons. Will people mind having to jiggle their mouse to get it working once that capacitor is discharged? One thing we’re sure of, [Clovis] has a proven track record of implementing projects like his weather station. Get in there and help with your own ideas, or simply follow along with us and see how this one turns out.

Not satisfied? Want more mousy goodness? Check out our freshly minted mouse and pointer projects list!

That’s about all the time we have for this week’s Hacklet. As always, see you next week. Same hack time, same hack channel, bringing you the best of Hackaday.io! 

Logic Noise: More CMOS Cowbell!

Logic Noise is an exploration of building raw synthesizers with CMOS logic chips. This session, we’ll tackle things like bells, gongs, cymbals and yes, cowbells that have a high degree of non-harmonically related content in them.

Metallic Sounds: The XOR

I use the term “Non-harmonic” in the sense that the frequencies that compose the sound aren’t even integer multiples of some fundamental pitch as is the case with a guitar string or even our square waves. To make these metallic sounds, we’re going to need to mess things up a little bit, and the logic function we’re introducing today to do it is the exclusive-or (XOR).

Continue reading “Logic Noise: More CMOS Cowbell!”

Building Super Small Linux Computers From Scratch

Conventional wisdom says small, powerful embedded Linux like the Raspberry Pi, Beaglebone, or the Intel Edison are inherently manufactured devices, and certainly not something the homebrew tinkerer can produce at home. [hak8or] is doing just that, producing not one, but two completely different tiny Linux computers at home.

The first is based on Atmel’s AT91SAM9N12 ARM processor, but the entire board is just about two inches square. On board is 64 MB of DDR2 DRAM, a USB host and OTG port, and not much else. Still, this chip runs a stripped down Linux off of a USB drive.

The second board is based on the Freescale i.MX233. This board is similar in size and capabilities, but it’s not exactly working right now. There’s an issue with the DRAM timings and a capacitor underneath the SD card is a bit too tall.

The real value of [hak8or]’s project is the incredible amount of resources he’s put into his readme.mds for these repos. If you’ve ever wanted to build an embedded Linux device, here’s your one-stop shop for information on booting Linux on these chips.