Ping Pong Air Cannon

Cannon Sucks Balls At 600 Mph

Every day we humans hang out and think nothing of the air that is all around us. It is easy to forget that the air has mass and is pulled down to the earth by gravity creating an ambient pressure of about 14.7 psi. This ambient pressure is the force that crushes a plastic bottle when you lower the internal pressure by sucking out the air. [Prof Stokes] from Brigham Young University has used this powerful ambient air pressure as the power source of his ping pong ball cannon.

Instead of filling a reservoir tank with compressed air and using that to fire a projectile, this canon has the air removed from the barrel to create the pressure differential that propels the ping pong ball. The ball is put in one end of a 10 ft long tube. That end of the tube is then covered by a sheet of Mylar. The other end is covered with the bottom of a disposable plastic cup. A vacuum pump is then used to remove the air inside the tube and it is this pressure differential that keeps the plastic cup secured to the end of the tube. When it’s firing time, a knife is used to cut the Mylar at the ping-pong-ball-end of the tube. Air rushes in to fill the vacuum and in doing so accelerates the ping pong ball towards the other end. There is a large jar at the business-end of the cannon that catches the ping pong ball and contains the shrapnel created during the ball’s rapid deceleration!

Since this was a science experiment at a university, some math was in order. Based on the atmospheric pressure and ball cross sectional area, the calculated speed was 570 meters/second or about 1300 mph. The calculations didn’t take into account leakage between the ball and the tube or viscosity of the air so a couple of lasers were set up at the end of the cannon to measure the actual speed – 600 mph. Not too bad for just sucking the air out of a tube!

IFS Trike

DIY Reverse Trike Bike Has Sick IFS

There is certainly no shortage of bicycle builds out there on the ‘net. We’re not talking custom race bikes or anything here, we mean cool odd-ball bikes built just because. We’ve seen trike conversions before, both with single wheels in the front and in the back, but today we stumbled across something we haven’t seen before.

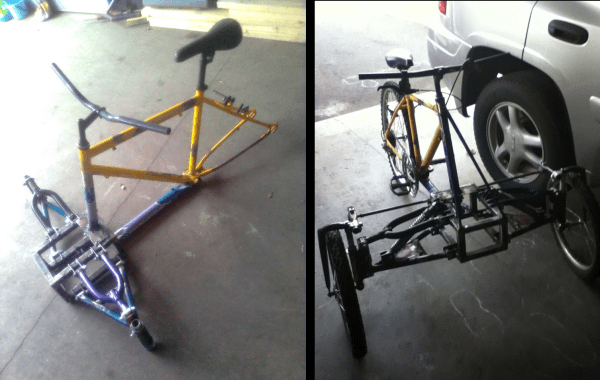
[Kong79] has built a reverse trike, with 2 wheels in the front. That by itself is nothing new but this trike has an independent front suspension, meaning each wheel can move up and down independently from the other.  This particular build uses a double A-arm setup that keeps the axle of the wheel near parallel with the ground throughout its range of travel.

The trike started off as a standard mountain bike. The front fork was removed to make way for the new front suspension. There is a new box frame that was welded up and positioned directly below the head tube. This frame will support all 4 A-arms. Speaking of the A-arms, they certainly aren’t off the shelf units. Take a look, the uppers are bike forks and the lowers were welded together from bike frame tubes.

The spindles are where it gets a little tricky but [Kong79] made it happen with his resourcefulness. Bike head tubes, head bearings and standard stems make up the spindle components and are responsible for allowing each front wheel to steer. Each spindle is connected to the steering column by a tie rod scrounged from an ATV.  The shocks were found at a motorcycle scrap yard.

This is a pretty unique build and it’s sure great to see people doing stuff like this. For more trick trikes, check out this wooden one or this no-weld-required recumbent.

minimalist desk

Sliding Minimalist Computer Desk Starts Life As Ikea Shelf

Where are you right now? You’re probably sitting at a desk staring at a computer screen. Us tinkerers/makers/hackers/diyers use computers all the time… they are a great tool and an easy way to spread and gather information. Since we spend so much time sitting at a computer, why shouldn’t the computer’s desk be made to enhance the experience?

Self-proclaimed web guru [Ellis] admits to being a minimalist and wanted a super sleek computer desk. He couldn’t find a commercially available model that he liked so he built his own.

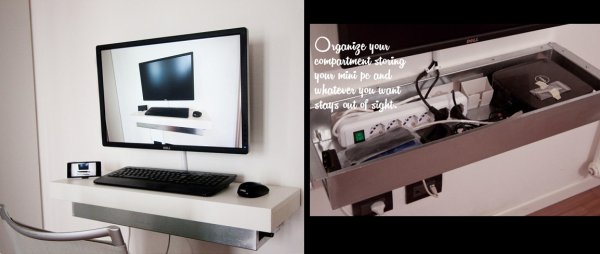
The desk started as an Ikea floating shelf. The shelf comes with a metal bracket that secures to a wall, then the shelf completely slides over the bracket so that the shelf looks as if it is floating in air. Once the u-shaped bracket was installed to the wall, a custom compartment was made to fit in between the bracket’s arms. This compartment will hold a power strip, mini Dell computer and other accessories. On the outside of each bracket arm, [Ellis] mounted drawer slides. The stock shelf was then modified to mount to the newly added drawer slides allowing it to be pulled forward for typing or to expose the hidden compartment. When closed, the shelf-desk looks clean and blends into the wall color.

A wide screen monitor is mounted directly on the wall just above the desk and a wireless keyboard/mouse combo supports the clean look. [Ellis] now has the minimalist computer desk he’s always wanted that doesn’t distract him from his work (or ‘net browsing).

DIY Freeboard

Serious Skateboard Build Lets You Snowboard Down The Street

For some of you HaD readers it’s winter and heading up to a mountain to go snowboarding is quite convenient. Unfortunately, for the boarder-holics, the off-season comes too quickly and lasts far to long. [jfaneumann] is a snowboarder and wanted to get that same carvey feeling during the summer months so he made a DIY skateboard that rides like a snowboard.

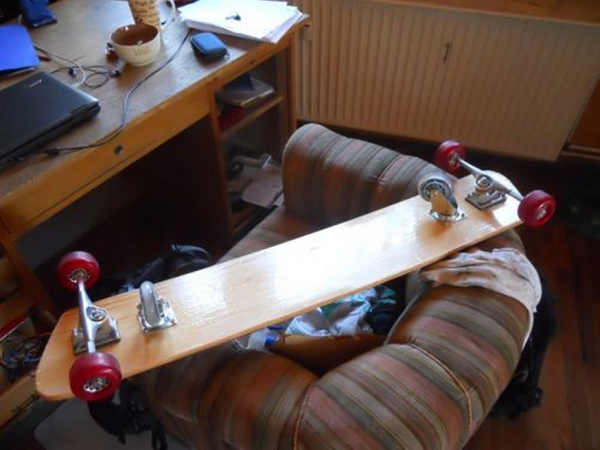
[jfaneumann] didn’t come up with the design, it’s modeled after a commercially available product called the Freebord which is basically an oversize skate deck with extra-wide trucks and integrated pivoting wheels (think casters) in the center of the deck. The pivoting wheels stand a little bit proud of the other 4 wheels which makes the board only ride on the pivoting wheels and two of the remaining wheels at a time. This setup allows the rider to carve, slide and spin down the street like a snowboarder would. This looks like fun to ride but at a cost of about $250 for a Freebord, it’s not cheap.

The project started with a home-made deck simply cut from plywood. To get that extra wide stance standard skateboard trucks were modified. Long coupling nuts were screwed onto the truck axles and epoxied into place. On a normal skateboard the wheel rides on an axle that is part of the truck. Since the axles were covered up by the coupling nuts, bolts were used to secure the wheels to the now much wider trucks.

The pivoting wheels for the Freebord look like standard casters so that’s what [jfaneumann] used for his board. He did remove the rubber wheels and replace them with inline skate wheels with real bearings. Wood shims space the casters away from the deck to put them at the right height compared to the other 4 skate wheels.

In the end, [jfaneumann] got the summer riding experience he desired without spending a boatload of cash.

Add a Mic to GPS

Upgraded GPS Now Accepts Voice Commands

[FreddySam] had an old Omnitech GPS which he decided was worthy of being taken apart to see what made it tick. While he was poking around the circuit board he found a couple solder pads labeled as ‘MIC1’. This GPS didn’t have a microphone. So, why would this unit have a mic input unless there is a possibility for accepting voice commands? [FreddySam] was about to find out.

The first step to get the system working was to add a physical microphone. For this project one was scavenged from an old headset. The mini microphone was removed from its housing and soldered to the GPS circuit board via a pair of wires. Just having the mic hanging out of the case would have been unsightly so it was tucked away in an otherwise unfilled portion of the case. A hole drilled in the case lets external sounds be easily picked up by the internalized microphone.

The hardware modification was the easy part. Getting the GPS software to recognize the newly added mic was a bit of a challenge. It turns out that there is only one map version that supports voice recognition, an old version; Navigon 2008 Q3. We suppose the next hack is making this work with new map packs. This project shows how a little motivation and time can quickly and significantly upgrade an otherwise normal piece of hardware. Kudos to [FreddySam] for a job well done.

Climbing Wall in Garage

Rock Climbing Wall Installed In Garage Doubles As Storage Space

Climbing enthusiast and human spider [Swighton] just couldn’t get enough climbing crammed into his day. If he couldn’t get out to the climbing spots, why not bring the climbing spot to him? So he did that by building a climbing wall in his garage.

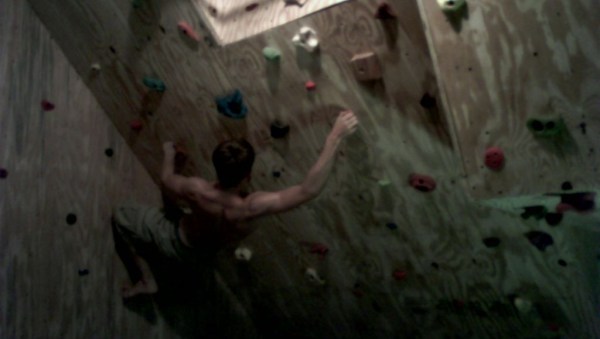
The process started with determining the available space that can be allocated to the project. In [Swighton]’s case he could afford an 8×12 ft section of real estate. The garage ceilings were 8 ft high. A few days were spent sketching out ideas and designs. To suit his needs, the wall had to have a 45 degree overhang section, a small 90 section (think ceiling, not wall) and a pull-up bar. Once the design was finalized, it was time to pull some sheet rock off the walls and ceiling so that the 2×4 and 2×6 climbing wall framing could be securely fastened to the current garage structure.

Three-quarter inch plywood would cover the wooden frame. Before the plywood sheets were cut to size and installed, he drilled holes every 8 inches to accept t-nuts. These t-nuts allow hand holds to be installed and easily reconfigured. The quantity of t-nuts adds up quickly, an 8 inch square spacing results in 72 t-nuts per sheet of plywood.

[Swighton] also added a hatch to allow access to the inside of the climbing wall so that space would not go to waste. It is now a storage area but may become a kids’ fort in the future. After it was all said and done the wall only cost $400 which includes $180 for the hand holds.

If you’re like [Swighton] and can’t get enough climbing action, check out this wall with light up hand holds or this interactive wall.

GPS Clock Hat

Hat-Mounted Clock Requires Mirror For Wearer To Tell Time

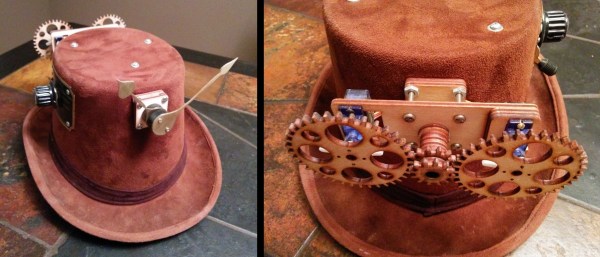
[gfish] was planning on attending Burning Man and wanted to make something unique (and useful) to wear. He decided on a hat/clock hybrid. Just slapping a clock on a hat would be too easy, though. [gfish] wanted his hat to change time zones both via manual switches or physical location.

On the front of the hat there are 2 hands, as most clocks have. Each one is attached to one of two concentric shafts that run to the back of the hat. Each hand is individually controlled by an RC vehicle servo. Those of you familiar with RC servos know that a servos’ max rotation is about 180 degrees and is certainly not enough for a full revolution required by the clock. To fix this, there is a 3:1 gear set that allows a 120 degree rotation of the servo to move the clock hand a full 360 degrees. With this method, each hand can’t move past 12 and instead has to quickly move counter-clockwise to get where it needs to be in order to again start its journey around the clock face.

Mounted inside the hat there is an Arduino that controls the clock, a GPS shield to determine location and an RTC to maintain accurate time. Mounted on the side of the hat is a control panel that contains an overall on/off switch as well as a rotary switch for selecting a specific timezone or for engaging GPS mode. The whole thing is powered by a 9 volt battery.

If you like unnecessarily complicated top hats, check out this WiFi enabled message displaying one.

Continue reading “Hat-Mounted Clock Requires Mirror For Wearer To Tell Time”