Optimized Molds With 3D Printing

[Florian] has a few arcade games and MAME machines, and recently he’s been trying to embed objects in those hard plastic spheres on the end of joysticks. A common suggestion is to 3D print some molds, but even though that’s a great idea in theory the reality is much different: you’re going to get layer lines on the casting, and a mirror finish is impossible.

No, a silicone mold is the way to do this, but here 3D printing can be used to create the mold for the silicone. Instead of a few pieces of hot glued cardboard or a styrofoam cup, [Florian] is 3D printing a a container to hold the liquid silicone around the master part.

After printing a two-piece part to hold both halves of a silicon mold, [Florian] put the master part in, filled it up with silicone, and took everything apart. There were minimal seam lines, but the end result looks great.

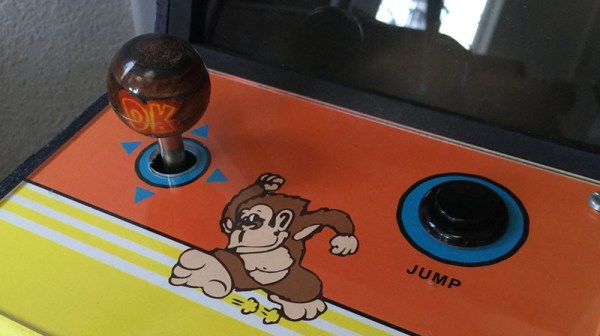
In addition to making a 3D printed mold container, [Florian] is also experimenting with putting 3D printed parts inside these joystick balls. The first experiment was a small 3D printed barrel emblazoned with the Donkey Kong logo. This turned out great, but there’s a fair bit of refraction that blows out all the proportions. Further experiments will include a Pac-Man, a skull, and a rose, to be completed whenever [Florian] gets a vacuum chamber.

Dirt Cheap Motor Balancing And Vibration Analysis

Ever the enterprising hacker and discerning tool aficionado, [Chris] knows the importance of “feel”. As a general rule, cheap tools will shake in your hand because the motors are not well-balanced. He wanted a way to quantify said feel on the cheap, and made a video describing how he was able to determine the damping of a drill using a few items most people have lying around: an earbud, a neodymium magnet, scrap steel, and Audacity.

He’s affixed the body of the drill to a cantilevered piece of scrap steel secured in a vise. The neodymium magnet stuck to the steel interrupts the magnetic field in the earbud, which is held in place with a third hand tool. [Chris] taped the drill’s trigger down and controls its speed a variac. First, [Chris] finds the natural frequency of the system using Audacity’s plot spectrum, and then gets the drill to run at the same speed to induce wobbling at different nodes. As he explains, one need not even use software to show the vibration nodes—a laser attached to the system and aimed at a phosphorescent target will plot the sine wave.

Just for fun, he severely unbalances the drill to find the frequencies at which the system will shake itself apart. Check it out after the break.

Continue reading “Dirt Cheap Motor Balancing And Vibration Analysis”

Ping Pong Air Cannon

Cannon Sucks Balls At 600 Mph

Every day we humans hang out and think nothing of the air that is all around us. It is easy to forget that the air has mass and is pulled down to the earth by gravity creating an ambient pressure of about 14.7 psi. This ambient pressure is the force that crushes a plastic bottle when you lower the internal pressure by sucking out the air. [Prof Stokes] from Brigham Young University has used this powerful ambient air pressure as the power source of his ping pong ball cannon.

Instead of filling a reservoir tank with compressed air and using that to fire a projectile, this canon has the air removed from the barrel to create the pressure differential that propels the ping pong ball. The ball is put in one end of a 10 ft long tube. That end of the tube is then covered by a sheet of Mylar. The other end is covered with the bottom of a disposable plastic cup. A vacuum pump is then used to remove the air inside the tube and it is this pressure differential that keeps the plastic cup secured to the end of the tube. When it’s firing time, a knife is used to cut the Mylar at the ping-pong-ball-end of the tube. Air rushes in to fill the vacuum and in doing so accelerates the ping pong ball towards the other end. There is a large jar at the business-end of the cannon that catches the ping pong ball and contains the shrapnel created during the ball’s rapid deceleration!

Since this was a science experiment at a university, some math was in order. Based on the atmospheric pressure and ball cross sectional area, the calculated speed was 570 meters/second or about 1300 mph. The calculations didn’t take into account leakage between the ball and the tube or viscosity of the air so a couple of lasers were set up at the end of the cannon to measure the actual speed – 600 mph. Not too bad for just sucking the air out of a tube!

New Part Day: Really, Really Wide Screens

Once again my inbox runneth over with press releases, Kickstarter announcements, unsolicited emails, and a bunch of product announcements. Most of these, of course, are never to be seen again. Once in a great while – statistically insignificant, really – there’s a product announcement that’s just interesting enough to take a closer look at. This time, it’s a really, really wide screen.

LCDs are curious beasts when it comes to display interfaces. Back in the bad old days of gigantic tube TVs, the aspect ratio of these displays was fairly limited. You could get a 4:3 display, and with the rare exception of o-scopes, vector displays, and other weird devices, that was it. Since then we’ve moved to LCDs, a promising technology if you want a display in the shape of a car dashboard, or as a thin strip to put on some rackmount modules. It took this long for a sliver of an LCD to appear.

This display produced by EarthLCD is a 10.4 inch display, about ten inches wide and one inch tall. The resolution is 1024 by 100. It is, by far, the skinniest LCD ever produced. The closest you’re going to get to a display with this kind of aspect ratio are old character LCDs, and even then you’re not going to address individual pixels.

If you’re struggling to figure out what this would be used for, this product makes it somewhat obvious. It’s a 1U rack with a beautiful 1024×100 display embedded in the front. You’ve never seen a server that cool.

Interestingly, the 1U display is driven by a single Raspberry Pi, and looking at the datasheet for the display (PDF) tells you pretty much everything. The display is driven by a regular old parallel interface, with six bits of color for R, G, and B. That means it can be driven with a Raspberry Pi without an adapter board, a BeagleBone, or even smaller ARM micros with the obvious reduction in color depth.

While the display isn’t a game changer or something that will knock your socks off, it is, interesting and something that could find its way into some interesting projects. If you have any idea what those projects would be, drop a note in the comments.

Continue reading “New Part Day: Really, Really Wide Screens”

Looking Inside The KR580VM80A Soviet I8080 Clone

The folks at Zeptobars are on a roll, sometimes looking deep inside historic chips and at others exposing fake devices for our benefit. Behind all of those amazing die shots are hundreds of hours of hard work. [Mikhail] from Zeptobars recently tipped us off on the phenomenal work done by engineer [Vslav] who spent over 1000 hours reverse engineering the Soviet KR580VM80A – one of the most popular micro-controllers of the era and a direct clone of the i8080.

But before [Vslav] could get down to creating the schematic and Verilog model, the chip needed to be de-capped and etched. As they etched down, they created a series of high resolution images of the die. At the end of that process, they were able to determine that the chip had exactly 4758 transistors (contrary to rumors of 6000 or 4500). With the images done, they were able to annotate the various parts of the die, create a Verilog model and the schematic. A tough compatibility test confirmed the veracity of their Verilog model. All of the source data is available via a (CC-BY-3.0) license from their website. If this looks interesting, do check out some of their work that we have featured earlier like comparing real and fake Nordic dies and amazing descriptions of how they figure out the workings of these decapped chips. If this is too deep for you check out the slightly simpler but equally awesome process of delayering PCBs.

A Secret Door To The Mines Of Moria

What home movie theater is complete without a secret entrance? [Eclipse_007] had the brilliant idea to make this Lord of The Rings themed hidden door, akin to the entrance way to the Mines of Moria.

It’s a custom door panel filled to the brim with LED lights on the underside. The front panel is a large piece of plexi-glass with a vinyl coating on one side. [Eclipse_007] painstakingly cut the design out of the vinyl coating, all by hand. Once installed the door just looks like another part of the wall. But when touched, the door lights up and then swings open, revealing the movie theater. Plans are already in the works to make it voice controlled to open when the password is spoken.

As one reddit user puts it:

That is probably the coolest thing I have ever seen.

I’m trying to imagine an estate agent introducing your house… two bathrooms, double glazing, five bedrooms, the Westgate of Moria which opens into a basement movie theater when you say Mellon, and a stylish modern kitchen…

Continue reading “A Secret Door To The Mines Of Moria”

Animated ASCII Fluid Dynamics Simulator Is Retro Cool

ASCII art holds a place near and dear to our hearts. If you were fortunate enough to get started in computers before there was such a thing as a graphical user interface (GUI) then you remember tolling for hours to make clever use of the ASCII characters to make on screen graphics appear as realistic as possible.

Although this animated ASCII fluid dynamics simulator dates back to 2012, it’s just too cool not to share. It’s the product of the International Obfuscated C Code Contest (IOCCC). A contest held each year where the goal is to write the most confusing C code that you can – making use of loopholes and ambiguity in the C programming language to obfuscate(hide) the purpose of the program. Basically, doing everything you’re taught not to do in school. You can take a look at the source code here.

We’re sure the programmer [Yusuke Endoh] would be the first to admit, that there is no practical use for such a low resolution simulator, but we give it an A+ in the retro cool department anyways. (Not to mention, the source code is way too confusing to even comment on) Take a look at the animated ASCII graphics in the video after the break.

Continue reading “Animated ASCII Fluid Dynamics Simulator Is Retro Cool”