Climbing Wall in Garage

Rock Climbing Wall Installed In Garage Doubles As Storage Space

Climbing enthusiast and human spider [Swighton] just couldn’t get enough climbing crammed into his day. If he couldn’t get out to the climbing spots, why not bring the climbing spot to him? So he did that by building a climbing wall in his garage.

The process started with determining the available space that can be allocated to the project. In [Swighton]’s case he could afford an 8×12 ft section of real estate. The garage ceilings were 8 ft high. A few days were spent sketching out ideas and designs. To suit his needs, the wall had to have a 45 degree overhang section, a small 90 section (think ceiling, not wall) and a pull-up bar. Once the design was finalized, it was time to pull some sheet rock off the walls and ceiling so that the 2×4 and 2×6 climbing wall framing could be securely fastened to the current garage structure.

Three-quarter inch plywood would cover the wooden frame. Before the plywood sheets were cut to size and installed, he drilled holes every 8 inches to accept t-nuts. These t-nuts allow hand holds to be installed and easily reconfigured. The quantity of t-nuts adds up quickly, an 8 inch square spacing results in 72 t-nuts per sheet of plywood.

[Swighton] also added a hatch to allow access to the inside of the climbing wall so that space would not go to waste. It is now a storage area but may become a kids’ fort in the future. After it was all said and done the wall only cost $400 which includes $180 for the hand holds.

If you’re like [Swighton] and can’t get enough climbing action, check out this wall with light up hand holds or this interactive wall.

Auto-Meter Reader Feeder Keeps Meter-Maids At Bay

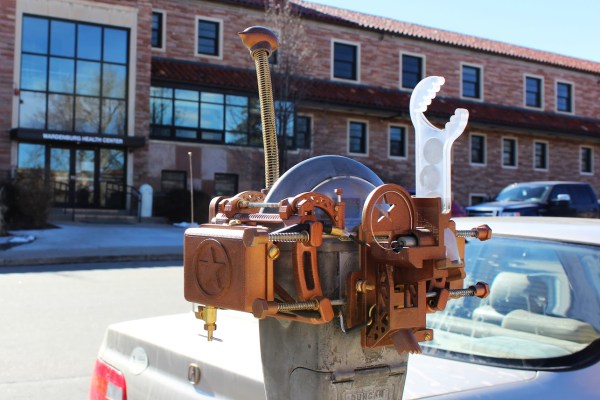
Planting your car just about anywhere almost always comes at a price; and, if you’re overdue for your return, odds are good that you’ll end up paying a much steeper price than intended. Parking meters are wonderful devices at telling the authorities just how much time you have left until you’re ticketworthy. [Zack] figured that five–even ten minutes late—is an absurd reason to pay a fine, so he’s developed a tool that will preload a meter with a few extra coins when the authorities get too close.

The law-enforcement detection system puts together of number of tools and techniques that we’re intimately familiar with: 3D printing, Arduino, a photoresistor, and a proximity (PIR) sensor. At the code level, [Zack] filters his analog photo resistor with a rolling average to get a clean signal that triggers both by day and by night. The trigger? Two possibilities. The PIR sensor detects curious law enforcement officers while the filtered photoresistor detects the periodic twirling siren lights. Both events will energize a solenoid to drop a few extra coins through a slide and into the meter slot.

For a collection of well-known components, [Zack] could’ve packed his contraption into a Altoids Tin and called it a day. Not so. As an interaction designer, looks could make or break the experience. For this reason, he opts for a face-hugging design with a steampunk twist. Furthermore, to achieve compatibility across a range of devices, [Zack’s] CAD model is the result of adjusting for various meter profiles from images he snapped in the urban wilderness. The result? A clean, authentic piece of equipment compatible with a family of meters.

For the shrewd-eyed observers, [Zack’s] first video post arrived online in 2011, but his work later resurfaced at a presentation in the 2015 Tangible, Embedded, and Embodied Conference by his former design instructor [Eric Paulos], who was eager to show off [Zack’s] work. For a deeper dive into the upcoming second edition, head on over to [Zack’s] image feed.

Continue reading “Auto-Meter Reader Feeder Keeps Meter-Maids At Bay”

3D Printed Snowblower

Automate Winter With A 3D Printed Snowblower

Remote controlled vehicles aren’t just for kids. In fact, you can get some seriously cool mini utility vehicles. In fact, you can even buy a mini tracked snow blowing vehicle! But [The_Great_Moo] was rather disappointed in the performance of his Kyosho Blizzard SR, so he did what any self-respecting hacker would — he redesigned the whole damn thing and 3D printed it.

The beauty with re-designing something from the ground up is you can design it specifically for 3D printing (unless of course you want to mass produce it!), so [The_Great_Moo] took his time and built all his parts with layer strength in mind. The large parts are printed at 0.4mm resolution, and the finer parts; like gears and shafts, are printed at 0.2mm resolution. He printed everything off using his Da Vinci 1.0 printer, and it apparently only took 40 hours!

Besides bolts and nuts everything is 3D printed — even the timing belt gears and gearbox! But the real question is… can it really blow snow. You’ll have to watch the video to find out.

Continue reading “Automate Winter With A 3D Printed Snowblower”

GPS Clock Hat

Hat-Mounted Clock Requires Mirror For Wearer To Tell Time

[gfish] was planning on attending Burning Man and wanted to make something unique (and useful) to wear. He decided on a hat/clock hybrid. Just slapping a clock on a hat would be too easy, though. [gfish] wanted his hat to change time zones both via manual switches or physical location.

On the front of the hat there are 2 hands, as most clocks have. Each one is attached to one of two concentric shafts that run to the back of the hat. Each hand is individually controlled by an RC vehicle servo. Those of you familiar with RC servos know that a servos’ max rotation is about 180 degrees and is certainly not enough for a full revolution required by the clock. To fix this, there is a 3:1 gear set that allows a 120 degree rotation of the servo to move the clock hand a full 360 degrees. With this method, each hand can’t move past 12 and instead has to quickly move counter-clockwise to get where it needs to be in order to again start its journey around the clock face.

Mounted inside the hat there is an Arduino that controls the clock, a GPS shield to determine location and an RTC to maintain accurate time. Mounted on the side of the hat is a control panel that contains an overall on/off switch as well as a rotary switch for selecting a specific timezone or for engaging GPS mode. The whole thing is powered by a 9 volt battery.

If you like unnecessarily complicated top hats, check out this WiFi enabled message displaying one.

Continue reading “Hat-Mounted Clock Requires Mirror For Wearer To Tell Time”

Camry Battery

Fixing A Toyota Camry Hybrid Battery For Under Ten Dollars

[scoodidabop] is the happy new owner of a pre-owned Toyota Camry hybrid. Well at least he was up until his dashboard lit up like a Christmas tree. He did some Google research to figure out what all of the warning lights meant, but all roads pointed to taking his car into the dealer. After some diagnostics, the Toyota dealer hit [scoodidabop] with some bad news. He needed a new battery for his car, and he was going to have to pay almost $4,500 for it. Unfortunately the car had passed the manufacturer’s mileage warranty, so he was going to have to pay for it out-of-pocket.

[scoodidabop] is an electrician, so he’s obviously no stranger to electrical circuits. He had previously read about faulty Prius batteries, and how a single cell could cause a problem with the whole battery. [scoodidabop] figured it was worth testing this theory on his own battery since replacing a single cell would be much less expensive than buying an entire battery.

He removed the battery from his car, taking extra care not to electrocute himself. The cells were connected together using copper strips, so these were first removed. Then [scoodidabop] tested each cell individually with a volt meter. Every cell read a voltage within the normal range. Next he hooked up each cell to a coil of copper magnet wire. This placed a temporary load on the cell and [scoodidabop] could check the voltage drop to ensure the cells were not bad. Still, every cell tested just fine. So what was the problem?

[scoodidabop] noticed that the copper strips connecting the cells together were very corroded. He thought that perhaps this could be causing the issue. Having nothing to lose, he soaked each and every strip in vinegar. He then wiped down each strip with some steel wool and placed them into a baking soda bath to neutralize the vinegar. After an hour of this, he reassembled the battery and re-installed it into his car.

It was the moment of truth. [scoodidabop] started up his car and waited for the barrage of warning lights. They never came. The car was running perfectly. It turned out that the corroded connectors were preventing the car from being able to draw enough current. Simply cleaning them off with under $10 worth of supplies fixed the whole problem. Hopefully others can learn from this and save some of their own hard-earned money.

Ball Balancing Robot Uses New TOF Sensor

By now, you’ve most likely have seen or even played with an ultrasonic distance sensor. They work by emitting a sound, and then listening for the “ping” to return. The sensor can then tell how far an object is away by calculating the time in between. With sound waves traveling at 343.2 meters per second (768 mph), it’s no small task to measure the short time it takes for the sound to be emitted, then hit something a few feet away, and return. Now, imagine trying to do that with light.

Light in comparison moves at a whopping 299,792,458 meters per second (or about 671 million miles per hour). You’re going to have to have a pretty fast finger on a stopwatch to measure the time it takes for light to bounce back from an object a few inches away.

[Paul Bristow] is doing just that with the use of a new Time of Flight (ToF) sensor called the TeraRanger One. Developed in cooperation with CERN, this sensor uses a very narrow beam of light (listed as +/- 2 degrees) to accurately measure the position of an object to a resolution of 5mm, with distances up to 14 meters away. It boasts an impressive update rate of >1000 samples a second, and is very micro-controller friendly with UART, I2C, SPI, and PWM output.

[Paul] and his fellow hackers at the Post Tenebras Lab Hackerspace in Geneva got their hands on this sensor, and in a short time had a ball balancing robot up and running. The crude program is not running a PID controller, so the results seen in the video after the break aren’t that impressive. Also, the sensor isn’t exactly cheap at about $180 USD. Despite that, it will be interesting to see what applications these sensors will be used for. If you have any ideas, leave them in the comments below.

Continue reading “Ball Balancing Robot Uses New TOF Sensor”

Reverse Engineering Apple’s Lightning Connector

Introduced with the iPhone 5 nearly two and a half years ago, Apple’s Lightning connector has stymied the incredible homebrew electronics scene that was previously accustomed to the larger, older, better documented, and more open 30-pin connector. Now, finally, the protocols inside the Apple Lightning connector have been broken. We’re still a ways off from a Lightning breakout board, but this is the first proof that a serial console can be obtained through a Lightning connector. That’s the first step to totally owning an iDevice, and this is how all those exploits will start.

[Ramtin Amin] began the teardown of the Lightning connector began as most reverse engineering tasks should – looking at the patents, finding a source for the connectors, and any other products that use similar hardware. [Ramtin] found a Lightning to Serial converter powered by an STM32 microcontroller. Disassembling the firmware and looking at the output on a logic analyzer, [Ramtin] figured out part of the protocol, most of the wiring, and after some research, schematics for how an until-now unidentified chip in Lightning-enabled iProducts was wired.

The chip in question is colloquially known as the Tristar, and more accurately as a CBTL1608A1. During the teardown craze of the iPhone 5 launch, this chip was frequently identified as a DisplayPort Multiplexer. It is a mux, but not for DisplayPort – it’s only to connect the accessory (Lightning) UART, debug UART, baseband, SoC, and JTAG. This is the key to the castle, and being able to get through this chip means we can now own our iDevices.

The chip is an incredibly small BGA affair that [Ramtin] desoldered, reflowed onto a breakout board, and connected to an STM32 Discovery board. Using the techniques he used with other Lightning-enabled hardware, [Ramtin] was able to connect his iPhone and ever so slightly peek his head into the inner workings of his device.

It’s not complete control of an iDevice yet, but this is how all those future exploits will start. [Ramtin] uploaded a short video as a proof of concept, you can check that out below.

Continue reading “Reverse Engineering Apple’s Lightning Connector”