Secret Outside Door

Secret Door Is Now Not So Secret

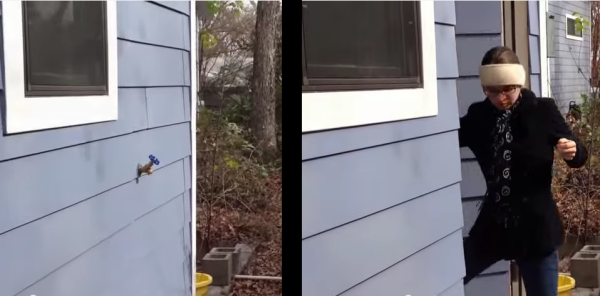
You’d be hard pressed to find someone who didn’t think secret doors are cool. They can come in many different forms, a built-in book case, a fake fireplace or even the rudimentary trap door under the rug. [oggfaba] has created a sweet secret door to enter his house. It is so well done there is no need for an architectural detail to hide it, it’s right there in plain sight.

To the unknowing onlooker, the rear of the house looks as any should with a window and water spigot. That water spigot is actually non-functional and acts as a door knob. The door-part of this secret door is just a standard fiberglass exterior door fitted with an electronic deadbolt and covered in exterior siding painted to match the rest of the house.

There are two methods to lock and unlock the door. There is a fob that can remotely unlock the installed deadbolt. There is also a keypad hidden under its own mini-secret door disguised as house siding material. There was no hacking involved with the deadbolt, keypad or remote. The Morning Industry QF-01SN deadbolt is available off the shelf with both unlocking options.

Continue reading “Secret Door Is Now Not So Secret”

Nice Looking DIY Magnetic Stirrer

DIY Magnetic Stirrer Looks Professional

Stirrers are used in chemistry and biology labs to mix containers full of liquids. Magnetic stirrers are often preferred over the mechanical types because they are more sterile, easier to clean and have no external moving parts. Magnetic stirrers quickly rotate a magnet below the glass beaker containing the liquids that need mixing. The magnetic field travels effortlessly through the glass and reacts against a small magnetic cylinder called the stir bar. The spinning stir bar mixes the contents and is the only part of the mixer that touches the liquids.

[Malcolm] built his own magnetic stirrer. Unlike some DIY stirrers out on the ‘web, this one gets an “A” for aesthetics. It’s clean white lines allow it to look right at home in the professional laboratory. The graduated knob looks good and is functional too as the the potentiometer it is attached to allows multiple mixing speeds. Surprisingly, a D-size battery is all that is needed to power the stirrer. Most of the parts required for this project can be found in your spare parts bin. [Malcolm] has written some excellent instructions on how he made the stirrer including a parts list and schematics.

Want to make a magnetic stirrer but aren’t into chemistry or biology? No worries… I pity the fool who don’t build one of these….

3&DBot Robot 3D Printer

3D Printer Gets Wheels, Leaves Trail Of Plastic Boxes

The limitation of 3D Printer build volume is over. The folks over at NEXT and LIFE Labs have created a prototype robot with a 3D print head attached to it. Unlike a traditional 3D Printer that moves the print head around within the confines of a machine, the 3&DBot drives the print head around any flat surface, extruding as it goes.

Although the 3&DBot has 4 wheels, they are all stationary and face independent directions. Normally, this arrangement would only allow a vehicle to rotate in a circle. However, the wheels used here are not conventional, they are Mecanum-style with many mini-wheels around the main. This arrangement allows omnidirectional movement of the robot, depending on how each wheel is driven. If you haven’t seen this type of movement before, it is definitely worth watching the video after the break.

Sure, the print quality leaves something to be desired and the distance the print head is from the robot chassis may be a bit limiting but all new technology has to start somewhere. This is a great joining of two technologies. Don’t scoff, remember your Iphone 12 wouldn’t be possible without this.

Continue reading “3D Printer Gets Wheels, Leaves Trail Of Plastic Boxes”

Robot Arm Artist

Watch Out Artists, Robots Take Your Job Next

Move over Claude Monet, there is a new act in town in the form of a robot capable of creating some pretty cool art.

We’ve seen robotic artists before but most of them are either cartesian-based or hanging drawbots. This is a full-fledged Sharpie-wielding robotic arm that draws with dots giving its work an impressionistic feel.

The actual robotic arm is a stock Interbotix WidowX. The folks over at Phantom Multimedia wrote some custom software that takes a graphic and breaks it down into a 1-bit representation. The code then goes through the bitmap at random, picking points to draw on the medium. The hard part of this project was figuring out how to translate the 2D image into 3D robotic arm movements. Since the arm has several joints, there are multiple mathematical solutions for arm position to move the marker to any given point. The team ended up writing an algorithm to determine the most efficient way to move from point to point. Even so, each drawing takes hours.

As if that wasn’t enough, the software was then reworked to probe positions. Instead of automatically moving the arm to a predetermined point, the arm is manually moved to a location and the data retrieved from the servo encoders is used to determine the position of a probe at the end of the arm. Each point taken in this manner can then be combined to generate a 3D model.

Continue reading “Watch Out Artists, Robots Take Your Job Next”

USB-Parallel-GRBL

USB To DB25 Adapter Uses GRBL For Parallel Port CNC Communication

With the continuing manufacture of new computers, there is a clear and obvious trend of the parallel port becoming less and less common. For our younger readers; the parallel port is an interface standard used for bi-directional communication between a computer and a variety of peripherals. The parallel port’s demise is partially due to the invention of the USB standard.

If tinkering with CNC Machines is one of your hobbies then you are familiar with the parallel port interface being fairly popular for CNC control board connections. So what do you do if your new fancy computer doesn’t have a parallel port but you still want to run your CNC Machine? Well, you are certainly not stuck as [Bray] has come up with a USB to Parallel Port Adapter solution specifically for CNC use.

A cheap off-the-shelf USB to DB25 adapter may look like a good idea at first glance but they won’t work for a CNC application. [Bray’s] adapter is Arduino-based and runs GRBL. The GRBL code is responsible for taking the g-code commands sent from the computer, storing them in a buffer until they are ready to be converted to step and direction signals and sent to the CNC controller by way of the parallel port DB25 connector. This is a great solution for people needing to control a CNC Machine but do not have a parallel port available.

[Bray] is using a Raspberry Pi running GRBLweb to control his adapter board. However, there are other programs you can use to communicate with GRBL such as Universal G-Code Sender and GRBL Controller.

The board has been created in Eagle PCB Software and milled out using [Bray’s] CNC Router. The design is single-sided which is great for home-brew PCBs. He’s even made a daughter board for Start, Hold and Reset input buttons. As all great DIYers, [Bray] has made his board and schematic files available for others to download.

DIY Lantern

Lantern Made In Preparation Of Zombie Apocalypse

[BenN] was at his local hackerspace one day when a friend stopped by and offered him a used 5AH lead acid battery. As any good tinkerer would, he jumped on the opportunity and immediately started looking around for a project to use the battery in. One of [BenN’s] recent other projects involved 12volt landscaping lights, the same voltage as the battery he was just given. At this point it was clear that he had a good start to making a lantern. This lantern project also supports [BenN’s] obsession with hobby of preparing for the zombie apocalypse.

A lantern needs an enclosure. Over on the hackerspace’s spare-parts rack was an old ATX power supply. All of the internal electrical components were removed to make room for the battery which fit inside nicely. The landscaping light just happened to be slightly larger than the power supply’s fan cut outs. Once the grill was removed from the metal power supply enclosure, the lamp fit in nicely and was secured using silicone glue which can tolerate any temperature the bulb can produce.

The feature that separates a lantern from a flashlight is the top-mounted carrying handle and this lantern will receive one made from the wiring removed from the ATX power supply. The electrical wiring is fairly straight forward. The battery is connected to the landscaping light by way of the original ATX on/off switch. The two terminals of the battery were also wired to the power supply’s AC input connector. This allows [BenN] to connect a DC battery charger to two of the three pins in order to charge the battery. Although this is a creative way to re-use the AC connector, it leaves quite a bit of potential to accidently plug in a 120v AC cord!


DIY Bike Turn Signals

DIY Bike Brake Light And Turn Signals

If you ever take your bike out and share the road with large automobiles, you know that sometimes it can get a little hairy. As a biker, you will stand no chance in a collision with a vehicle. Communicating your intentions, i.e. turning and braking, can certainly reduce your risk of getting in an accident. [Mike] didn’t like the traditional idea of taking a hand off the handlebars in order to signal to traffic so he did something about it, he built turn signals and a brake light for his bike.

The business end of this project is the rear-facing light bar mounted under the rider’s seat. It is made from Radio Shack project boxes and mounted to an off-the-shelf L bracket. A bunch of LEDs were installed in the project boxes, the yellow turn signal LEDs are arranged in the shape of arrows and the red brake light LEDs are in an oval. Inside the project boxes you will find the 9v battery that powers the circuit and also a breadboard that is home to the circuits responsible for blinking the turn signals.

DIY Bike Turn Signals

Check out the switch assembly that is mounted to the handle bars. It was built using an old reflector bracket which was already the correct size to mount to handle bars. As you would expect, there is a toggle switch for turning the turn signals on and off. A little bit more interesting is the brake switch. It is a hinge-lever style limit switch and positioned in a manner such that it is activated when the brake lever is pulled. There is no additional thought or effort required on the cyclist’s part!

Something that is certainly not expected on the switch assembly is the headphone jack. [Mike] likes to listen to music while he rides and a cord dangling around from a backpack or bike bag gets in the way. On the rear light bar, there is a headphone jack that allows an MP3 player to be plugged into. The audio signals travel up the same CAT5 cord used for the turn and brake signals. This allows only a short run of headphone cable from the handlebars to [Mike’s] ears.