Robot Arm Artist

Watch Out Artists, Robots Take Your Job Next

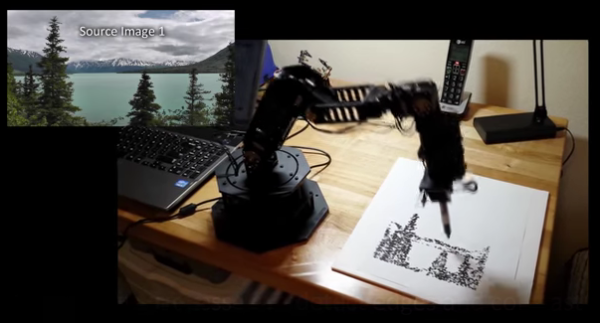
Move over Claude Monet, there is a new act in town in the form of a robot capable of creating some pretty cool art.

We’ve seen robotic artists before but most of them are either cartesian-based or hanging drawbots. This is a full-fledged Sharpie-wielding robotic arm that draws with dots giving its work an impressionistic feel.

The actual robotic arm is a stock Interbotix WidowX. The folks over at Phantom Multimedia wrote some custom software that takes a graphic and breaks it down into a 1-bit representation. The code then goes through the bitmap at random, picking points to draw on the medium. The hard part of this project was figuring out how to translate the 2D image into 3D robotic arm movements. Since the arm has several joints, there are multiple mathematical solutions for arm position to move the marker to any given point. The team ended up writing an algorithm to determine the most efficient way to move from point to point. Even so, each drawing takes hours.

As if that wasn’t enough, the software was then reworked to probe positions. Instead of automatically moving the arm to a predetermined point, the arm is manually moved to a location and the data retrieved from the servo encoders is used to determine the position of a probe at the end of the arm. Each point taken in this manner can then be combined to generate a 3D model.

Continue reading “Watch Out Artists, Robots Take Your Job Next”

USB-Parallel-GRBL

USB To DB25 Adapter Uses GRBL For Parallel Port CNC Communication

With the continuing manufacture of new computers, there is a clear and obvious trend of the parallel port becoming less and less common. For our younger readers; the parallel port is an interface standard used for bi-directional communication between a computer and a variety of peripherals. The parallel port’s demise is partially due to the invention of the USB standard.

If tinkering with CNC Machines is one of your hobbies then you are familiar with the parallel port interface being fairly popular for CNC control board connections. So what do you do if your new fancy computer doesn’t have a parallel port but you still want to run your CNC Machine? Well, you are certainly not stuck as [Bray] has come up with a USB to Parallel Port Adapter solution specifically for CNC use.

A cheap off-the-shelf USB to DB25 adapter may look like a good idea at first glance but they won’t work for a CNC application. [Bray’s] adapter is Arduino-based and runs GRBL. The GRBL code is responsible for taking the g-code commands sent from the computer, storing them in a buffer until they are ready to be converted to step and direction signals and sent to the CNC controller by way of the parallel port DB25 connector. This is a great solution for people needing to control a CNC Machine but do not have a parallel port available.

[Bray] is using a Raspberry Pi running GRBLweb to control his adapter board. However, there are other programs you can use to communicate with GRBL such as Universal G-Code Sender and GRBL Controller.

The board has been created in Eagle PCB Software and milled out using [Bray’s] CNC Router. The design is single-sided which is great for home-brew PCBs. He’s even made a daughter board for Start, Hold and Reset input buttons. As all great DIYers, [Bray] has made his board and schematic files available for others to download.

Build Your Own Retrocomputer With Modern Chips

If you’ve ever wanted to get started in retrocomputing, or maybe the Commodore 64 you’ve been using since the 80s just gave up the ghost, [Rick] aka [Mindrobots] has just the thing for you: a retrocomputer based on a PIC microcontroller and a Parallax Propeller.

The two chips at the heart of the computer are both open source. The Propeller is the perfect board to take care of the I/O, video, and audio outputs because it was purpose-built to be a multitasking machine. The microcontroller is either a PIC32MX150 or a PIC32MX170 and is loaded with a BASIC interpreter, 19 I/O pins, a full-screen editor, and a number of communications protocols. In short, everything you would ever want out of a retro-style minicomputer.

The whole computer can be assembled on a PCB with all the outputs you can imagine (VGA, PS/2, etc) and, once complete, can be programmed to run any program imaginable including games. And, of course, it can act as a link to any physical devices with all of its I/O because its heart is a microcontroller.

Retrocomputing is quite an active arena for hackers, with some being made from FPGAs and other barebones computers being made on only three chips. It’s good to see another great computer in the lineup, especially one that uses open chips like the Propeller and the PIC.

A 3D printed peristaltic pump with tubing

A 3D Printed Peristaltic Pump

After getting access to a Lulzbot 3D printer, [Tim] designed a 3D printable peristaltic pump. The design was done in OpenSCAD, which makes it parametric and easy to modify.

Peristaltic pumps work by squeezing a length of tubing to push fluids. This mechanism is similar to how your intestines work. The pump provides an isolated fluid path, which is why they’re commonly used in medical and food grade applications. Like many products in the medical space, these pumps tend to be rather expensive. Being able to print one for your own projects could save quite a bit of cost.

The pump is based on [emmett]’s gear bearing design. One nice thing about this design is that it is printed preassembled. Pop it out of the printer, add some tubing, and you’re ready to pump fluids.

On top of the isolated fluid path, this pump gives accurate volume measurement. For that reason, we can imagine it moving booze for a robotic bartender build. After the break, a video of the pump moving some fluid.

Continue reading “A 3D Printed Peristaltic Pump”

We’re At Maker Faire This Weekend

It’s that time of year again where the east coast division of the Hackaday crew makes the trek out to Maker Faire New York. We’ll be there the entire weekend, checking out the sights, talking to the people who make the things you make things with, and standing in an hour-long line for a hamburger.

We’ve been going to the NYC Maker Faire for a few years now, and each time we’re surprised by the sheer variety of stuff at the faire. This year, SeeMeCNC is bringing a gargantuan delta printer, [Adam] and I are going to geek out when we meet the Flite Test crew, and we’ll be filing a few interviews with the folks from Intel, Atmel, BeagleBone, and TI. If you’re wondering what the, “I can’t believe Make is allowing this at the faire” project is for this year, here you go.

If you’re heading to the faire and find some of the Hackaday crew wandering around, don’t be afraid to introduce yourself. I’ll be wearing a flagpole with the Jolly Wrencher, and [Adam] will probably be wearing something emblazoned with the Hackaday logo. We have stickers to give out, and if you’re really cool, some sweet swag.

This year is a little different from the other times we’ve made the trek to Maker Faire – this time we have a press pass, and that means access to some very important people. If you have a question you’d like to ask Atmel’s VP of MCUs, Intel’s “maker czar”, [Massimo], someone at TI, or anyone else on the schedule, leave a note in the comments.

Retrotechtacular: The CURTA Mechanical Calculator

The CURTA mechanical calculator literally saved its inventor’s life. [Curt Herzstark] had been working on the calculator in the 1930s until the Nazis forced him to focus on building other tools for the German army. He was taken by the Nazis in 1943 and ended up in Buchenwald concentration camp. There, he told the officers about his plans for the CURTA. They were impressed and interested enough to let him continue work on it so they could present it as a gift to the Führer.

This four-banger pepper mill can also perform square root calculation with some finessing. To add two numbers together, each must be entered on the digit setting sliders and sent to the result counter around the top by moving the crank clockwise for one full rotation. Subtraction is as easy as pulling out the crank until the red indicator appears. The CURTA performs subtraction using nine’s complement arithmetic. Multiplication and division are possible through successive additions and subtractions and use of the powers of ten carriage, which is the top knurled portion.

Operation of the CURTA is based on [Gottfried Leibniz]’s stepped cylinder design. A cylinder with cogs of increasing lengths drives a toothed gear up and down a shaft. [Herzstark]’s design interleaves a normal set of cogs for addition with a nine’s complement set. When the crank is pulled out to reveal the red subtraction indicator, the drum is switching between the two sets.

Several helper mechanisms are in place to enhance the interface. The user is prevented from ever turning the crank counter-clockwise. The crank mechanism provides tactile feedback at the end of each full rotation. There is also a lock that disallows switching between addition and subtraction while turning the crank—switching is only possible with the crank in the home position. There is a turns counter on the top which can be set to increment or decrement.

You may recall seeing Hackaday alum [Jeremy Cook]’s 2012 post about the CURTA which we linked to. A great deal of information about the CURTA and a couple of different simulators are available at curta.org. Make the jump to see an in-depth demonstration of the inner workings of a CURTA Type I using the YACS CURTA simulator.

Continue reading “Retrotechtacular: The CURTA Mechanical Calculator”

THP Quarterfinalist: 3GHz Spectrum Analyzer

Radio seems to be an unofficial theme for The Hackaday Prize, with a few wireless frameworks for microcontrollers and software defined radios making their way into the quarterfinal selection. [roelh]’s project is a little different from most of the other radio builds. It’s a simple spectrum analyzer, but one that works up to 3GHz.

The hardware is a mishmash of chips including an ADL5519 power detector, an Si4012 for the local oscillator, and a MAX2680 mixer. An Atmel XMega takes care of all the on board processing, displaying the spectrum on a small LCD, writing data to an SD card, and sending data over a 3.5mm jack that doubles as either an analog input or a half duplex RS232 port.

Seen in the video below, [roelh]’s spectrum analyzer is more or less finished, complete with a nice looking enclosure. Now [roelh] is working on documentation, porting his source to English, and getting all the files ready to be judged by our real judges.


SpaceWrencherThe project featured in this post is a quarterfinalist in The Hackaday Prize.

Continue reading “THP Quarterfinalist: 3GHz Spectrum Analyzer”