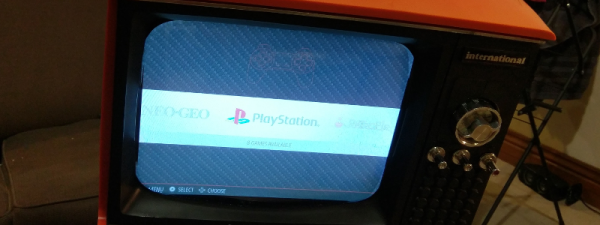
Vintage Portable TV Turned Retro Gaming System

When [FinnAndersen] found an old TV set by the side of the road, he did what any self-respecting DIY/gaming enthusiast would do: He took it apart and installed a Raspberry Pi 3 running RetroPie in it in order to play retro games on a retro TV!

[Finn] took the CRT out of the TV before realizing that it actually worked. It was already too late, so [Finn] ordered a 12″ LCD screen to put in its place. He liked the idea of the curved screen the CRT had, though, so he molded a piece of acrylic around the CRT and, after some cutting and grinding, had it fitting in the screen’s space.

[Finn] also liked the idea of the TV still being able to view a television signal, so he bought a TV tuner card. After a couple of mods to it, he could control the card with the TV’s original channel changer. He used an Arduino to read the status of the rotary encoders the original TV used. After some trial and error, [Finn] was able to read the channel positions and the Arduino would send a signal to the channel up and down buttons on the tuner card in order to change the channel.

Next up was audio. [Finn] found a nicer speaker than came with the TV, so he swapped them and added an amplifier. The original volume knob is still used to control the volume. A USB Hub is hidden in the side of the TV at the bottom, to allow controllers to connect and finally, a power supply converts the mains voltage to 12V DC which runs both the Raspberry Pi and the TV Tuner.

[FinnAndersen] has built a great RetroPie cabinet reusing a great looking vintage TV. It’s unfortunate that he removed the CRT before figuring out that he could use it, but the replacement looks pretty darn good! And the added advantage? It’s portable, sort of. At least, without the CRT inside, it’s much lighter than it was. Here‘s another retro console inside an old TV, and this article is about connecting a Raspberry Pi to every display you can get your hands on.

Continue reading “Vintage Portable TV Turned Retro Gaming System”

Hackaday Prize Entry: Electro-Magnetic Enabled Bagpipes

Bagpipes are an instrument at least a millennia old, the most popular of which, in modern times, is the Great Highland bagpipe. There are other types of bagpipes, some of which have a bellows rather than requiring the player to manually inflate the bag by breathing into it. The advantage of the bellows is that it delivers dry air to the bag and reed (instead of the moist air from the player’s breath) and this dryness means that the instrument stays in tune better and the reed lasts longer.

[TegwynTwmffat] has built his own Irish uilleann pipes, (one of the types that use a bellows) using a carbon steel chanter (the part with the finger holes) and a steel reed. The reed vibrates and a pickup is used to convert this vibration into an electric signal, similar to the way a guitar pickup converts a vibrating string into an electric signal. This means that the signal from [Tegwyn]’s pipes can be sent to an amplifier. It also means that the signal can be processed the same way as the signal from an electric guitar – through distortion, flanger, wah, or delay pedals, for example.

[Tegwyn] has put up a drawing of the chanter showing dimensions and locations of the holes and has posted a couple of songs so you can hear the pipe in action. The first has the pipes without any effects on them, the second with effects. The comments for the second say that there are no electric guitars in the song – it’s all the pipes! Bagpipes seem to be a (relatively) popular instrument to hack and we’ve seen a couple of them over the years, such as this one made from duct tape, and this one – an electronic version.

Continue reading “Hackaday Prize Entry: Electro-Magnetic Enabled Bagpipes”

Using Modern C++ Techniques With Arduino

C++ has been quickly modernizing itself over the last few years. Starting with the introduction of C++11, the language has made a huge step forward and things have changed under the hood. To the average Arduino user, some of this is irrelevant, maybe most of it, but the language still gives us some nice features that we can take advantage of as we program our microcontrollers.

Modern C++ allows us to write cleaner, more concise code, and make the code we write more reusable. The following are some techniques using new features of C++ that don’t add memory overhead, reduce speed, or increase size because they’re all handled by the compiler. Using these features of the language you no longer have to worry about specifying a 16-bit variable, calling the wrong function with NULL, or peppering your constructors with initializations. The old ways are still available and you can still use them, but at the very least, after reading this you’ll be more aware of the newer features as we start to see them roll out in Arduino code.
Continue reading “Using Modern C++ Techniques With Arduino”

Hackaday Prize Entry: DIY ARM Scientific Calculator

What does a hacker do when he or she wants something but can’t afford it? They hack one together, of course. Or, in the case of [Ramón Calvo], they thoughtfully plan and prototype. [Ramón Calvo] wanted a scientific calculator, but couldn’t afford one, so he designed and built one himself.

[Ramón] started off with Arduino but upgraded initially to Freescale’s Freedom KL25Z development board upgraded to an ARM Cortex-M0+ programmed using mbed. The display is an Electronic Assembly DOGL-128 128×64 pixel LCD. [Ramón] did a couple of iterations on the PCB, going from a large DIY one in order for the Arduino version to work, to the current, smaller version for the ARM chip with hand soldered SMD components. After that, [Ramón] looked into the algorithms needed to parse mathematical input. He settled on the shunting-yard algorithm, which converts the input into Reverse Polish Notation (RPN), which is easier for the software to work with.

[Ramón] has a ton of features working, including your standard add, subtract, multiply and divide operations, square root, nth root and exponentiation, trigonometry, log and log10, and factorial(!) There are a few things still on the to-do list, such as low power and a graphing mode, and there are a couple of bugs still in the system, but the overall system is up and running. [Ramón] has put up the schematic and KiCAD files up on his Hackaday.io project page along with the bill of materials.

We’ve had a few Hackaday prize entries in the form of calculators, such as this one with Nixie tubes and this one that emulates 70’s HP calculators.

Detect Cars Running Stop Signs (and Squirrels Running Across The Roof)

There’s a stop sign outside [Devin Gaffney]’s house that, apparently, no one actually stops at. In order to avoid the traffic and delays on a major thoroughfare, cars take the road behind [Devin Gaffney]’s house, but he noticed a lot of cars didn’t bother to stop at the stop sign. He had a Raspberry Pi and a camera, so he set them up to detect the violating cars.

His setup is pretty standard – Raspberry Pi and camera pointed outside at the intersection. He’s running OpenCV and using machine learning to detect the cars and determine if they have run the stop sign or not. His website has some nice charts showing when the violations occurred by hour and by day of the week. Also on the site are links that you can use to help train the system in noticing cars, cars that run the stop sign, determining if there’s enough of the video to determine if there’s a violation, and whether or not there’s a car going the wrong way through the intersection.

This is an interesting use of the Pi and OpenCV; there’s no guarantee that this will help the people of [Devin Gaffney]’s neighborhood, but hopefully gives them some ammunition (assuming they want something done about the intersection.) It’s a cheap and easy setup and it’s nice to let the community have a hand in training the system. For more OpenCV, check out this article on taking the perfect jump shot or this one which tries to quantify cloudiness. Cool stuff.

[via reddit]

Continue reading “Detect Cars Running Stop Signs (and Squirrels Running Across The Roof)”

Gaming Beyond Retropie

Looking for something a bit more from your Raspberry Pi? Tired of the usual console and arcade games? Eltech’s Exagear Desktop is a virtual machine that runs on your Raspberry Pi and allows you to run x86 games. [Dmitry]’s done a write-up about running more modern games on your Raspberry Pi.

Up until now, the Pi has been a great platform for retro gaming. By running MAME or EmulationStation, you can play classic arcade games as well as the great console games you played as a kid. Exagear Desktop goes one further, allowing you to use Wine to play more modern PC games on your Raspberry Pi 3.

The Pi 3 is still a bit underpowered for bleeding edge games, but is powerful enough that it can play some of the PC games from a few years ago. [Dmitry]’s example shows how to get Arcanum, Disciples II, and Fallout running on the Raspberry Pi. In the second part of the write-up, [Dmitry] shows you how to get Heroes of Might and Magic 3, Sid Meier’s Alpha Centauri, and Caesar 3 installed and running as well.

Obviously they will always lag behind today’s gaming machines, but the power now available in a computer the size of a credit card is pretty impressive. It’s nice to have a tool that allows one to play more than just the console games from years gone by — this opens up a whole range of great PC games to add to our library. Maybe it’s time to fabricate that new PC game controller.  Or, if the Raspberry Pi seems like too much power, you could consider playing retro games on an Arduino.

Before There Were Nixie Tubes, There Were Edge-Lit Displays?

We’ve seen a bunch of replacements for nixie tubes using LEDs and edge-lit acrylic for the numbers. But one of the earliest digital voltmeters used edge-lit Lucite plates for the numbers and a lot of incandescent lamps to light them up.

[stevenjohnson] has a Non-Linear Systems Model 481 digital voltmeter and he’s done a teardown of it so we can get a glimpse of the insides. Again, anyone who’s seen the modern versions of edge-lit numeric displays knows what they are: A series of clear plastic plates with numbers (or characters) etched into them, each with a light source beneath them. You turn one light on to light one plate, another to light another, and so on. The interesting bit here is the use of incandescent bulbs and the use of sequential relays to cycle through the lights. The relays make a lot of racket, especially with the case open.

[stevenjohnson] also notes that he might have made a mistake opening up the part of the machine where the plates are stored as it took him a bit to get the plates back in place and back in the unit. We’d imagine it was pretty loud if you were taking a lot of measurements with this machine, although it looks great inside and, obviously, the idea is a pretty good one. Check out this edge-lit nixie tube display or these edge-lit numeric modules.

[via boingboing]

Continue reading “Before There Were Nixie Tubes, There Were Edge-Lit Displays?”