New Wisdom On Old Practices

Getting into machining is hard. From high-speed seel versus carbide to “old US iron” versus “new Asian manufacture” to simply choosing which drill bits to buy, many hard decisions must be made before one even has a chance to gain experience. Fear not, [Quinn Dunki] has created “a roadmap for how to get involved in this hobby.

We saw [Quinn’s] first entry in her lathe series back in January, and now the series is complete! Starting with the definition of a machine tool and ending with the famous Clickspring scriber and a multi-material pen, [Quinn] leaves no stone unturned. [Quinn’s] style contrasts with the likes of [ThisOldTony], [AvE] or [Clickspring], as she makes sure to include the gory details of everything, citing her dissatisfaction with most YouTube machinists as motivation:

they’re all about the money shots of chips flying, but thin on the actual work of machining, which is mostly work-holding setups, changing bits and dies around, etc. That’s where all the knowledge is. The machine does the work once you spend 20 minutes setting it up properly for the operation. Everyone skips that part. I scour Tubalcain videos for details like the angle of the compound for a facing operation, or how to drill a deep hole with a short tail stock without the carriage getting in the way. Simple things like that get glossed over, but stump a beginner.

Of the series, our favorite part was “Grinding tool bits.” When combined with [ThisOldTony’s] Grinding HSS Tools, the two form an education in high-speed steel tool grinding fit for a hacker. Need more than high-speed steel? We’ve got you covered.

Veni, Vidi, ViciLogic Teaches You Digital Logic Interactively

This is about the time of the year you realize you aren’t going to keep all of those new year’s resolutions you made. However, if one of them was to learn VHDL and FPGAs, you might be in luck. Vicilogic has a free course in Fundamentals of Digital Systems. You do have to register, but it didn’t even verify our e-mail address, so it shouldn’t be too onerous to sign up.

Associated with the National University of Ireland Galway, the training is high quality and offers animated demos in your browser of the digital circuitry. You can even control the demos yourself. You’d think the work was occurring in some browser script, but according to the site, the demos are tied to real FPGA boards. You can supposedly look in on them as you use them with a video stream, but we never saw that working so your mileage may vary. If you want a preview of what it looks like, check out the video below. There’s guided exercises and also quizzes where you have to interact with the demos.

Continue reading “Veni, Vidi, ViciLogic Teaches You Digital Logic Interactively”

Jaw-Dropping, IC-Free Pong On An Oscilloscope

Pong may not be much anymore, but it’s the granddaddy of all video games, and there’s still a lot to learn by studying its guts. And what better way to do that than by having it all laid out before you as you play? All it takes is 200 discrete transistors and two large handfuls of passives tacked to a piece of copper clad board to get a version of Pong executed without a single chip that’s playable on an oscilloscope.

Clearly a labor of love, if not an act of temporary insanity, [GK]’s realization of Pong is a sight to behold. Every scrap of it is circuits of his own design, executed dead bug style, apparently because [GK] enjoys life on hard mode. The game itself is surprisingly playable and you can even play against the machine. The video below is a little hard to watch, what with some glare on the oscilloscope CRT, but we’ll cut [GK] plenty of slack on this one; after all, it looks like this whole project was pulled off in one marathon weekend build session.

We’re still busy poring over the hand-drawn Forrest Mims-style schematics, which by themselves are almost a complete course in analog design. A lot of the circuits remind us [GK]’s bouncing ball simulation, which we covered a while back.

Continue reading “Jaw-Dropping, IC-Free Pong On An Oscilloscope”

Transcranial Electrical Stimulation With Arduino, Hot Glue

The advance of electronic technology has been closely followed by the medical community over the past 200 years. Cutting edge electronics are used in medical imaging solutions to provide ever greater bandwidth and resolution in applications such as MRI machines, and research to interface with the human nervous system continues at a breakneck pace. The cost of this technology – particuarly in research and development – is incredibly high. Combine this with the high price of the regulatory approvals necessary for devices which deal in terms of life and death, and you’ll find that even basic medical technology is prohibitively expensive. Just ask any diabetic. On the face of things, there’s a moral dilemma. Humanity has developed technologies that can improve quality of life. Yet, due to our own rules and regulations, we cannot afford to readily distribute them.

One example of this is that despite the positive results from many transcranial electrical stimulation (TCS) studies, the devices used are prohibitively expensive, as are treatment regimens for patients. Realising this, [quicksilv3rflash] decided to develop a homebrew, open source transcranial electrical stimualtion device, and published it on Instructables. Yes, that’s the world we’re now living in.

It’s important to publish a warning here: Experimenting with this sort of equipment can easily kill you, fry your brain, or have any number of other awful results. If you don’t have a rock solid understanding of the principles behind seperate grounds, or your soldering is just a little sloppy, you don’t want to go anywhere near this. In particular, this device cannot be powered safely by a wall-wart.

To be honest, we find it difficult to trust any medical device manufactured out of modules sourced from eBay. But as a learning excercise, there is serious value here. Such a project requires mastery of analog design to avoid dangerous currents being passed to the body. The instructions also highlight the importance of rigorously testing the device before ever connecting it to a human body.

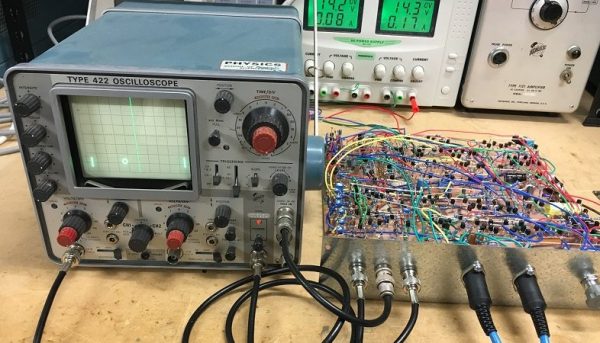
The equipment is based around an Arduino Nano receiving commands from a computer over serial, fed by an application written in Python & PyGame. To think, this writer thought he was being bold when he used it to control a remote control car! The Arduino Nano interprets this data and outputs it over SPI to a DAC which outputs a signal which is then amplified and fed to the human brain courtesy of op-amps, boost converters and sponge electrodes. The output of the device is limited to +/-2.1mA by design, in accordance with suggested limits for TCS use.

It should be noted, [quicksilv3rflash] has been experimenting with homebuilt TCS devices for several years now, and has lived to tell the tale. It’s impressive to see a full suite of homebrew, opensource tools being developed in this field. [quicksilv3rflash] reports to have not suffered injuries from the device, and several devices have been shipped to redditors. We’ve only found minimal reports on people receiving these, but nothing on anyone actually using the hardware as intended. If you’ve used one, get in touch in the comments.

It goes without saying – this sort of experimentation is dangerous and the stakes for getting it wrong are ludicrously high. We’ve seen before what happens when medical devices malfunction – things get real ugly, real fast. But hackers will be hackers and if you were wondering if it was possible to build a TCS device for under $100 in parts from eBay, well, yes. Yes it is.

Hackaday Prize Entry: [Nardax] Shoots Fireballs

If you’re looking for a high entertainment value per byte of code, [Nardax] has you covered with his wearable spellcasting controller. With not much effort, he has built a very fun looking device, proving what we’ve always known: a little interaction can go a long way.

[Nardax] originally intended his glorified elbow-mount potentiometer to be a fireworks controller. Ironically, he’s now using it to throw virtual fireballs instead. Depending on the angle at which he holds his elbow before releasing it, he can cast different spells in the game World of Warcraft. We’re not at all sure that it helps his gameplay, but we’re absolutely sure that it’s more fun that simply mashing different keys.

There’s a lot of room for expansion here, but the question is how far you push it. Sometimes the simplest ideas are the best. It looks like [Nardax] is enjoying his product-testing research, though, so we’ll keep our eyes out for the next iterations of this project.

We’ve seen a number of high-tech competitors to the good old power glove, and although some are a lot more sophisticated than a potentiometer strapped to the elbow, this project made us smile. Sometimes, it’s not just how much tech you’ve got, but how you use it. After all, a DDS pad is just a collection of switches under a rug.

An Introduction To Differential I²C

A few weeks back, we talked about the no-nos of running I²C over long wires. For prototyping? Yes! But for a bulletproof production environment, this practice just won’t make the cut. This month I plucked my favorite solution from the bunch and gave it a spin. Specifically, I have put together a differential I²C (DI²C) setup with the PCA9615 to talk to a string of Bosch IMUs. Behold: an IMU Noodle is born! Grab yourself a cup of coffee and join me as I arm you with the nuts and bolts of DI²C so that you too can run I²C over long cables like a boss.

What’s so Schnazzy about Differential Signals?

There’s a host of ways to make I²C’s communication lines more noise resistant. From all of the choices we covered, I picked differential signals. They’re simple, fairly standardized, and just too elegant to ignore. Let’s take a moment for a brief “differential-signals-101” lecture. Hopefully, you’re already caffeinated! Continue reading “An Introduction To Differential I²C”

Gaming Beyond Retropie

Looking for something a bit more from your Raspberry Pi? Tired of the usual console and arcade games? Eltech’s Exagear Desktop is a virtual machine that runs on your Raspberry Pi and allows you to run x86 games. [Dmitry]’s done a write-up about running more modern games on your Raspberry Pi.

Up until now, the Pi has been a great platform for retro gaming. By running MAME or EmulationStation, you can play classic arcade games as well as the great console games you played as a kid. Exagear Desktop goes one further, allowing you to use Wine to play more modern PC games on your Raspberry Pi 3.

The Pi 3 is still a bit underpowered for bleeding edge games, but is powerful enough that it can play some of the PC games from a few years ago. [Dmitry]’s example shows how to get Arcanum, Disciples II, and Fallout running on the Raspberry Pi. In the second part of the write-up, [Dmitry] shows you how to get Heroes of Might and Magic 3, Sid Meier’s Alpha Centauri, and Caesar 3 installed and running as well.

Obviously they will always lag behind today’s gaming machines, but the power now available in a computer the size of a credit card is pretty impressive. It’s nice to have a tool that allows one to play more than just the console games from years gone by — this opens up a whole range of great PC games to add to our library. Maybe it’s time to fabricate that new PC game controller.  Or, if the Raspberry Pi seems like too much power, you could consider playing retro games on an Arduino.