A 3D-printed teapot with an e-ink display

Top Up Your Teapot In Time With This E-ink Tea Timer

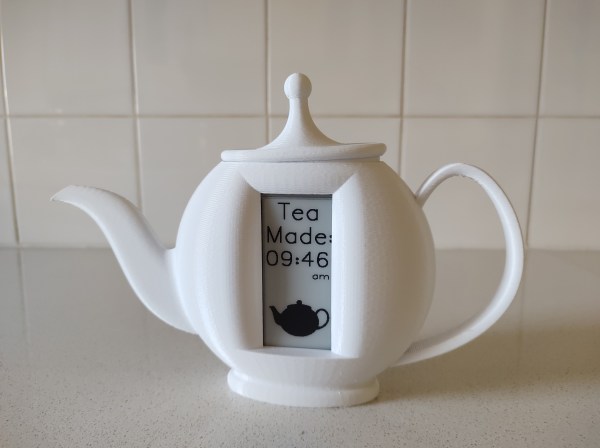
Whether you’re a tea aficionado or just a casual drinker, it’s important to pay attention to your brewing times: too short and you’re just drinking hot water, too long and your brew becomes bitter and astringent. [Bob] wanted to help his parents avoid the latter scenario, and made them a convenient little tea timer that displays the time when they last replenished the pot.

Operating the timer couldn’t be easier: just press down on the teapot’s lid and it will store the current time on its e-ink display. Inside is a Pimoroni Badger 2040 with a real-time clock daughter board, powered by a set of AAA batteries. The Badger is an RP2040-powered board with an integrated e-ink display that’s perfect for this use case: the display needs to be updated only once when the button is pressed, and doesn’t use any power after that.

Naturally, the tea timer is encased in a teapot-shaped enclosure. It has a clever mechanism inside that pushes one of the Badger’s buttons when you press down on the lid, and also provides the satisfying click that you hear in the video embedded below. It took more than thirteen hours to print on [Bob]’s Creality Ender 3, but the end result definitely looks the part.

Functionally, this tea timer is about as simple as it gets: most other designs focus on the initial brewing process, and include features to alert you when your tea is ready.

Continue reading “Top Up Your Teapot In Time With This E-ink Tea Timer”

A clock based on magnetic viewing film

Magnet Clock Makes Field Lines Visible

The traditional method for visualizing magnetic fields, which your science teacher probably demonstrated at some point, is to sprinkle some iron filings onto a piece of paper and hold it over a magnet. It’s a bit of a messy process though, and nowadays there’s a more modern method available in the form of magnetic viewing films. These work thanks to tiny nickel particles suspended in an oily medium, and come in very handy if you want to examine, say, the magnetic field pattern of a DC electric motor. [Moritz v. Sivers] had another idea for this magic material however, and used it to make a Magnet Viewing Clock.

A DIY clock, opened upThe clock’s front panel looks very similar to a large monochrome LCD, but is actually a big slab of magnetic viewing film. Four disks are mounted behind it, each carrying number-shaped magnetic stickers that are cleverly hidden from view. An Arduino Uno keeps track of time through a real-time clock and operates four stepper motors that rotate the number wheels. When they move into position, their magnetic stickers become visible through the film and you can read the time.

The clock’s mechanical parts are 3D printed, while the digits were cut from a sheet of sticky magnetic foil using a vinyl cutter. If you’d like to try making something similar you’re in luck: [Moritz] made the design files and the Arduino sketch available on his GitHub page. Magnetic viewing films are pretty neat things to play with anyway, and can even be used to read hidden messages.

Continue reading “Magnet Clock Makes Field Lines Visible”

A huge cardboard computer with an equally huge mouse

Massive Mouse Game Mimics Classic Software Crashes

Computer mice come in all kinds of shapes and sizes, but are typically designed to fit in the palm of your hand. While some users with large hands may find standard mice uncomfortably small, we don’t think anyone will ever make that complaint about the humongous peripheral [Felix Fisgus] made for a game called Office Job at the ENIAROF art festival in Marseille. With a length of about two meters we suspect it might be the largest functional computer mouse in existence.

An optical mouse sensor mounted on a cardboard frameInside the massive mouse is a wooden pallet with four caster wheels that enable smooth movement in all directions. This motion is detected by an ordinary optical mouse sensor: perhaps surprisingly, these can be used at this enormous scale simply by placing a different lens in front.

As for the mouse button, [Felix] and his colleagues found of that the bottom of an empty five-liter can has a nice “pop” to it and installed one in the front section of the device, hooked up to an ESP32 board that communicates with a computer through Bluetooth.

The mouse connects to an equally huge desktop computer, powered by a Raspberry Pi, on which users play a game that involves clicking on error messages from a wide variety of old and new operating systems. Moving the mouse and pressing its button to hit those dialog boxes is a two-person job, and turns the annoyance of software errors into a competitive game.

Optical mouse sensors are versatile devices: apart from their obvious purpose they can also serve as motion sensors for autonomous vehicles, or even as low-resolution cameras.

Continue reading “Massive Mouse Game Mimics Classic Software Crashes”

An RGB laser projector opened up on a workbench

Laser Projector Needs Hardware Hack After Software Mod

You probably recognize that dreadful feeling when you reboot a gadget after updating its firmware, only to be greeted by a blank screen and an unresponsive device. This apparently happened to the previous owner of a bricked RGB laser projector that [Buy It Fix It] got his hands on: it briefly flashed its laser on power-up but otherwise remained completely dead.

A thorough inspection of the major components didn’t reveal any physical damage, so the issue had to be in software. [Buy It Fix It] managed to connect his Segger J-link programmer to the STM32 main processor and downloaded the contents of its firmware, only to find the remains of a PDF file which seemed to have been accidentally flashed into the chip’s program space. Fixing the device should then just be a matter of restoring the proper firmware, but [Buy It Fix It] wasn’t able to find a copy of it anywhere.

A PCB with a few mod wires on itWhat he did find was Maximus64’s GitHub repository that contained a software mod for a different projector model, as well as its original firmware. Flashing that version didn’t fix [Buy It Fix It]’s projector either, although it did now start to actuate its galvos.

A bit of reverse engineering revealed that the two projectors were very similar from a hardware point of view, but had their laser drivers hooked up to different I/O pins: simply cutting the board traces and soldering some wires to re-route the signals was enough to bring the projector back into a working state.

Having to modify hardware in order to make it fit a piece of software is unfortunate, but sometimes you just have to make do with what you’ve got. If you’ve got no firmware to begin with, then you might even have to write your own from scratch.

Continue reading “Laser Projector Needs Hardware Hack After Software Mod”

An alarm clock with a Nixie tube display

Retro Alarm Clock With Nixies Is Thoroughly Modern Inside

We feature a lot of clocks here at Hackaday, but alarm clocks seem to be less popular for some reason. Maybe that’s because no-one enjoys being woken up in the morning, or simply because everyone uses their smartphone for that purpose already. In any case, we’re delighted to bring you [Manuel Tosone]’s beautiful Nixie tube alarm clock that cleverly combines modern and classic technologies in a single package.

An alarm clock with a Nixie tube display, openedThe clock and alarm functionalities are implemented by a PIC24 microcontroller on a custom mainboard. It keeps track of time through its real-time clock with battery backup, and plays a song from an SD card when it’s time to wake up. A 2 x 3 W class D audio amplifier plus a pair of stereo speakers should be able to wake even the heaviest sleepers.

Of course, the real party piece is the clock’s display: four IN-4 Nixie tubes show the time, with neon tubes indicating the day of the week. The 180 V needed for the Nixies is generated by an MC34063A-based boost converter, which also powers the neon tubes.

Instead of using the standard current-limiting resistor for each Nixie tube, [Manuel] designed an array of transistor-based current sources: this enables linear control of the tubes’ brightness, and should keep the amount of light constant even as the tubes age. The individual segments are switched by SN75468 Darlington arrays, with no need for those hard-to-find SN74141 drivers.

The mainboard and the display are housed inside a 3D-printed case that mimics the style of 1980s digital alarm clocks, but with a nice 1970s twist courtesy of those Nixie tubes. [Manuel]’s GitHub page has all the schematics as well as extensive documentation describing the circuit’s operation — an excellent resource if you’re planning to build a Nixie project yourself. If Nixies aren’t your thing, you can also make an alarm clock with a VFD tube, or even roll your own luminous analog dial.

Continue reading “Retro Alarm Clock With Nixies Is Thoroughly Modern Inside”

A toy gamepad controlling Super Mario World emulated on a MacBook

Turning A Toy Gamepad Into A Real One, With Bluetooth

It’s important to instill healthy habits in your children when they’re still young. Preferences for sports, snacks and dinosaurs are typically formed in early childhood, as is loyalty to a specific gaming platform. [RetrogradeScene] apparently wished to steer his young daughter towards the Nintendo camp, but wasn’t looking forward to having her grubby hands touch his prized controllers. So he built her her own kid-friendly controller out of a Fisher-Price toy.

The toy in question is an imitation game controller that just makes funny sounds when you press the buttons. Converting it into a real, working game controller was a matter of soldering some wires onto the existing PCB and hooking them up to a microcontroller board, in this case a DFRobot FireBeetle. After loading the ESP32-BLE-Gamepad library and assigning the correct pin-button combinations in software [RetrogradeScene] ended up with a big, brightly-coloured gamepad that actually functioned as one.

Unfortunately, the FireBeetle took up space where the original AAA batteries were sitting, so the hacked gamepad needed a new power source. Classic batteries are heavy and inconvenient anyway, so [RetrogradeScene] installed a modern lithium battery plus a USB-C port for charging. Of course, no Bluetooth gadget is complete without an accompanying smartphone app either: [RetrogradeScene] wrote one for his iPhone that enables him to quickly change the button layout between the Nintendo and Xbox styles.

This might be a rare example of someone making a gamepad from, well, a gamepad. We’ve seen a few more unusual things being converted into game controllers, ranging from a handful of LEGO bricks to entire cars.

Continue reading “Turning A Toy Gamepad Into A Real One, With Bluetooth”

A EuroRack synthesizer module with an oscilloscope in the background showing a waveform

Recreating The Sounds Of The ’90s With A YM3812 Synthesizer

One reason the x86 PC became the dominant game platform in the early 1990s was the availability of affordable sound cards like the AdLib and Sound Blaster. These provided a quantum leap in sound quality compared to the PC speaker’s tinny beeps, thanks to Yamaha’s YM3812 chip, also known as OPL2. [Tyler] has made a detailed study of the various OPL series chips and wrote a comprehensive guide describing their operation.

[Tyler] begins by explaining the theory of FM synthesis. The basic idea is that you generate sine waves of different frequencies, combine them through mixing and modulation, and then adjust their strength over time. This way, a few simple operations on the chip’s nine sound channels can generate an astonishing variety of sounds from clear notes to chaotic noise. He then delves into the details of the YM3812 chip, including its 279 different register settings that enable all these operations.

The final goal of [Tyler]’s research is the design of a YM3812 EuroRack module that fits inside standard modular synthesizers. He’ll go into detail on the board’s design and construction in future blog posts, but he already shows the finished product and demonstrates its features in the video embedded below. It’s a great introduction if you’re new to FM synthesis and want to recreate those magic DOS game sounds.

Of course, you can also just connect the OPL2 chip to your DOS computer, whether through a classic sound card or through a parallel port. The related YM2612 from the Sega Genesis also makes a fine synthesizer.

Continue reading “Recreating The Sounds Of The ’90s With A YM3812 Synthesizer”