Two New Dev Boards That Won’t Make Your Wallet Hurt-So-Good

If you’ve been keeping up with the hobbyist FPGA community, you’ll recognize the DE0 Nano as “that small form-factor FPGA” with a deep history of projects from Oldland cpu cores to synthesizable Parallax Propeller processors. After more than four years in the field though, it’s about time for a reboot.

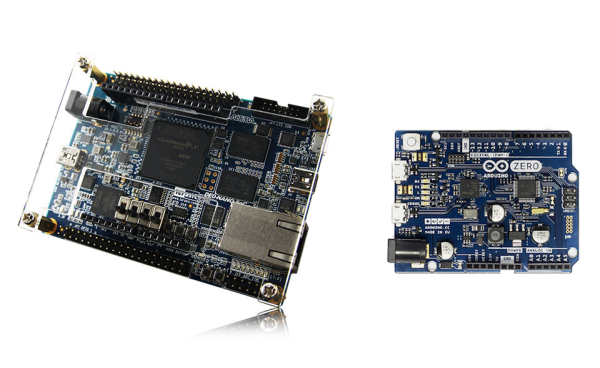
Its successor, the DE0 Nano SoC, is a complete redesign from multiples perspectives while doing it’s best to preserve the bite-size form factor and price that made the first model so appealing. First, the dev board boasts a Cyclone V with 40,000 logical elements (up from the DE0’s 22K) and an integrated dual-core Arm Cortex A9 Processor. The PCB layout also brings us  3.3V Arduino shield compatibility via female headers, 1 Gig of external DDR3 SDRAM and gigabit ethernet support via two onboard ASICs to handle the protocol. The folks at Terasic also seem to be tipping their hats towards the “Duino-Pi” hobbyist community, given that they’ve kindly provided both Linux and Arduino images to get you started a few steps above your classic finite-state machines and everyday combinational logic.

And while the new SoC model sports a slightly larger form factor at 68.59mm x 96mm (as opposed to the original’s 49mm x 75.2mm), we’d say it’s a small price to pay in footprint for a whirlwind of new possibilities on the logic level. The board hits online shelves now at a respectable $100.

Next, as a heads-up, the aforementioned Arduino Zero finally makes it’s release on June 15. If you’ve ever considered taking the leap from an 8-bit to a 32-bit processor without having to hassle through the setup of an ARM toolchain, now might be a great time to get started.

via [the Arduino Blog]

Prof Gershenfeld Speaks On Fab Labs And All-things Digital

Fab Labs have developed hand-in-hand with the all-too-familiar hackerspaces that we see today. If you’re curious to discover more about their past and future, [Prof Gershenfeld], founder of the Fab Lab, and director of MIT’s Center for Bits and Atoms brings us a fresh perspective on both these fab labs and the digital world we live in.

In a casual one-hour chat on Edge, [Prof Gershenfeld] dives deeply into the concept of digital in our world. We might consider digital to be a binarized signal, an analog waveform discretized into a 0 and 1 from which all of computer architecture is built upon today. Digital doesn’t just exist in the computing sense, however; it’s a concept that has been applied to communication, computation, and, these days: personal fabrication.

[Prof Gershenfeld’s] talk may highlight coming changes in the future, but changes are already happening today. These days, fab labs and hackerspaces serve their communities in a very special way. They take “experts-of-the-field” away from universities and isolated labs, and they scatter them all over the world. With this shift, anyone can walk through their doors and build a solid foundation in fields like embedded programming and computer aided manufacturing by striking a conversation with these local experts. In a nutshell, both spaces found a culture for development of expertise far more accessible to the world community than their university counterparts.

If you can spare the hour, put on some headphones, tune in, and resume your CAD work, PCB layout, or that Arduino library. You may discover that your work is built on a number of digital principles, and that your contributions push the rest farther along the development chain towards building something awesome.

Finally, if you’re interested in taking notes on building your own fab lab, have a look at the inventorylayout, and guidelines at the CBA website.

Some Snap-Fits For Thought

While laser cutters, desktop mills, and 3D printers might be wonderful tools for rapid prototyping, it’s best to have a strong understanding on a few techniques to really “digitize” those sheets of Delrin and rolls of PLA into something meaningful. In a nutshell, we need to know how to cut-or-squirt parts that fit together.

[Yoav] has a few tips for HDPE. The first technique is a clip-on, clip-off feature meant for repeated use. The second joins two parts with a joint that can’t be removed except by removing a dowel pin, or other press-fit shaft that holds them together. The last technique is similar to the first, except it embeds the deforming geometry directly into the mating surfaces.

If you’re interested in some detailed design guides and a few equations, have a look at the Bayer Guide and DuPont Design Guide; both provide a detailed set of geometric techniques and information about their associated stresses and deflections.

Finally, if you’re looking for a triumph of snap-fit design, have a look at [Jonathan Ward’s] MTM Snap–a snap-fit desktop milling machine and the direct predecessor to the modern-day Othermill.

Thanks for the tip, [uminded]!

Otherworldy CAD Software Hails From A Parallel Universe

The world of free 3D-modeling software tends to be grim when compared to the expensive professional packages. Furthermore, 3D CAD modeling software suggestions seem to throw an uproar when new users seek open-source or inexpensive alternatives. Taking a step apart from the rest, [Matt] has developed his own open-source CAD package with a spin that inverts the typical way we do CAD.

Antimony is a fresh perspective on 3D modeling. In contrast to Blender’s “free-form sculpting” and Solidworks’ sequential extrudes and cuts, Antimony invites you to break down your model into a network of both primitive geometry and operations that interact with that geometry.

Functionally, Antimony represents objects as a graphical collection of nodes that encode both primitives and operations. Want a cylinder? Start with a circle node and pipe it into an extrude node. Need to cut out some part geometry? Try defining it with one or more primitives, and then perform a boolean intersection operation. Users can even write their own nodes with custom scripts written in Python. Overall, Antimony boasts the power of parametric design similar to OpenSCAD while it also boosts readability with a graphical, rather than text-based, part description. Finally, because part geometry is essentially stored as a series of instructions, the process of modeling the part does not limit the resolution of the output .STL mesh. (Think: vector-based images, versus pixel-based images).

Current versions of the software are available for both Mac and Linux, and the entire project is open-source and available on the Githubs. (For the shrewd-eyed software developers, most of the project is written with Python that interacts with lower-level routines handled in C++ and exposed through Boost.Python.) Take a video tour of an Antimony workflow with [Matt] after the break. All-in-all, despite that the software is still in its alpha stages, it’s highly functional and (for the block-diagram fans) intuitive. We’re thrilled to put our programming hats on and try CAD from, as [Matt] coins it “a parallel universe.”

Continue reading “Otherworldy CAD Software Hails From A Parallel Universe”

Multicopters And Their MultiWii Beginnings

With more than five years down the road in this successful hack, [Alexinparis] and his pioneering Nintendo controller hack have been taking eager enthusiasts to the skies with homebrew multicopters armed with MultiWii firmware.

The MultiWii firmware, like most other glorious moments that gloss these pages, was as a hack, and a darn good one. By harvesting the (I²C-based) accel-gyro sensor package in a Nintendo Wii MotionPlus, [Alexinparis] developed control firmware for an Arduino Pro Mini, and, thus: the MultiWii Controller Board was born. With a successful WiiMotion Plus pcb extraction, an Arduino Pro Mini, and some help from the forums, the dedicated hobbyist could build their own flying platform with customizable firmware enabling bi, tri, quad, hex, octo, Y6, and Y4 propeller configurations.

With a working flight controller, [Alexinparis] sent his firmware skyward in a tricopter built from scratch. For a light-but-sturdy shell, he opted for a lost-foam cast hull made from fiberglass and carbon fiber tow. This hull houses most of the electronics safely inside the hollow shell while maintaining the strength to sustain heavy blows from crashes. (The version shown above features additional carbon fiber reinforcement in the center.)

multiwiiLostFoammultiwiiLostFoamHousingmultiwiiDone

More than five years later, MultiWii is a mature open-source project with firmware and wiki under constant update. If you’ve ever considered getting started with multicopters, this project stands as a tested-and-tried road to success. In fact, even RC vendor HobbyKing offers low-cost Multiwii PCBs compatible with the firmware. For more details on the project’s humble beginnings, head on over to the RC Groups thread and followup documentation thread.

We’ve seen MultiWii countless times in the past as the firmware in numerous multicopter builds. It’s about time we give [Alexinparis] some well-deserved credit for paving the way.

Continue reading “Multicopters And Their MultiWii Beginnings”

Simple Keypad Scanning With SPI And Some Hardware

16-button keypads have a clever method of encoding their data into 8 pins. Pins are mapped to four rows and four columns on the keypad. A user reads the keypad by bringing each row up to logic: HIGH, and reading the corresponding column values, (HIGH or LOW). Keypad scanning can be farmed out to a microcontroller with a simple finite-state machine and some button debouncing techniques. [Mario], [Glen], and [Paul] on the Netduino forums took an entirely different route: they’ve designed and implemented a Keypad Scanner using any microcontrollers SPI peripheral and a 74HC595 Shift register.

The trio’s solution is an elegant adventure into circuit design. With two diodes and a voltage divider, they devise a simple circuit that pulls the SPI MISO line LOW if a button in the corresponding circuit’s row is pushed closed. Copied four-fold, this circuit joins the rows and columns of the 74HC595 to the keypad matrix. To scan across the four columns, the microcontroller performs an SPI transfer of the key value: 0x01. To decode which button is pushed, the value received back from the SPI bus encodes which button was pushed out of the 16 possible buttons. Note: some cases for ambiguity as to “which button was pressed” do exist if multiple buttons are pushed at the same time, but for the general case where we’re punching in values one-by-one, this circuit works perfectly.

The team’s hack is a clever use of existing hardware to outsource a microcontroller’s software problem to hardware while leveraging the SPI peripheral to cleverly decrypt and retrieve data back from the keypad. Kudos to the team of three over at the Netduino Forums, and we’re always thrilled to see and idea grow from one person to the next. In case you want to take a step lower and build up the keypad itself, here’s a blast from the past that does just that.

Robo Foam Cutter Makes Short Work Of Your Foam Rolls

Tired of cutting your foam sheets down to size? [jgschmidt] certainly was, and after one-too-many hours cutting foam manually, he built himself a machine that cuts sheets automatically, and he guides you through the process step-by-step.

[jgschmidt’s] build is a clever assembly of stock parts acquired from ServoCity. That’s a nice touch, considering we don’t often see their components in quick hacks. With a stepper to feed more foam, and a stepper to drive the blade mechanism, the device can consistently cut foam from a roll to desired lengths.

The blade mechanism consists of two exacto blades fixed nose-to-nose such that the machine can cut on both forward and reverse sweeps. While we’ve certainly seen some stellar past foam cutter builds, we can’t resist drooling over the speedy throughput of [jgschmidt’s] machine as it cuts on both forward and back-strokes. Finally, when the blades dull, they can be swapped out for a few dime’s worth of new parts.

Many of the steps in [jgschmidt’s] build are laudably practical with a “get it done” attitude. From hot-glued wire insulation to the double-edged blade formed from exacto knives, we’re thrilled to see him take a few pieces off the shelf and few pieces off the web and build himself a new workshop tool. Perhaps the neatest feature of this hack is its ability to rapidly transform a raw material into numerous repeatable, useful forms for his customers.

via [Instructables]

Continue reading “Robo Foam Cutter Makes Short Work Of Your Foam Rolls”