Tricking A USB Power Supply

battery_load_pulser6

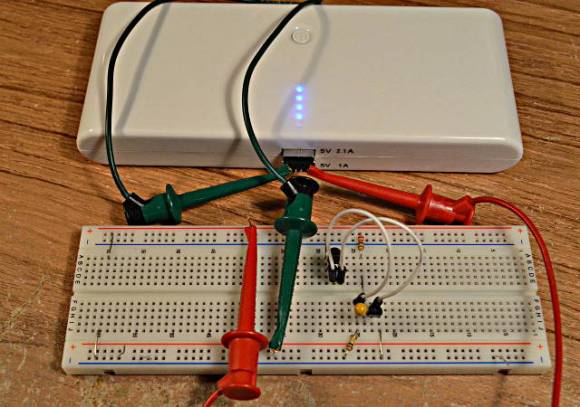
[Paul] recently purchased an inexpensive USB power pack, hoping to use it for powering small electronics projects. Unfortunately it has been designed to only stay on when a device is drawing a lot of power (like charging a cell phone), so he set out to fix it.

He started by experimenting to see just how much current is required to keep the battery pack on, and for how long. Testing a few resistors he discovered that a 22 ohm one will keep the power supply on indefinitely. If there’s no load, it only remains powered on for about 13 seconds. Now you can’t just hook up the 22 ohm resistor to a 5V power supply for the sake of keeping it on — that would draw 1.1watts and get very hot!

His next step was to determine how long the load needs to be on for, and at what interval in order to keep the power supply active. He created a test circuit using a Teensy microcontroller and determined that a 20ms pulse every 1.4 seconds was enough to keep it on — any less and it would  switch off after a few minutes. The final transistor based circuit draws about 222mA — but at a 1.6% duty cycle, resulting in only a 3.5mA draw! [Paul] suspects the switching power supply inside battery pack probably draws more than that! He can’t take all the credit though, he learned of the idea from a forum post — but he certainly has made a very nice write up for people to follow in his footsteps!

Now that’s a good old fashioned product hack!

3D Printing With Metal… At Home!

[Bam] from the LulzBot forums  has successfully printed metal using his 3D printer and a Budaschnozzle 1.1 hot end. Well, solder to be specific — but it’s still pretty awesome!

He’s making use of 3mm solder purchased from McMaster (76805a61), which has a blend of 95.8% tin, 4% copper and 0.2% silver. It took quite a few tries to get it extruding properly, and even now it seems to only be able to print about 15mm before jamming up — a more specific hot end with a larger thermal mass might help. He plans on trying a thinner filament (1.75mm) as it might help to keep it at the proper extrusion temperature, which in this case is around 235C.

During our research we found another user from the RepRap blog who has also been experimenting with printing low-melt point alloys — and he’s even successfully created an Arduino compatible Sanguino board using the printer!

If you want to try this yourself, you’ll need a nozzle you don’t care about, bored out to about 1mm — any smaller and it won’t extrude at all. Be warned though, the solder will corrode brass and aluminum, and [Bam] notes that after going through 1lb of solder, the nozzle was closer to 2mm in diameter when he was done! Oh and for the love of hacking — use ventilation!

Stick around after the break to watch a video on a professional version of this system — which is essentially a repurposed welding robot, using electron beam direct manufacturing. These technologies can’t make nicely finished parts, but they excel when considering they can make near net-weight parts, requiring only a small amount of machining to finish.

Continue reading “3D Printing With Metal… At Home!”

GameBoy Color Costume

game boy costume

Okay, okay. We know it’s November now, but when [John] sent this project in, we just had to share it. He made a fully functional Gameboy Color costume!

The costume makes use of a Raspberry Pi (located on his back), running RetroPie, which is an open source project dedicated to creating a universal console emulator.  To create the controllers he used two Teensy microcontrollers in his gloves, setup to emulate two USB keyboards on the Pi. Since he’s using Teensy 3.0, it supports capacitive touch sensing, so all he had to do was wire pieces of aluminum to the input pins to create touch-sensitive metal buttons on the gloves. He then slapped a cheap 10″ LCD from Adafruit onto his chest, stuffed a few 12V LiPo batteries in his pockets, and was ready to be the hit of any party he went to.

The costume was a great success, although a pesky pair of Mario and Luigi kept holding his hands all night… Stick around after the break to see a demonstration video!

Continue reading “GameBoy Color Costume”

InFORM: MIT’s Morphing Table

Have you ever wished your dinner table could pass the salt? Advancements at MIT may soon make this a reality — although it might spill the salt everywhere. Enter the inFORM: Dynamic Physical Affordances and Constraints through Shape and Object Actuation.

While the MIT paper doesn’t go into much detail of the hardware itself, there are a few juicy tidbits that explain how it works. There are 900 individually actuated white polystyrene pins that make up the surface, in an array of 30 x 30 pixels. An overhead projector provides visual guidance of the system. Each pin can actuate 100mm, exerting a force of up to 1.08 Newtons each. To achieve the actuation, push-pull rods are utilized to maximize the dense pin arrangement as seen, making the display independent of the size of the actuators. The actuation is achieved by motorized slide potentiometers grouped in sets of 6 using custom PCBs that are driven by ATMega2560s — this allows for an excellent method of PID feedback right off the actuators themselves. There is an excellent image of the entire system on page 8 of the paper that shows both the scale and complexity of the build. Sadly it does not look like something that could be easily built at home, but hey, we’d love for someone to prove us wrong!

Stick around after the break to see this fascinating piece of technology in action. The video has been posted by a random Russian YouTube account, and we couldn’t find the original source for it — so if you can, let us know in the comments!

Continue reading “InFORM: MIT’s Morphing Table”

Laser Origami!

One of our tipsters just sent us a link to some fascinating videos on a new style of rapid prototyping — Laser Origami!

The concept is fairly simple, but beautifully executed in the included videos. A regular laser cutter is used to cut outlines of objects in clear lexan, then, by unfocusing the laser it slowly melts the bend lines, causing the lexan to fold and then solidify into a solid joint. It becomes even more interesting when they add in a servo motor to rotate the workpiece, allowing for bends of angles other than 90 degrees!

Depending on the part you are designing, this method of rapid prototyping far exceeds the speeds of a traditional 3D printer. The part shown in the included image could be printed in about 4 hours, or using the laser, cut and folded in 4 minutes flat!

Stick around after the break to see this awesome demonstration of the technology!

Continue reading “Laser Origami!”

Homemade Nixie Tubes

Do you love Nixie Tubes? Upset that they aren’t really manufactured anymore, and the cost of old ones is rising? Why not make your own? That’s exactly what [Dalibor] of the Czech Republic is up to, including blowing the glass tubes himself!

He’s chosen the Z568 nixie tubes to copy, as they are his favorite style of nixie. To create the display he has etched the digits and housing out of 0.3mm stainless steel sheet — which potentially means if he gets the hang of making the tubes, he could actually produce them to sell! To perform the glass blowing, he scored a Heathway glassblowing lathe off eBay — but unfortunately he hasn’t documented much of anything on making the glass tubes, which is too bad because we think that would be equally fascinating as the nixie displays themselves. On his first attempt with a properly sealed tube, the nixie worked and he even recorded striking voltage values very similar to industry tubes — not bad for something made in a backyard shed!

He has since then continued refining this art and is entering a glass-art contest called “When Prague Meets Shanghai” with a beautiful entry dubbed the ShanghaiTime Nixie Clock.

If this post seems vaguely familiar, it’s because this isn’t the first time we’ve posted an article about homemade nixie tubes, but we think [Dalibor’s] is by far the most elegant! Stick around after the break to see one of his first test videos — You might even think he’s cheating, the tubes look so professional!

Continue reading “Homemade Nixie Tubes”

Guitar Amp Turned Tool Cabinet

amp cabinet

While HANDMADE.hackaday was a rather ephemeral experiment, we still come across some mighty fine examples of handmade projects that we think deserve to grace the pages of Hack a Day. As is the case with this beautifully repurposed guitar amp turned tool cabinet.

After gutting the original amp, [Max] set to bending some 22ga steel plate into drawers. He enjoys using that particular gauge because its fairly easy to cut and bend, while still being rigid enough for most applications. Once content with the bending jobs, he attached ball bearing roller slides to the sides and installed the drawers. Making use of the original amp face for the top drawer he cleaned up all the edges and gave it some new paint — it’s a beautifully crafted example of what you can do with a bit of sweat and elbow grease!

And for the audiophiles, don’t worry — the amp wasn’t functional before it was cannibalized for its casing.

[Via Reddit]