3D Printed Stamp Rollers

If you have an artistic bent, you might have seen self-inking stamp rollers. These are like rotary rubber stamps that leave a pattern as you roll across a page. [Becky] wanted a larger custom roller and turned to 3D printing to make it happen. The first prototype used a modified Sharpie. However, she soon moved to an unmodified acrylic marker that had a rectangular tip.

A Tinkercad design produces a cap that fits the marker and a wheel that contains the desired pattern. Text works well, although you can easily do a custom pattern, too, of course.

Continue reading “3D Printed Stamp Rollers”

General Instruments Video Game Chip Rides Again

Early video games like Pong were not computer-controlled. They used discrete logic to generate the TV signals. As you might expect, the market exploded when you could get all the logic on a chip. Many of those games used the General Instrument AY-3-8500-1 chip, and [Jeff Tranter] shows us the chip and the many different yet similar games it could play. You can check out the retro gameplay in the video below.

These were marvels of their day, although, by today’s standards, they are snoozers. All the games were variations on a theme. A ball moved and hit paddles, walls, or goals. A few available light gun games were rarely seen in the wild because they took extra components.

Continue reading “General Instruments Video Game Chip Rides Again”

Data Science The Stanford Way

Data science is a relatively new term for a relatively old discipline. Essentially, it is data analysis, particularly for large data sets. It involves techniques as wide-ranging as statistics, computer science, and information theory. What to know more? Stanford has a “Data Science Handbook” that you can read online.

Topics range from how to design a study and create an analytic plan to how to do data visualization, summarization, and analysis. The document covers quite a bit but is very concise.

Continue reading “Data Science The Stanford Way”

A Classic Shortwave Radio Restored

Before the Internet, if you wanted to hear news from around the world, you probably bought a shortwave receiver. In the golden age of world band radio, there was a great deal of high-quality programming on the shortwave bands and a large variety of consumer radios with shortwave bands. For example, the Sony CRF-160 that [M Caldeira] is restoring dates from the late 1960s or early 1970s and would have been a cool radio in its day. It retailed for about $250 in 1972, which sounds reasonable, but — don’t forget — in 1972 that would have been a 10% downpayment on a new car or enough to buy a Big Mac every day for a year with change left over.

As you can see in the video below, the radio seemed to work well right out of the gate, but the radio needed some rust removal and other sprucing up. However, it is an excellent teardown, with some tips about general restoration.

Continue reading “A Classic Shortwave Radio Restored”

Ham Radio Memes In The 1970s

If you have a fondness for old and unusual ham gear, [Saveitforparts] has a great video (see below) about a Robot slow scan receiver he found at a junk store.  Slow scan or SSTV is a way to send pictures via low-bandwidth audio, such as you often find on the ham bands. The idea is you take a picture, send some squeaks and blips over the air, and in about 8 or 10 seconds, a single frame of video shows up at the receiver. Hams aren’t the only ones who used it. The Apollo missions used an SSTV system in some cases, too.

I’ve been a ham radio operator for a very long time. When I first heard about SSTV, I thought it sounded cool that you could be talking to someone and then show them a picture of your station or your dog or your kids. But when I looked into it, the reality was far different. In the pre-internet days, SSTV-equipped hams hung out on a handful of watering hole frequencies and basically just sent memes and selfies to each other. Everyone would take turns, but there wasn’t really any conversation.

This actually still goes on, but the hardware isn’t a big deal anymore. The Robot in the video had to decode the signal from audio and store the image somehow. On old gear — some of it homebrew — it was simply persistent phosphor that would eventually fade, but, of course, eventually, images were stored in some form of digital memory. These days, you are likely to use a PC soundcard to both send and receive the necessary audio.

Continue reading “Ham Radio Memes In The 1970s”

Pimp The Potentiometer

Sometimes, a hack isn’t really about the technology but about the logistics. If we asked you to light up an LED using an Arduino, there’s a good chance you’d know exactly how to do that. How about a bunch of LEDs? Simple. Now turn on LEDs proportional to an input voltage. A little harder, but nothing that you probably haven’t done a million times. Finally, arrange the LEDs in an attractive circle around a potentiometer. Wait, how are you going to do that? [Upir] shows us a ready-made ring light for just this purpose and you can see the beautiful thing in the video below.

We made the LED things sound slightly easier than it is. The ring light has 31 LEDs but only 12 pins, so there is some multiplexing going on. The modules come in pairs for about $20, so not a throwaway part, but they will really dress up anything that needs a knob of any kind.

Naturally, it doesn’t matter what you use to drive the LEDs. You could track a pot or a rotary encoder. Or you could show microphone levels or something else. After all, it is just a bunch of LEDs. For that matter, they’d probably make a good pair of robot eyes. Let us know what you want to use them for in the comments.

If your significant other is a little geeky, you might want a different kind of ring light. We couldn’t help but wish the LEDs on the ring were addressable. That would open up a world of interesting possibilities while reducing the pin count, too.

Continue reading “Pimp The Potentiometer”

Roll Your Own Python Debugger

Debugging might be the one thing that separates “modern” programming from “classic” programming. If you are on an old enough computer — or maybe one that has limited tools like some microcontrollers — debugging is largely an intellectual exercise. Try a program, observe its behavior, and then try again. You can liberally sprinkle print statements around if you have an output device or turn on LEDs or digital outputs if you don’t. But with a debugger, you can get a bird’s-eye view of your program’s data and execution flow.

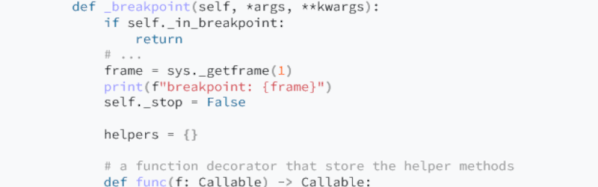
For some languages, writing a debugger can be hard — you usually use at least some system facility to get started. But as [mostlynerdness] shows, Python’s interpreter wants to help you create your own debugger, and you can follow along to see how it’s done. This is accessible because Python has a built-in debugging core that you can use and extend. Well, regular Python, that is. MicroPython has some low-level support, and while we’ve seen attempts to add more, we haven’t tried it.

Of course, you may never need to build your own debugger — most of the IDEs have already done this for you, and some of the code is, in fact, lifted from an open code base and simplified. However, understanding how the debugging plumbing works may give you a leg up if you need to create custom logic to trap an error that would be difficult to find with a generic debugger. Plus, it is just darn interesting.

Like many Python things, there are some version sensitivities. The post is in four parts, with the last two dealing with newer API changes.

We can’t promise that Python can debug your hardware, though. We always thought the C preprocessor was subject to abuse, but it turns out that Python has the same problem.