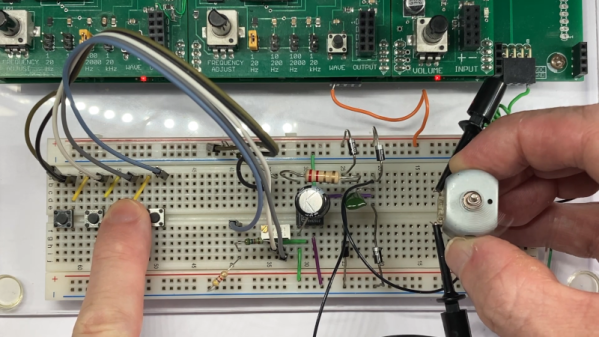
The Computer That Controlled Chernobyl

When you think of Chernobyl (or Chornobyl, now), you think of the nuclear accident, of course. But have you ever considered that where there is a nuclear reactor, there is a computer control system? What computers were in control of the infamous reactor? [Chornobyl Family] has the answer in a fascinating video documentary you can see below.

The video shows a bit of the history of Soviet-era control computers. The reactor’s V-30M computer descended from some of these earlier computers. With 20K of core memory, we won’t be impressed today, but that was respectable for the day. The SKALA system will look familiar if you are used to looking at 1970s-era computers.

Continue reading “The Computer That Controlled Chernobyl”

3D Printed — Um — Hook And Loop Fasteners

[Teaching Tech’s] latest video discusses “3D printed Velcro.” But as even he admits, Velcro is a trademark, so we think it is more appropriate to talk about hook and loop fasteners. In fact, you can see the good-natured official video about the trademark below [Teaching Tech’s] video. Regardless, his experiments with several 3D-printed Vel… fastener designs are worth watching.

Some of the designs were rather large, like we would have expected. However, some of the designs were fairly small and looked almost like real Velcro. However, since the pattern is not as random as the fabric portions of the real deal, it seems like alignment between parts is more critical when you are joining the two halves.

Continue reading “3D Printed — Um — Hook And Loop Fasteners”

If You Aren’t Making Your Own Relays…

We’ve all been there. Someone will say something like, “I remember when we had to put our programs on a floppy disk…” Then someone will interrupt: “Floppy disk? We would have killed for floppy disks. We used paper tape…” After a few rounds, someone is talking about punching cards with a hand stylus or something. Next time someone is telling you about their relay computer, maybe ask them if they are buying their relays already built. They will almost surely say yes, and then you can refer them to [DiodeGoneWild], who shows how he is making his own relays.

While we don’t seriously suggest you make your own relays, there are a lot of fun techniques to pick up, from the abuse of a power drill to the calculation of the coil parameters. Even if you don’t learn anything, we get the desire to make as much as you can.

Continue reading “If You Aren’t Making Your Own Relays…”

$1 Graphene Sensor Identifies Safe Water

If you live in a place where you can buy Arduinos and Raspberry Pis locally, you probably don’t spend much time worrying about your water supply. But in some parts of the world, it is nothing to take for granted, bad water accounts for as many as 500,000 deaths worldwide every year. Scientists have reported a graphene sensor they say costs a buck and can detect dangerous bacteria and heavy metals in drinking water.

The sensor uses a GFET — a graphene-based field effect transistor to detect lead, mercury, and E. coli bacteria. Interestingly, the FETs transfer characteristic changes based on what is is exposed to. We were, frankly, a bit surprised that this is repeatable enough to give you useful data. But apparently, it is especially when you use a neural network to interpret the results.

What’s more, there is the possibility the device could find other contaminants like pesticides. While the materials in the sensor might have cost a dollar, it sounds like you’d need a big equipment budget to reproduce these. There are silicon wafers, spin coating, oxygen plasma, and lithography. Not something you’ll whip up in the garage this weekend.

Still, it is interesting to see a FET used this way and a cheap way to monitor water quality would be welcome. Using machine learning with water sensors isn’t a new idea. Of course, the sensor is one part of the equation. Monitoring is the other.

Retro Gadgets: The 1974 Breadboard Project

It is hard to imagine experimenting with electronics without the ubiquitous solderless breadboard. We are sure you have a few within arm’s reach. The little plastic wonders make it easy to throw together a circuit, try it, and then tear it down again. But, surprisingly, breadboards of that type haven’t always been around, and — for a while — they were also an expensive item. Maybe that’s what motivated [R. G. Cooper] to build Slip-n-Clip — his system for quickly building circuits that he published in a 1974 edition of the magazine Elementary Electronics.

The system isn’t really what you would think of as a breadboard today, but it was effective and certainly cheap to build. The biggest problem? It wasn’t something you’d use with DIP ICs. But in the early 1970s, you might not be building very much with ICs, and the ones you used might be in oddball transistor-like packages. Things were strange in the 70s!

A Brief History of Breadboards

In the very old days, people built radios and such on wooden substrates that were actually bread-cutting boards. That’s where the name came from. It was common to draw a diagram with the physical layout you had in mind, glue it to the board, and use it as a guide for building and troubleshooting. Wood was easy to drill and cut. A nail or a thumbtack would make dandy terminals. Probably the last time we saw that done was about a dozen years ago in Make Magazine. Even then, it was only a novelty — few people still build circuits like this, but you can see how [Colin] did it in the video below.

Continue reading “Retro Gadgets: The 1974 Breadboard Project”

It’s A Sander! No, It’s A Toothbrush! Relax, Relax, It’s Both

We always enjoy a project that transforms some common object into something useful for us. [Modelkitsdeluxe] fits the bill by modifying a power toothbrush into a miniature sander. If you want to practice your Spanish, you can watch the video below. Or you can try the automatically translated captions.

As you can guess from the user name, he is mainly interested in working with small models, but it struck us that this might also be useful for general 3D printing. Honestly, once you have the idea, there isn’t much to it. You mutilate a brush head that fits the toothbrush to accept a small sanding disk.

There are probably a dozen ways to attach your sandpaper or emery cloth to the head. [Modelkitdeluxe] used double-sided tape and Velcro. While we applaud the upcycling, we’ll probably stick with a hobby tool. Our toothbrush makes an annoying buzz every 30 seconds or so to remind you to move to another part of your mouth. That doesn’t seem like a great feature when doing precision sanding. On the other hand, you could probably yank the controller out of the toothbrush and use it for the motor, drive, and batteries to avoid that.

If you want to tackle that, here’s something to get you started. If sanding doesn’t turn your crank, maybe you can try turning your deadbolt.

Continue reading “It’s A Sander! No, It’s A Toothbrush! Relax, Relax, It’s Both”

PCB Toaster Oven Solders Your Boards

Using a toaster oven to reflow PCBs isn’t anything new, but just using a toaster oven has some limitations. Making toast isn’t as complex as reflowing PCBs. [Nabil] decided to modify an oven to get better results. In fact, this was the second iteration and involved making a custom PCB to replace the one in the oven. You can see the unit in the video below.

Of course, unless you have the exact oven (a Breville BOV450XL), you won’t want to duplicate the board, but it might give you some good ideas. The new board has a 2.8-inch capacitive LCD, an ESP32, and a few sensors and actuators.

Continue reading “PCB Toaster Oven Solders Your Boards”