Let’s face it; remembering a bunch of passwords is the pits, and it’s just getting worse as time goes on. These days, you really ought to have a securely-generated key-smash password for everything. And at that point you need a password manager, but you still have to remember the password for that.
Well, Motorola is sympathetic to this problem, or at least they were in 2013 when they came up with the password pill. Motorola Mobility, who were owned by Google at the time, debuted it at the All Things Digital D11 tech conference in California. This was a future that hasn’t come to pass, for better or worse, but it was a fun thought experiment in near-futurism.
With the convenience of digital cameras and editing software, shooting video today is so easy. But fifty years ago it wasn’t electronics that stored the picture but film, and for many that meant Super 8. Editing Super 8 involved a razor blade and glue, and an editing station, like a small projector and screen, was an essential accessory. Today these are a relatively useless curio, so [Endpoint101] picked one up for not a lot and converted it into an HDMI monitor.
Inside these devices there’s a film transport mechanism and a projection path usually folded with a couple of mirrors. In this case the glass screen and much of the internals have been removed, and an appropriate LCD screen fitted. It’s USB powered, and incorporates a plug-in USB power supply mounted in a UK trailing socket for which there’s plenty of space.
There’s always some discussion whenever a vintage device like this is torn apart as to whether that’s appropriate. These film editors really are ten a penny though, so even those of us who are 8 mm enthusiasts can see beyond this one. The result is a pleasingly retro monitor, which if we’re honest we could find space for ourselves. The full video is below the break. Meanwhile it’s not the first conversion we’ve seen, here’s another Hanimex packing a Raspberry Pi.
Today, we take office software suites for granted. But in the 1970s, you were lucky to have a typewriter and access to a photocopier. But in the early 1980s, IBM rolled out PROFS — the Professional Office System — to try to revolutionize the office. It was an offshoot of an earlier internal system. The system would hardly qualify as an office suite today, but for the time it was very advanced.
The key component was an editor you could use to input notes and e-mail messages. PROFS also kept your calendar and could provide databases like phonebooks. There were several key features of PROFS that would make it hard to recognize as productivity software today. For one thing, IBM terminals were screen-oriented. The central computer would load a form into your terminal, which you could fill out. Then you’d press send to transmit it back to the mainframe. That makes text editing, for example, a very different proposition since you work on a screen of data at any one time. In addition, while you could coordinate calendars and send e-mail, you could only do that with certain people.
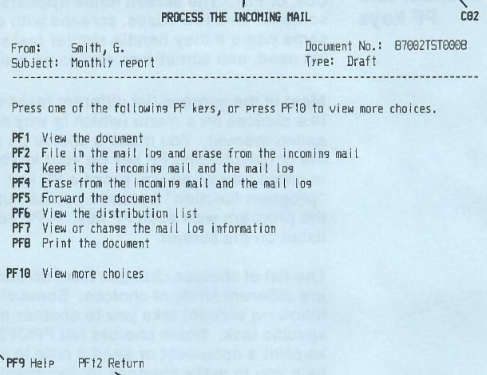
A PROFS message from your inbox
In general, PROFS connected everyone using your mainframe or, perhaps, a group of mainframes. In some cases, there might be gateways to other systems, but it wasn’t universal. However, it did have most of the major functions you’d expect from an e-mail system that was text-only, as you can see in the screenshot from a 1986 manual. PF keys, by the way, are what we would now call function keys.
The calendar was good, too. You could grant different users different access to your calendar. It was possible to just let people see when you were busy or mark events as confidential or personal.
You could actually operate PROFS using a command-line interface, and the PF keys were simply shorthand. That was a good thing, too. If you wanted to erase a file named Hackaday, for example, you had to type: ERASE Hackaday AUT$PROF.
Styles
PROFS messages were short and were essentially ephemeral chat messages. Of course, because of the block-mode terminals, you could only get messages after you sent something to the mainframe, or you were idle in a menu. A note was different. Notes were what we could call e-mail. They went into your inbox, and you could file them in “logs”, which were similar to folders.
Luna 9 was the first spacecraft to soft-land on the moon. In 1966, the main spacecraft ejected a 99-kg lander module that used a landing bag to survive impact. The problem is, given the technology limitations of 1966, no one is exactly sure where it is now. But it looks like that’s about to change.
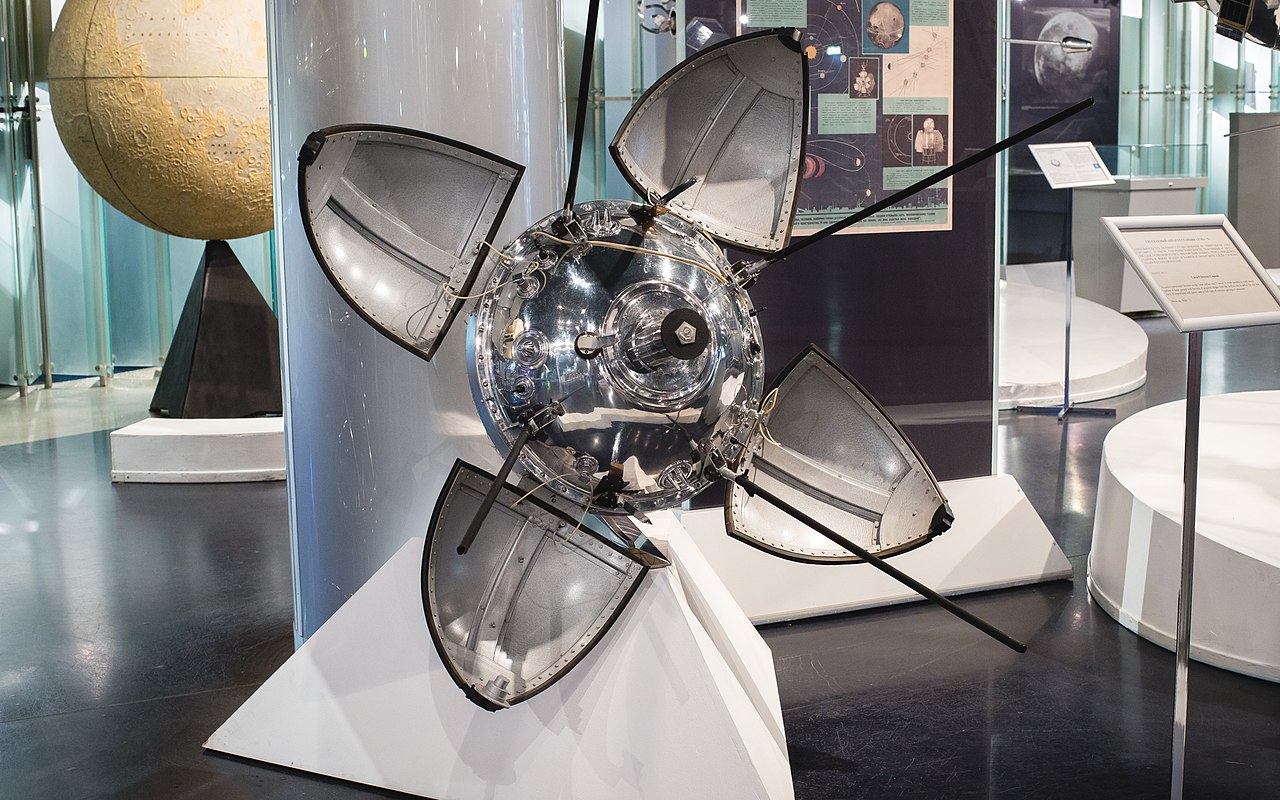
A model of the Luna 9 lander with petals deployed.
We know that the lander bounced a few times and came to rest somewhere in Oceanus Procellarum, in the area of the Reiner and Marius craters. The craft deployed four stabilizing petals and sent back dramatic panoramas of the lunar surface. The Soviets were not keen to share, but Western radio astronomers noticed the pictures were in the standard Radiofax format, so the world got a glimpse of the moon, and journalists speculated that the use of a standard might have been a deliberate choice of the designers to end run against the government’s unwillingness to share data.
Several scientists have been looking for the remains of the historic mission, but with limited success. But there are a few promising theories, and the Indian Chandrayaan-2 orbiter may soon confirm which theory is correct. Interestingly, Pravda published exact landing coordinates, but given the state of the art in 1966, those coordinates are unlikely to be completely correct. The Lunar Reconnaissance Orbiter couldn’t find it at that location. The leading candidates are within 5 to 25 km of the presumed site.
The Luna series had a number of firsts, including — probably — the distinction of being the first spacecraft stolen by a foreign government. Don’t worry, though. They returned it. Since the Russians didn’t talk much about plans or failures, you can wonder what they wanted to build but didn’t. There were plenty of unbuilt dreams on the American side.
Featured Art – 1:1 model of the Luna 9, Public Domain.
Sometimes you’re looking for a component for a project that you know should exist, but you just cannot find it. Something like a 14-segment LED display, but not just one with a fixed color, instead you want some of that sweet addressable RGB-ness. Unfortunately for [EastMakes], this particular display was nowhere to be found, so he decided to try making his own.
Using addressable SK6805 RGB LEDs with a mere 1.5 x 1.5 footprint as the basis, the layout for these individual LEDs on the PCBs was determined, and a layout created in KiCad. The PCB manufacturing and assembly were straightforward enough — the thing that really makes these displays is the diffuser. Here a few different approaches were tried, including FR4 with translucent segments in the soldermask, and a 3D printed version in both white and black PLA filament.
The FR4 approach using 0.8 mm thin PCBs looked quite all right, with the addition of through vias in the 1 mm version showing how these help to boost overall brightness. The 3D printed version prototypes didn’t look too shabby either, but it would probably help a lot if this diffuser panel also fit around the LEDs to prevent light bleeding between segments.
We’d love to see this type of RGB display being experimented with, as it seems to hold a lot of promise while also definitely being something that ought to exist.
Sometimes the simplest objects need some overthinking. This is exactly what [Chris Borge] realized when using his 3D scanner and finding that the included rotation table left quite a bit to be desired — providing him the perfect excuse to build a new one.
One of the main features of a rotation stage is the, well, rotation. This was done in [Chris]’s case with a NEMA 17 stepper motor, perfect for precise rotation of scanning. Hooking up the motor to a basic perf board with an Arduino Nano allows for on the fly adjustments to rotation speed. To really solidify the over-engineering, [Chris] applies his obligatory concrete mix to add some heft to the stage.
While the previous features could be removed/downgraded without much loss, the adjustable grid built into the top adds significant functionality. The grid is based on [Chris]’s past projects, which allows cross compatibility.
We love over-engineering here at Hackaday, especially when adding something new. For more prime overthought design, check out this over engineered egg cracker!
Airport runways seem pretty simple, just another strip of asphalt or concrete not unlike the roads that our cars drive upon every day. We can even use these same highways as landing strips in a pinch, so you’d assume that the engineering for either isn’t that dissimilar. Of course, you can use a highway for an occasional emergency, but a runway that sees the largest and heaviest airplanes taxi, take off and land on a constant basis is a whole other challenge, as detailed in a recent [Practical Engineering] video and its transcript.
When you consider that an Airbus A380 the take-off weight is up to 550 ton, it’s quite clear what the challenge is for larger airports. Another major issue is that of friction, or lack thereof, as the speeds and kinetic energy behind it are so much higher. One only has to look at not only runway overruns but also when one skids off sideways due issues like hydroplaning and uneven friction. Keeping the surface of a runway as high-friction as possible and intact after hundreds of take-offs, tail-strikes and other events is no small feat.
Of course, the other part of runway engineering is for when things do go wrong and an airplane enters the runway safety areas, or overrun zones. This usually provides some flat and clear space where an airplane can safely bleed off its kinetic energy, with the collapsing surface of the EMAS technology being one of the best demonstrations of how this can be safely and dramatically shortened.