With over 160 years of history under its belt, Morse code is by far the oldest digital signaling system known to man. Originally developed for telegraph systems, [Samuel Morse’s] code has been sent over wires, via radio, and even with flashes of light. Hackers, makers and engineers have been working with Morse code throughout history. For many years, simple code keys and practice oscillators were the “hello world” of hobby electronics. In fact, a company which started out selling a Morse key has gone on to become one of the largest electronic component distributors in the world. The company still bears the name of that project: Digi-Key. This week’s Hacklet is all about some of the best Morse code projects on Hackaday.io!
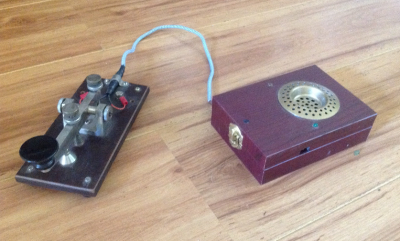 We start with [voxnulla] and Morse key HID + ugly hack. [voxnulla] found an old key at his favorite thrift store. It was dusty, greasy, and for some reason had been painted hospital green. Once the paint and grime were removed, and the original wooden plate restored, the key actually looked pretty good. [Voxnulla] then decided to turn it into a USB Human Interface Device (HID), emulating the keyboard of his computer. An Arduino converts Morse code characters tapped at the key into keystrokes over USB. As [voxnulla] knows, when butterflies aren’t available, real programmers drive vim with a Morse key!
 Next up is [Voja Antonic] with Daddy, I don’t have the key. If you didn’t read [Voja’s] article about Hacking the Digital and Social System, check it out! Many apartments have an intercom system where you have to “buzz” someone in, activating a solenoid lock in the door. [Voja] inserted a Microchip PIC12 series microcontroller between the speaker and the unlock button. All a user has to do is tap out the right Morse code password on the call button in the lobby. If the code is accepted, the PIC unlocks the door, and you’re in!
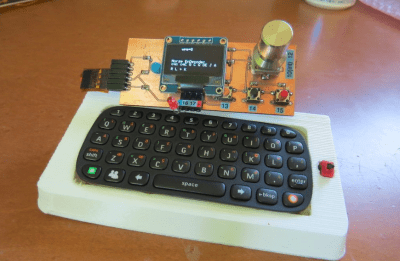 [kodera2t] took things into the digital age with Stand-alone Tiny Morse code encoder/decoder. This project grew out of his general purpose Portable tiny IoT device project. [kodera2t] rolled his own Arduino-compatible board for this project. The tiny ATmega1284 powered computer allows him to encode and decode Morse code. A smartphone-sized keyboard and a lilliputian OLED display serve as the user interface, while rotary encoder allows for variable code speed. You can even “tap” Morse out on one of the tactile buttons!
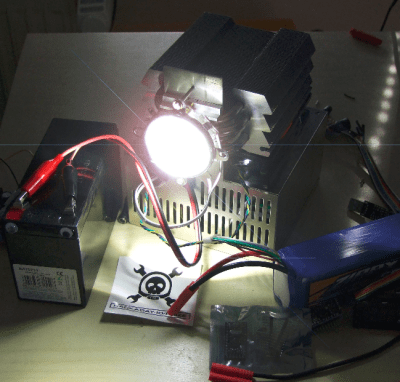 Finally, we have [Yannick (Gigawipf)] with Portable (morsing) 100W led flashlight. 100 watt LEDs have gotten quite cheap these days, and they’re perfect when you absolutely, positively have to blind everyone around you. These LEDs can also be switched on and off quickly, which makes them perfect for Morse code. In years past, mechanical shutters had to be used to perform the same feat. [Yannick] used a 5000mAh 5S Zippy Li-Po to supply electrons to this hungry beast, while a 600 Watt constant current boost converter keeps that power under control. An Arduino running Morse code converter software controls the boost convert and LED. [Yannick] uses his computer to send a message over the Arduino’s serial link, and the light does the rest, flashing out the message for all to see.
If you want more Morse goodness, check out our brand new Morse code project list! My Morse is a bit rusty, so if I wasn’t able to copy your transmission and missed your project, don’t hesitate to drop me a message on Hackaday.io. That’s it for this week’s Hacklet. As always, see you next week. Same hack time, same hack channel, bringing you the best of Hackaday.io!