Join Hackaday Editors Elliot Williams and Tom Nardi as they take a whirlwind tour of the best and brightest hacks of the last week. This episode starts off with an update about that Soviet Venus lander that’s been buzzing the planet, then moves on to best practices for designing 3D printed parts, giving Chrome OS devices a new lease on life, and a unique display technology that brings a Star Wars prop to life.
You’ll also hear about designing new motherboards for beloved old computers, why you might want to put your calipers on a flatbed scanner, and a NASA science satellite that’s putting in double duty as a wartime reporter. Finally, they’ll cover the interesting physics of meteor burst communications, and the latest developments in the ongoing libogc license kerfuffle.
Check out the links below if you want to follow along, and as always, tell us what you think about this episode in the comments!
A funny thing happens as the average electronics hobbyist gets older: Their eyes- well they just don’t work the same as they used to. But what if your life started out with compromised vision? In this epic forum post (Google translated from Polish to English), we meet nearly blind hacker [Urgon]. He goes into great detail about his condition and how it affects not just his daily life, but also his abilities as an electronics engineer. Or conversely, how it doesn’t.
[Urgon]’s origin story is familiar. At eight years old, he disassembled his first television. His self-education continued by using his remaining vision to soak up every bit of literature about electronics that he could get his hands on. A well-intentioned but protective mother kept him away from soldering irons, fearing that the close proximity to his good eye might not bode well for his remaining vision.
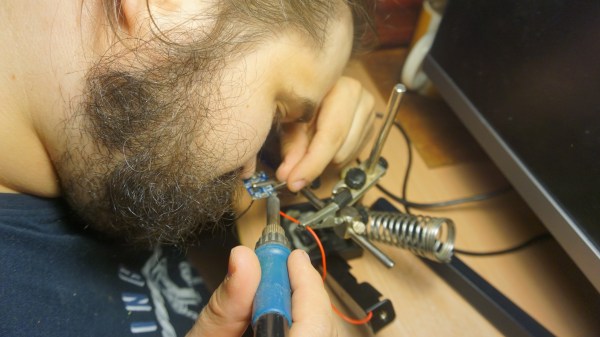
If Urgon can solder SOIC’s 0805’s, so can you!
Despite a failed eye, and his other having quite severe glaucoma, [Urgon] has persevered. He uses assistive technologies as you’d expect, but notes that in more recent times some excellent free software has surpassed some of the commercial products he used in the past.
While even the sighted among us often shy away from SMD components, [Urgon] dives right in. SOIC packages and 0805 parts don’t hold him back. Bright LED flashlights, zooming in with his smart phone, and surely a healthy dose of patience make his hackery possible.
That’s not to say that [Urgon] hasn’t had some noteworthy incidents. He’s suffered electric shock from the 400 V capacitors in an ATX PSU, burned his face with his soldering iron, and even managed to step on a DIP package. Barefoot. Yes, the pins were facing up.
But wait- there’s more! In this follow-up post, [Urgon] discusses more assistive/adaptive technologies and how hackers like you and I can focus our efforts on things the vision impaired will find most helpful.
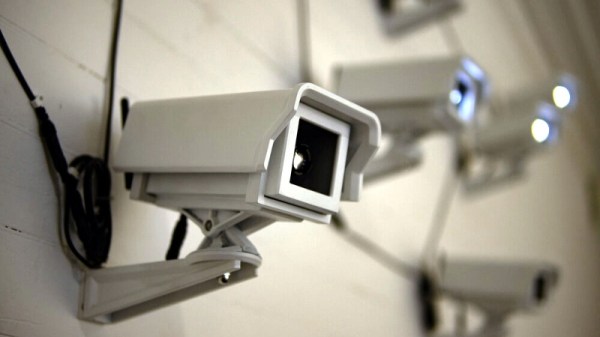
After taking mental note of the number of surveillance cameras pointed at him while standing in line at the local Home Depot, [Mac Pierce] was inspired to create A Scanner Darkly. The art installation uses beams of light projected by mock security cameras to create a dot-matrix character display on the opposing wall, which slowly blinks out US surveillance laws and regulations.
[Mac] has put together an extensive behind the scenes look at how he created A Scanner Darkly, which among other things covers the incredible time and effort that went into producing the fifteen identical cameras used to project the 3×5 grid. Early on he decided on 3D printing each one, as it would give him complete control over the final result. But given their considerable size, it ended up taking 230 hours and 12 kilograms of PLA filament to print out all the parts. It took a further 55 hours to sand and paint the camera housings, to make sure they didn’t actually look like they’d been 3D printed.
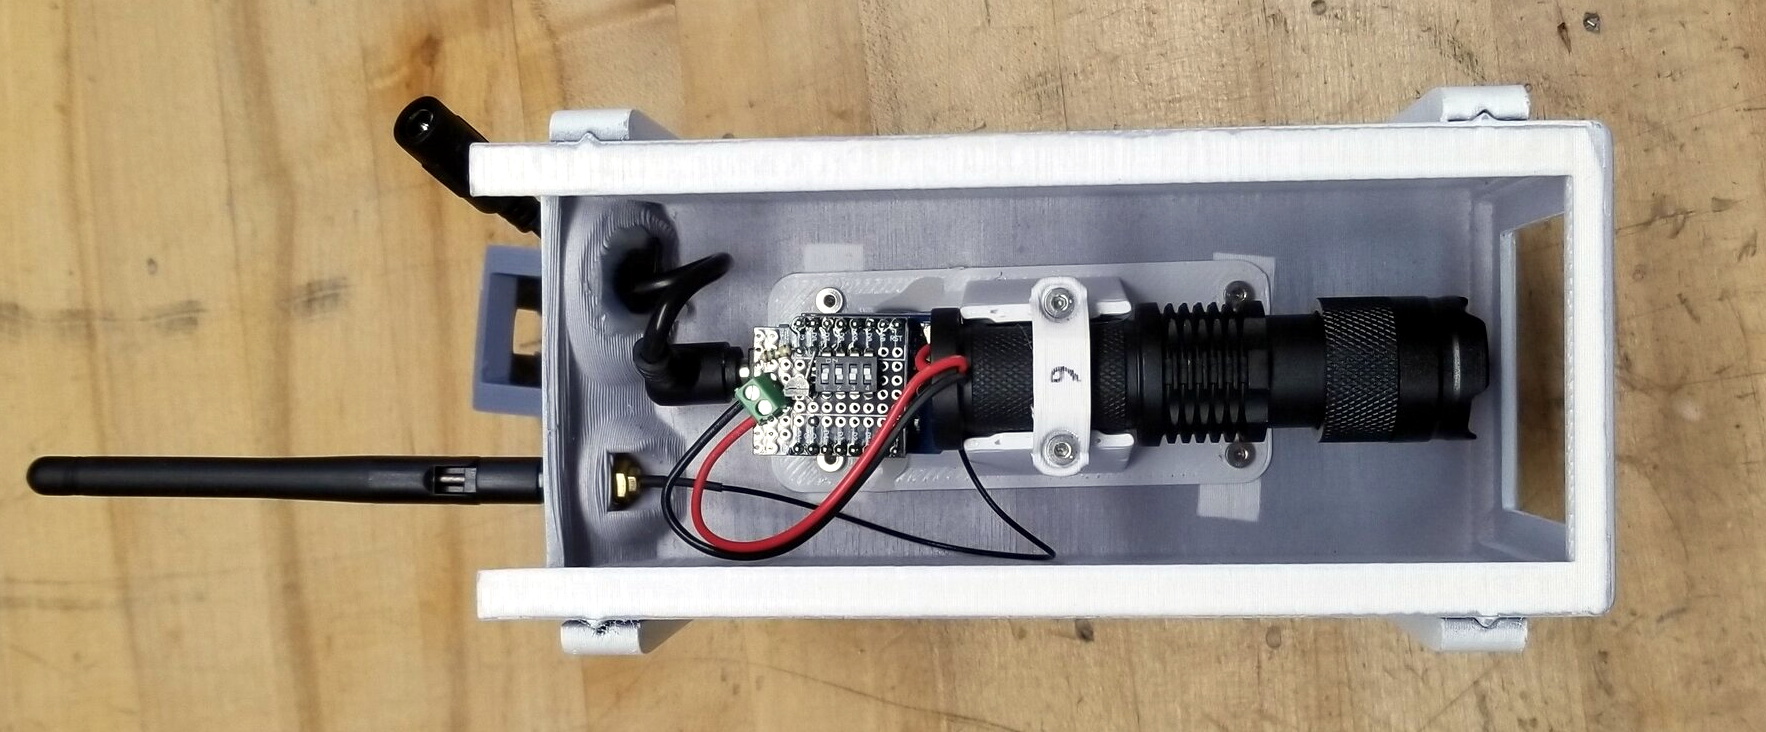
Internally, each camera has an off-the-shelf LED flashlight that’s had its power button rigged up to an ESP8266. Once they’ve been manually pointed to the appropriate spot on the wall, [Mac] can turn each camera’s spotlight on and off over WiFi. Rather than rely on the gallery’s infrastructure, all of the cameras connect to the ESP32 M5Stack that serves as the central controller via ESP-Now.
From there, it was just a matter of writing some code that would load a text document from the SD card, convert the current character into a 3×5 array, and then command the appropriate cameras to turn their lights on or off. [Mac] has not only provided the STL files for the 3D printed camera, but the client and server Arduino code to control the lights. Combined with his excellent documentation, this makes A Scanner Darkly something of a viral art piece; as anyone with the time and appropriate tools can either duplicate the installation or use it as a base for something new.
While some will no doubt argue that [Mac] could have completed this project far faster had he just modified some commercial dummy cameras, it’s important to remember that as an artist, he had a very specific look in mind for A Scanner Darkly. This project is a perfect example of how a creator’s passion can take an idea to new heights, and we think the end result proves it’s worth the time and sweat to put in the extra effort.
A monochromator is an optical instrument that permits only a narrow selection of wavelengths to be transmitted from a source, and the particular model [Doug] obtained renders visual light monochromatic by way of a mechanically-adjusted system of mirrors and diffraction gratings that allows only the selected wavelength to pass. The big dial is how the operator selects the desired wavelength, and is labeled in ‘mu’ (or milli-micro), but [Doug] helpfully points out the more modern term for that is nanometers.
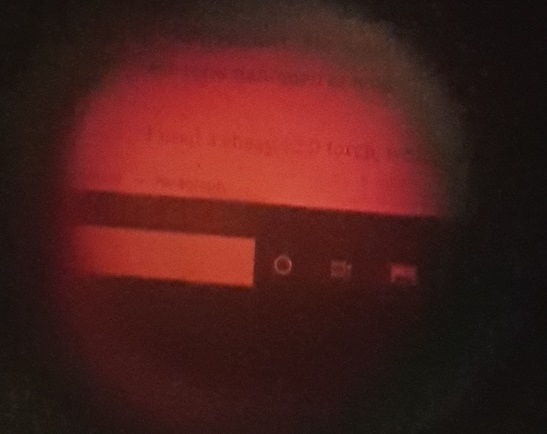
LCD monitor viewed through a monochromator set to pass red wavelength only, showing that images remain intact.
How does it work? Light enters the device via an opening at the base, and only the selected wavelength exits from the top. The dial’s range is from 450 nm to 640 nm (representing violet-blue to red), which [Doug] demonstrates by shining a white LED flashlight into the unit and showing how only green, red, or blue will exit from the top depending on the setting of the dial.
An interesting side note is that with this particular device, images can be rendered monochromatic but otherwise remain intact. [Doug] demonstrates this by viewing a small section of his LCD monitor through the device, as shown in the photo he managed to capture.
It’s an interesting piece of vintage equipment that shows what is possible with passive optical components and a clever mechanical design. These devices are therefore entirely manually-operated tools (at least until someone sticks a stepper motor to the adjustment dial to create an automated scanner, that is.)
Our first thought was that having big fins coming out of your VR goggles might not look very cool. But then we realized if you are wearing VR goggles, that’s probably not your biggest concern. (Ba-doom, tss.) Seriously, though, high-intensity graphics can cause your phone or device to get pretty toasty up there pressed against your face, so [arfish] set out to make a heatsink.
The build isn’t very hard. Some 0.8 mm aluminum sheet is easy to shape and cut. Thermal pads from the PC world help with heat transfer.
The average person’s experience with an ultraviolet (UV) wand is getting a cavity at the dentist. However, anyone with a resin-based 3d printer knows how important a UV curing system is. Often times some spots on a print need a little bit of extra UV to firm up. [Mile] has set out to create an open-source UV curing wand named Photon that is cost-effective and easy to build.
What’s interesting here is that there are dozens if not hundreds of UV curing systems ranging from $5 LED flashlights to larger industrial flood systems. [Mile] dives right in and shows the trade-offs that those cheaper modules are making as well as what the commercial systems are doing that he isn’t. [Mile’s] Photon wand tries to be energy efficient with more irradiated power while staying at a lower cost. This is done by carefully selecting the CSP LEDs instead of traditional wire-bonded and making sure the light source is properly focused and cooled. From the clean PCB and slick case, it is quite clear that [Mile] has gone the extra step to make this production-friendly. Since there are two industry-standard wavelengths that resins cure at (364nm and 405nm), the LED modules in Photon are user-replaceable.
What we love about this project is looking past what is readily available and diving deep. First understanding the drawbacks and limitations of what is there, then setting a goal and pushing through to something different. This isn’t the first UV curing tool we’ve seen recently, so it seems there is a clear need for something better that’s what is out there today.
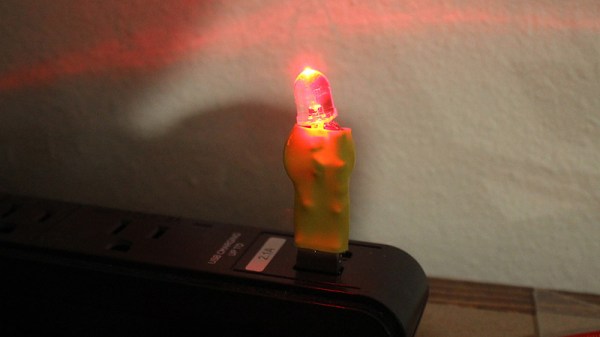
Sometimes the simplest hacks are the most useful ones, and they don’t come much simpler than the little supercapacitor LED flashlight from serial maker of cool stuff [Jeremy S. Cook]. Little more than an LED, a supercapacitor, USB plug, and couple of resistors, it makes a neat little flashlight that charges from any USB A power socket and delivers usable light for over half an hour.
It’s neat, but on its own there’s not much to detain the reader until it is revealed as a “Hello World” supercapacitor project from an article in which he delves into the possibilities of these still rather exotic components. Its point is to explore their different properties when compared to a battery, for example a linear voltage drop in contrast to the sharp drop-off of a chemical cell. In the video below the break we see him try a little boost regulator to deliver a constant voltage, with consequent severe loss of lighting time for the LED. It’s by this type of experimentation that we learn our way around a component unfamiliar to us, and the article and video are certainly worth a look if you’ve never used a supercapacitor before.