A new BeagleBoard is on the way, full of FPGA hotness: the BeagleV-Fire has been announced. The new $150 Single-Board Computer (SBC) from the pioneering open source BeagleBoard company is built around a RISC-V chip that has FPGA features built in. The BeagleV-Fire is built around the snappily named Microchip PolarFire MPFS025T FCVG484E, a System on a Chip (SoC) that has five Reduced Instruction Set Coding Version 5 (RISC-V) cores and a big chunk of FPGA fabric built in. That means it combines the speed of RISC-V processors with the flexibility of Field Programmable Gate Arrays (FPGA), a big pile of logic gates that can be reprogrammed.
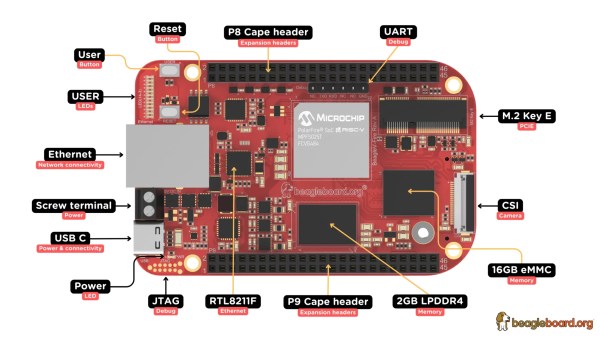
The new BeagleV-Fire includes a sizeable chunk of FPGA to work with: the core chip includes 23 K logic elements and 68 Math blocks, plus 4 Serializer/Deserializer (SerDer) lanes that can throw about 12.7 Gbps of data into and out of the fabric. On the BeagleV-Fire, the main chip is supported by 16 GB of eMMC and 2 GB of LPDDR4 RAM, plus a micro SD slot for extra storage. Gigabit Ethernet is also included, plus USB-C power and a few serial connections for debugging. There is no WiFi built in, but there is an M.2 Key E connection were you could plug in an a wireless adapter if you need it.
Like most other BeagleBoards, the BeagleV-Fire has two headers with 92 pins, which offer access to pretty much every signal on the board, plus lots of analog to digital stuff that works with add-on boards (BeagleBoard refers to them as capes). Also present is the usual 22-pin CSI connector for attaching cameras and other devices.
Want one? They are available for immediate order on BeagleBoard.org or from the usual suspects. It looks like they are already in stock for next-day delivery. If this all sounds familiar, it’s probably because we’ve been posting about this particular board for awhile now, covering both the announcement and first tests. Continue reading “BeagleV Catches Fire With The BeagleV-Fire”