Analog Soil Moisture Alarm

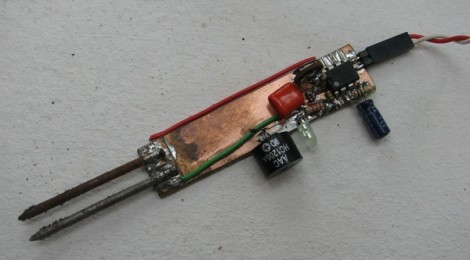
The lion’s share of soil moisture monitors we see are meant as add-ons for a microcontroller. So we’re glad that [Miceuz] tipped us off about this soil moisture alarm he built with analog parts. It’s really not hard to take the concept and build it in the analog world. That’s because you’re just measuring a resistance value. But for those of us who never really got started with analog parts this is a great project to learn from.

A high-efficiency op-amp is doing the brunt of the work. When the soil is moist the resistance is rather low compared to a reference voltage provided by a separate resistive divider. But when the plant gets thirsty and the soil dries out the resistance increases, triggering the op-amp to illuminate an LED and create some noise on the buzzer (we’re a bit confused on how that buzzer works).

Unfortunately this isn’t a viable long-term solution as the battery calculations show it lasting only about four months. That’s where a microcontroller-based circuit really shines, as it can put it self in low-power sleep and wake infrequently to take readings.

Alarm Clock Wakes You Like [Lawrence Welk]

That awful buzzing/beeping beside the bed in the morning might not seem so bad if it were a cascade of bubbles instead. At least that’s what [Will] is hoping for. He took a child’s toy and turned it into a bubble blowing alarm clock.

We’re guessing you’re not going to be too happy with the alarm settings feature. This isn’t using a real-time clock, or any clock at all really. [Will] rolled his own light detection circuit using a PNP transistor whose base is controlled by an LDR. When the light level in the room reaches a certain threshold the bubbles start streaming out of the front of this thing. He test the system in the video by switching a lamp on and off in a dark room.

Up at dawn has never been a way we could describe ourselves, but the one-wire control method seen here could easily be provided by a microcontroller rather than the LDR. Oh, and for those that don’t get it; the [Lawrence Welk] show always started with a screen full of bubbles.

Continue reading “Alarm Clock Wakes You Like [Lawrence Welk]”

Six-digit VFD Alarm Clock

[Haris Andrianakis] just finished building this very clean-looking vacuum fluorescent display clock. It shows six digits using IV-11 tubes, and also has a half-dozen RGB LEDs to spice things up (check out the video after the break for an example). An ATmega168 drives the device, controlling the display and serving as a battery-backed real-time clock.

As with any tube-based clock there’s a fair amount of work that goes into driving the display. Each tube has a filament which requires 1.2V, and the segments themselves need 60 volts to light up. The microcontroller is not hard to protect; this is done with a series of transistor-based circuits used for switching. But the need for three voltages (to power microcontroller, filament, and segments) means a more complex PSU design. [Haris] chose to use a MAX6921 to simplify the process.

If you’re considering building something like this, we’d recommend looking for some 12-segment tubes. As we’ve seen before, they can display letters as well as numbers in case you wish to repurpose the device in the future.

Continue reading “Six-digit VFD Alarm Clock”

Wireless Door Alarms Protect Your Stuff From Afar

wireless-shed-alarm

[Webby] had a friend named [Steve], and as the story goes [Steve] had a few storage sheds on his property that were prone to break-ins.

While the doors were all fitted with a lock, wooden doors are only so strong, and are easy fodder for intruders bearing crowbars and the like. [Steve] was looking for a good way to know when people were poking their heads where they don’t belong, so he rigged up a set of simple alarms that let him know when it’s time to break out the shotgun.

On each of the shed doors, he installed a small IR proximity sensor wired up to a PIC12F675 microcontroller. The PIC is is connected to the “call” button a medium range wireless radio, so that whenever the IR sensor detects that the door is ajar, the PIC triggers an alert on the base unit.

The solution is simple, which we figure also makes it pretty reliable – nice job!

Preheat Alarm Added To A Basic Kitchen Oven

[Justin] didn’t want to keep checking if the ‘oven heating’ indicator light had gone off before popping his unbaked edibles into the oven. Many models offer a buzzer to let you know when the chosen temp is reached, but for folks who own a basic oven model there’s just a light that tells when the heating element is getting juice. Not to worry, he plied his circuit design skills and built a buzzer to alert him when the oven’s ready.

It only took a few components to accomplish the task. [Justin] uses a pair of NPN transistors triggered by a photoresistor. One transistor is responsible for switching on the buzzer, the other transistor is driven by the photoresistor and controls the base of its companion transistor (see the schematic for a better understanding).

He designed and etched a small PCB to host all the parts. As you can see above, it mounts over the indicator light and is powered by a 9V battery. There’s an on/off switch to the right so the buzzer doesn’t keep triggering while cooking, and a potentiometer allows him to fine-tune the photoresistor sensitivity.

Leaking Water Detector From An Old Smoke Alarm

[Thomas Clauser] had his basement flood last year when a hurricane swept over New England. The problem with flooding or leaking water is that chances are you won’t notice until it’s too late. He decided to protect against this in the future by building his own leaking water detector. It’s a simple device that sits on the floor of his basement and triggers an audio alarm if water begins to cover the floor.

He used an old smoke detector for the build; a nice choice since it’s loud, and designed for long-term battery operation. It also has a button for testing if the detector is working. [Thomas] removed the PCB from the smoke detector case and soldered wires onto the test button contacts. He cut a sponge to squeeze it inside of a PVC pipe connector housing. That sits against the floor, with the wires for the test button contacts placed through the sponge. If water is soaked up by the sponge it completes the circuit and triggers the alarm.

A few other design features really make this a nice setup. He notched out the bottom of the PVC connector so that water can flow freely, and added a switch to one of the probe wires lets him kill the alarm when inspecting the damage.

DIY Binary Alarm Clock Small Enough To Fit In Your Pocket

portable-binary-clock

[linux-dude] always wanted to have a binary clock, but he didn’t want to pay someone else to make it for him. Additionally, he was looking for a compact alarm clock he could take on the road, rather than relying on the one in his hotel room.

Inspired by other binary clock projects he has seen over the years, he set off to build his own, which he wanted to fit inside an Altoids tin. His binary clock uses an Arduino Duemilanove (which fits perfectly in the tin) to keep time and control the indicator LEDs. The LEDs are arranged in two rows as you would expect, representing hours and minutes. A small piezo speaker serves as the alarm buzzer, which should be sufficient to wake up most people, though something bigger might be required for heavy sleepers.

We didn’t see any sort of battery pack or power plug mentioned, so we’re not quite sure how [linux-dude] keeps his clock juiced up. Additionally, the lack of an real time clock is something we’re puzzled by. While the Arduino does have a clock function that can be used, an RTC might serve him better – then again if he’s gone for just a day or two at a time, a small amount of drift may not be an issue.