build_status_board

LED Build Monitor Helps Keep An Eye On Your Servers

In his line of work, Hackaday reader [Pedantite] often has to monitor the build status of several continuous integration servers throughout the day. One afternoon, he got the idea to install a set of stop lights in the office in order to monitor the status of the servers, but filed it away as a “wouldn’t it be cool if…” project.

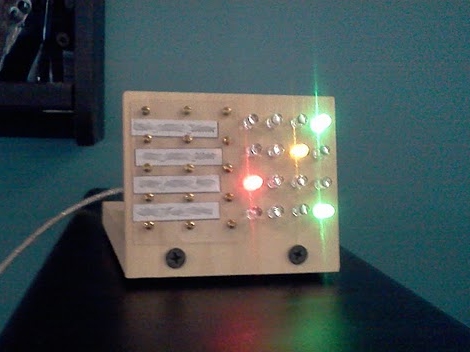
After some time had passed, he was bitten by the idea bug again and decided he would build a physical device to display the status of his build processes. This time around, he brainstormed on a smaller scale and the result is the “Indictron” you see above.

He built a simple LED board made up of four rows of four LEDs to display the build processes. Different LEDs are lit depending on the project’s current build status as well as the results of the previous build. The board uses an ATmega88, and interfaces with a compiler watchdog application using a virtual USB package made specifically for AVR micro controllers.

The end result is a simple, yet useful status board that “just works”. He does not seem to have code or schematics posted on his site at the moment, but we’re pretty sure he would share them upon request.

If you’re interested in a bit more of [Pedantite’s] work, check out his “Good Times” parental timer we featured last week.

DIY Low-power PSU For Home Server Use

diy_pc_psu

[Viktor] decided to replace his old power hungry home server with a model that is much easier on the old electric bill. The new motherboard uses an Intel Atom chip and consumes far less power than its predecessor. He figured there was no reason to use a bulky ATX power supply when all he needed was 12V for the mainboard and a pair of 5V rails for his hard drives, so he decided to build a PSU himself.

He sourced a 100VA toroid transformer as the basis of the power supply due to its popularity with audio amp builders, adding a standard bridge rectifier and smoothing capacitor before regulating the DC output. A pair of switching regulators were added, one for the 6A, 12V, and a second for the 1.5A, 5V supply. The motherboard only requires about 18W at full tilt, so the PSU should be more than sufficient for his needs.

Schematics and board layouts are available for free on his site, if you are in the market for your own DIY low-power PSU.

Looking for more build to suit electronics?  Check out this DIY amp we featured just the other day.

[Thanks, Chris]

DIY PIC Development Board And Web Server

websd

Inspired by a project featured here on Hack-a-Day, [arthurb] bought himself a PIC 24F and started experimenting once he learned the ins and outs of programming the chip. Using a breadboard and a nest of wires was fine for his first few projects, but as he advanced, he began to feel the need for a full-fledged development board. With a list of required features in mind he got to work, constructing a well thought out board as well as a handful of expansion boards that can be used for various other projects. His main development board includes Ethernet connectivity for use with his web server software, the ability to utilize an SD card for storage, and a USB port for programming. His expansion boards include a temperature sensor, a numeric touchpad, as well as a video output module. Overall it is a pretty impressive build, considering he had never programmed a PIC before starting this project. All of his boards are thoroughly documented, and he has included plenty of source code in hopes of helping other individuals just starting out in PIC programming.

You can see his web server in action here, but keep in mind that it is running off a PIC, so please be courteous in your usage.

Chumby Webserver Using Upgraded Internal Storage

The Chumby One has an internal SD card offering a fair amount of storage. [Kenneth Finnegan’s] came with a 1 GB card that had about 500 MB left over which he filled with a collection of MP3s. But he wanted to do more and so installed a pre-compiled version of lighttpd to act as a web server. The problem is that this binary requires a thumb drive to be plugged in because it maps the storage directory to the mounted USB folder. He wasn’t happy with that so he upgraded the internal SD card and rolled his own webserver to run from the internal SD card.

The upgrade involved going from a 1 GB to an 8 GB microSD card. In order to run the webserver internally he needed to recompile lighttpd to use a different root directory. This meant setting up an ARM cross-compiler and eventually finding a new place for the start up script. The location change for the ‘lighty’ directory leaves us wondering if a symlink couldn’t have solve the problem without recompilation. But we don’t have the hardware on hand to try this out ourselves.

But if you want to give it a shot, check out [Bunnie’s] post about Chumby-based hardware. Looks like you can head out to the big-box store and have one in hand without shelling out too many clams.

Mac SE Reborn As A Server And Mac Emulator

[Sprite_TM] cooked up an amazing hack by resurrecting a Mac SE using a Dockstar and ARM processor. The retro hardware had a bad mainboard thanks to the corrosive properties of a failed backup-battery. He had been wanting to do something with the Seagate Dockstar and decided it would find a nice home in the Mac. But what fun is a dead machine housing a headless server? To add to the fun he included an ARM processor running a Mac emulator, along with all the bits to make the screen, keyboard, and peripherals work. When the Mac is off the Dockstar still runs as a server.

But one of the best parts is the floppy drive. It still takes floppies, but there’s no magnetic media inside of them anymore. Instead, he’s added an SD card slot and some protoboard in the space for the read head. The drive itself has had the read head transplanted for some pogo pins (hey, we saw those earlier today). When you insert the floppy, the pogo-pins raise up and contact the protoboard, connecting the SD card to a Teensy microcontroller.

There’s so much going on with this project we just can’t cover it all here. Things like a chemical cleaning to return the original color of the classic case, and building a converter so that the peripherals are USB compatible are just some of the pleasures awaiting you in [Sprite_TM’s] post. He’s also filmed a demo video that we’ve embedded after the break.

Continue reading “Mac SE Reborn As A Server And Mac Emulator”

Server Enclosure From 22 Rolls Of Tape

Who needs metal, wood, or acrylic if you are talented with duct tape? This server is housed in a 20-sided enclosure made entirely of duct tape, 22 rolls of it. A team of seven completed the project after eight build session over the course of about ten days. It’s currently in use at this year’s MillionManLan 9 as confirmed by this incredibly boring live feed.

However whimsical, we do appreciate the build process. Tubes are rolled until they reach the specified thickness, then cut to length on a chop saw. More sticky stuff is applied to the joints and piece by piece the frame comes together. From the diagram laying off to the side in one of the pictures it looks like they did the smart thing by designing this in CAD before getting their hands dirty sticky.

Arduino Webserver

The Arduino platform should be perfect for throwing together a lightweight webserver because of the availability of quality shields that take care of the hardware for you. As [Ovidiu Predescu] found, there are a few hiccups along the way and he’s put together a guide that covers the workarounds. Specifically, using an Ethernet shield and data logging shield at the same time produces a bus conflict which he sidesteps by cutting the CS pin trace on the data logging board and moving it to a different pin. There is also a bug with one of the chips on the Ethernet shield that is fixed using a similar method. So if you’re not just going to etch your own webserver hardware maybe this is the next best thing.