Although technology keeps advancing every year, safety-critical systems in factories and power plants typically stay with the technology that was available when they were built, in the spirit of “don’t fix it if it ain’t broke”. When it comes to safety, there are probably few systems more critical than nuclear power plants, and as a result one power station in Dungeness, in the south-east of England, was controlled by the same Ferranti Argus 500 computer from the early 1970s until the reactor was shut down in 2018.
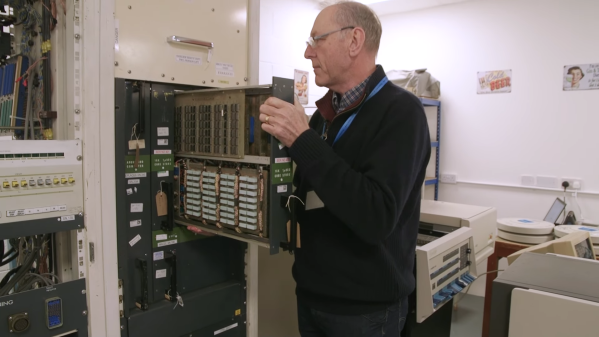
The national Museum of Computing in Bletchley was lucky enough to be allowed to scavenge the old computer from the decommissioned plant, and volunteers at the museum have managed to get it running again in its new home. They describe the process in the video embedded below, and demonstrate a few features of this rather unique piece of 1970s technology.
The computer consists of several large cabinets that house enormous PCBs full of diode-transistor logic (DTL) chips, made by Ferranti itself. It comes with 32 kilo-words, or 96 kilobytes, of magnetic core memory, and was designed to run programs stored on punched tape. However, the paper tape reader was removed at some point in the computer’s life and replaced with a PC-based system that emulates the tape reader’s output through its parallel port. This was probably sometime during the 1990s, judging from the fact that the https://hackaday.com/tag/magnetic-core-memory/PC runs OS/2.
Setting up the computer in its new home was complicated by the fact that hundred of cables had to be disconnected in order to move the system out of the power plant. With the help of decades-old documentation, and the experience of one volunteer who used to be a Ferranti engineer, they eventually got it into a state where it could run programs again.
Ultimately, the Argus 500 will be turned into a live exhibit that will simulate a power station alongside another computer that was rescued from a different nuclear plant. Depending on the availability of some parts that are still missing, this might happen later this year, or perhaps next year. In any case, the museum already has a collection that’s well worth visiting if you’re in the area. The story of how they rescued a neglected IBM 360 also makes for fascinating reading. Continue reading “Ancient Nuclear Plant Computer Finds New Home In Bletchley Museum”