A Super Easy Laser Engraver

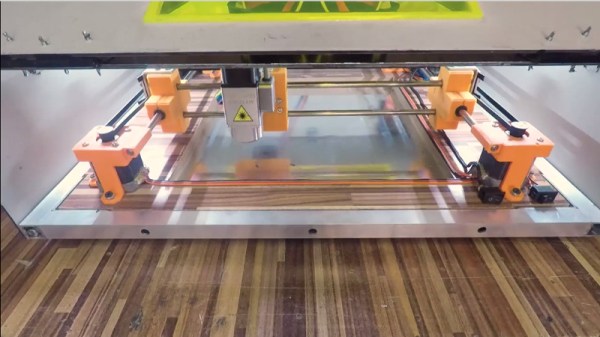
CNC comes in all shapes and sizes, from huge industrial lathes to homebuilt wire benders. [MJKZZ] has built their own compact rig, using optical drive parts to create a cute but effective laser engraver. (Video embedded below.)

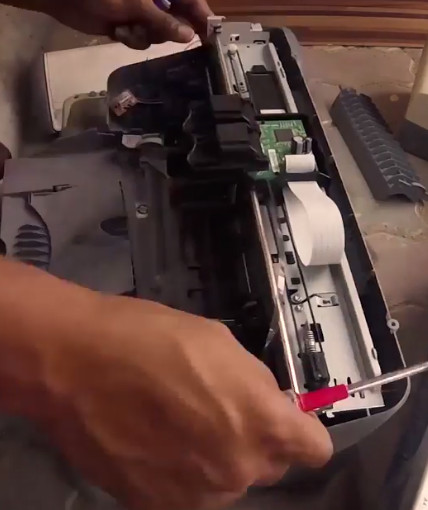
The build aims to keep things simple by holding the laser stationary, and moving the bed instead. The laser in question is a 500 mW unit, driven by the Z axis on the Arduino CNC shield used to run the system. A DVD drive is taken apart, and the worm drive stepper motor assembly is used to slew the carriage back and forth, atop which is glued a bed. Upon this bed, a copy of the same assembly is then installed, offset 90 degrees, giving the X and Y axes.

The result of this setup is a lightweight moveable bed, controllable through Gcode with GRBL. With the laser situated above on some camera mounting gear, paper can be installed on the bed and engraved with ease. The resulting accuracy is admirable, and at full power, the laser is capable of cutting through the paper.

While it’s a lightweight rig, it could serve a purpose as a cheap and easy way to produce stencils from computerized artwork. Optical drives remain popular in the DIY CNC scene, as they’re a great way to source a moveable platform with all the mechanical considerations already worked out.

Continue reading “A Super Easy Laser Engraver”

An Open Hardware Laser Engraver For Everyone

Right now, you can get a diode laser engraver on eBay for around $100 USD. That sounds like a deal, but it’ll probably use some arcane proprietary software, won’t be terribly accurate, and the laser itself will almost certainly be fully exposed. Of course there’s no shortage of DIY builds which improve upon this situation greatly, but unfortunately the documentation and instructions to replicate them yourself often leave a lot to be desired.

To get a safe and accurate laser platform into the hands of hackers everywhere, we need more well documented open source designs that are actually built with community in mind. Projects like the Engravinator from [Adam Haile]. This isn’t a one-off design with documentation thrown together after the fact, it’s a fully open hardware engraver with a concise assembly guide that’s built from 3D printed parts and readily available components. You’re free to source and print the parts yourself or, eventually, purchase everything as a kit.

Pen-equipped Engravinator

The microwave-sized Engravinator is built from standard 2020 aluminum extrusion, and offers a workable area of 130mm x 130mm. There’s a hatch on the front of the enclosure for objects that are small enough to fit inside the machine, but the open bottom and handles on the top also allow the user to place the Engravinator directly onto the work surface. [Adam] says this feature can be especially useful if you’re looking to burn a design into a tabletop or other large object.

Outside of the aluminum extrusion and miscellaneous hardware that make up the frame, most of the other parts are 3D printed. Released under the CERN Open Hardware License v1.2 and distributed as both STL and STEP files, the printable parts for the Engravinator are ripe for modification should you be so inclined. The same goes for the DXF files for the enclosure panels, which will need to be cut out of orange acrylic with a CNC or (ironically) a laser.

Continue reading “An Open Hardware Laser Engraver For Everyone”

Review: NEJE DK-8-KZ Laser Engraver

When I got my first 3D printer I was excited, but now that I’m contemplating adding a forth to my collection, I have to come to the terms with the fact that these machines have all the novelty of a screwdriver at this point. Which is fine; getting the cost down and availability up is the key to turning a niche piece of technology into a mainstream tool, and the more people with 3D printers at home or in their workshop the better, as far as I’m concerned. But still, there’s a certain thrill in exploring the cutting edge, and I’ve been looking for something new to get excited about as of late.

NEJE DK-8-KZ

Lasers seem like an interesting next step in my quest towards complete in-house fabrication capability, so I started researching cheap setups to get my feet wet. In the course of looking up diode-powered laser cutters, I came across the NEJE DK-8-KZ. At only 1W, there’s no question this device isn’t going to be cutting a whole lot. In fact, it’s specifically sold as an engraver. But given the fact that you can get one of these little guys for around $70 USD shipped, it’s hard to complain.

Now I wasn’t 100% sure what I would do with a laser engraver, but I thought it would be a good way to test the waters before putting serious money (and time) into something more powerful. Plus, if I’m being totally honest, I wanted to start on something on the lower end of the power spectrum because I’m terrified of blinding myself.

So what kind of laser do you get for $70? Let’s find out… Continue reading “Review: NEJE DK-8-KZ Laser Engraver”

Monoprice Mini Laser Engraver Hack

There’s an old saying, that in theory there’s no difference between theory and practice, but in practice there is. That sentiment could easily be applied to refitting a 3D printer to hold a laser. There shouldn’t be much to it, rig up a laser module to turn on under computer control, mount it to your hot end carriage and off you go. In practice, though there are other considerations to account for. If you have a Monoprice Mini Select, you can start with instructions from [drodrii] for adding a laser to your printer.

Although [drodrii] mentions that you need a second 3D printer to make a bracket for the laser, we think you should be able to print it on the Mini as long as you do it before the first step of removing the hot end. However, since your laser module might not exactly match the one used in this project, you’d have to get it right the first time if you don’t have another 3D printer. Of course, you could remove the laser gear, remount the hot end, print a new bracket and start over, but that’d be a drag.

Continue reading “Monoprice Mini Laser Engraver Hack”

Improving Cheap Laser Engravers For PCB Fabrication

A few months ago, [Marco] picked up a cheap, cheap, cheap laser engraver from one of the familiar Chinese resellers. It’s a simple affair with aluminum extrusions, a diode laser, and a control board that seems like it was taken from a 3D printer controller designed five years ago. Now, [Marko] is building some upgrades for this engraver and his PCB production skills have gone through the roof.

The laser engraver [Marko] picked up is called the EleksMaker, and lucky for him there are quite a few upgrades available on Thingiverse. He found two 3D printable parts, one that keeps the belt parallel to the aluminum extrusion, and another that provides adjustable x-axis tightness on the belt. With these two mods combined, [Marko] actually has a nice, smooth motion platform that’s more precise and makes better engravings.

These upgrades weren’t all 3D-printable; [Marko] also got his hands on a few Trinamic TMC2130 stepper motor drivers. These stepper drivers are the new hotness in 3D printing and other desktop CNC machines, and looking at the waveform in an oscilloscope, it’s easy to see why. These drivers produce a perfectly smooth waveform via interpreted microstepping, and they’re almost silent in operation. That’s terrible if you want to build a CNC chiptune player, but great if you want smooth engraving on a piece of copper clad board.

This project has come a long way since the last time we took a look at it a few months ago, and the results just keep getting better. [Marko] is making real PCBs with a laser engraver that cost less than $200, and the upgrades he’s already put into it don’t add up to much, either. You can take a look at [Marko]’s progress in the video below.

Thanks [dechemist] for the tip.

Continue reading “Improving Cheap Laser Engravers For PCB Fabrication”

Homebuilt Laser Engraver Using Salvaged Parts

Now that anyone can go online and get a fairly decent 3D printer for around $200, they’ve officially fallen out of the “Elite Hacker” arsenal and are now normal, if perhaps highly specialized, tools. That’s great for the 3D printing community as a whole, but what about those who want to be on the fringe of technology? Telling people you have a 3D printer at home doesn’t get that wide-eyed response like it used to. What’s a “l33t” hacker to do?

Enter the laser engraver/cutter: it’s like a 3D printer, but easier to build and has a higher capacity for bodily harm! While there are a couple good options for kits and turn-key setups out there, just like the early days of 3D printers, some of the best machines are still home built. In his latest video, YouTuber [MakerMan] takes us through his build which features an impressively low part count.

To start his build, [MakerMan] strips down four printers and salvages seven high quality 8 mm linear rods; a huge cost saving tip in itself. We’ll certainly be picking up any printers we see in the trash for the next couple months hoping to score some rods. With the addition of some cheap LM8UU bearings and 3D printed holders for them, [MakerMan] has a smooth 2D motion platform for just a couple bucks. The frame of the machine is built out of type of aluminum square tubing you can find at the hardware store, no expensive extrusion here.

For the laser itself, [MakerMan] is using a six watt PLH3D-6W-XF from Opt Lasers. This module features integrated driver and cooling, so all you need to do is provide it power and a stable means of moving it over the work piece. They even offer a magnetic “dock” which allows you to remove the laser from the mount without any tools for servicing or tool changes. [MakerMan] reports he’s been able to engrave stainless steel with this laser module, and cut thin wood.

This isn’t the first laser engraver we’ve seen built out of scrap parts, though if you want to save some work you could just upgrade a cheap commercial model.

Continue reading “Homebuilt Laser Engraver Using Salvaged Parts”

Drop-in Controller For EBay K40 Laser Engraver Gets Results

[Paul de Groot] wrote in to let us know about a drop-in controller replacement he designed for those economical K40 laser engravers that are everywhere on eBay. With the replacement controller, greatly improved engraving results are possible along with a simplified toolchain. Trade in the proprietary software and that clunky security dongle for Inkscape and a couple of plugins! [Paul] felt that the work he accomplished was too good to keep to himself, and is considering a small production run.

Laser engravers are in many ways not particularly complex devices; a motion controller moves the head in x and y, and the laser is turned on or off when needed. But of course, the devil is in the details and there can be a surprising amount of stuff between having a design on your screen and getting it cut or engraved in the machine. Designing in Inkscape, exporting to DXF, importing the DXF to proprietary software (which requires a USB security dongle to run), cleaning up any DXF import glitches, then finally cutting the job isn’t unusual. And engraving an image with varying shades and complex dithering? The hardware may be capable, but the stock software and controller? Not so much. It’s easy to see why projects to replace the proprietary controllers and software with open-source solutions have grown.

Cheap laser engravers may come with proprietary controllers and software, but they don’t need to stay that way. Other efforts we have seen in this area include LaserWeb, which provides a browser-based interface to a variety of open-source motion controllers like Grbl or Smoothieware. And if you’re considering a laser engraver, take a few minutes to learn from the mistakes of other people.