UC Berkeley Prints Glass Nanoparticles

In a recent video, [Joel] of 3D Printing Nerd interviews a researcher at University of California, Berkeley about their work with glass 3D printing technology. A resin is impregnated with tiny glass nanoparticles and produces green parts. An oven burns away the resin and then another heating step produces the actual silica glass part. You can see a video about the process below.

As you might expect with glass, the temperatures are toasty. The first burn is at 1100 C and the fusing burn is at 1300 C. The nanoparticles are about 40 nanometers across. The resulting parts are tiny with very small feature sizes. The technology to do this has been around for a few years, and the University continues researching this form of computed axial lithograph (CAL) 3D printing. These parts are so small that it uses an adaptation called microCAL that produces much smaller parts at high precision. However, the equipment available today won’t produce very large objects. The video talks about the uses for some of these small glass items.

We wonder how much the firings in the ovens change the tiny tolerances. They obviously work, so either they account for that or it doesn’t shrink much.

If you want your own 3D printed glass, a laser system might be more practical. If you just want transparent plastic, your FDM printer can do that. Really.

Continue reading “UC Berkeley Prints Glass Nanoparticles”

The Sunchronizer Keeps Your Solar Panel Aligned

In the past few years, the price-per-watt for solar panels has dropped dramatically. This has led to a number of downstream effects beyond simple cost savings. For example, many commercial solar farms have found that it’s now cheaper to install a larger number of panels in fixed positions, rather than accepting the extra cost, maintenance, and complexity of a smaller number panels that use solar tracking to make up the difference. But although this practice is fading for large-scale power production, there are still some niche uses for solar tracking. Like [Fabian], if you need to maximize power production with a certain area or a small number of panels you’ll wan to to build a solar tracker.

[Fabian]’s system is based on a linear actuator which can tilt one to four panels (depending on size) in one axis only. This system is an elevation tracker, which is the orientation generally with respect to latitude, with a larger elevation angle needed in the winter and a lower angle in the summer. [Fabian] also designs these to be used in places like balconies where this axis can be more easily adjusted. The actuator is controlled with an ESP32 which, when paired with a GPS receiver, can automatically determine the sun’s position for a given time of day and adjust the orientation of the panel to provide an ideal elevation angle on a second-by-second basis. The ESP32 also allows seamless integration with home automation systems like SmartHome as well.

Although this system only tracks the sun in one axis right now, [Fabian] is working on support for a second axis which mounts the entire array on a rotating table similar to an automatic Lazy Susan. This version also includes a solar tracking sensor which measures solar irradiance in the direction the panel faces to verify that the orientation of the panel is maximizing power output for a given amount of sunlight. Tracking the sun in two axes can be a complicated problem to solve, but some solutions we’ve seen don’t involve any GPS, programming, or even control electronics at all.

Continue reading “The Sunchronizer Keeps Your Solar Panel Aligned”

Autonomous Boat Plots Lake Beds

Although the types of drones currently dominating headlines tend to be airborne, whether it’s hobbyist quadcopters, autonomous delivery vehicles, or military craft, autonomous vehicles can take nearly any transportation method we can think of. [Clay Builds] has been hard at work on his drone which is actually an autonomous boat, which he uses to map the underwater topography of various lakes. In this video he takes us through the design and build process of this particular vehicle and then demonstrates it in action.

The boat itself takes inspiration from sailing catamarans, which have two hulls of equal size connected above the waterline, allowing for more stability and less drag than a standard single-hulled boat. This is [Clay]’s second autonomous boat, essentially a larger, more powerful version of one we featured before. Like the previous version, the hulls are connected with a solar panel and its support structure, which also provides the boat with electrical power and charges lithium-iron phosphate batteries in the hull. Steering is handled by two rudders with one on each hull, but it also employs differential steering for situations where more precise turning is required. The boat carries a sonar-type device for measuring the water depth, which is housed in a more hydrodynamic 3d-printed enclosure to reduce its drag in the water, and it can follow a waypoint mission using a combination of GPS and compass readings.

Like any project of this sort, there was a lot of testing and design iteration that had to go into this build before it was truly seaworthy. The original steering mechanism was the weak point, with the initial design based on a belt connecting the two rudders that would occasionally skip. But after a bit of testing and ironing out these kinks, the solar boat is on its way to measure the water’s depths. The project’s code as well as some of the data can be found on the project’s GitHub page, and if you’re looking for something more human-sized take a look at this solar-powered kayak instead.

Continue reading “Autonomous Boat Plots Lake Beds”

Handsome Sim Racing Button Box Is A Super Easy Build

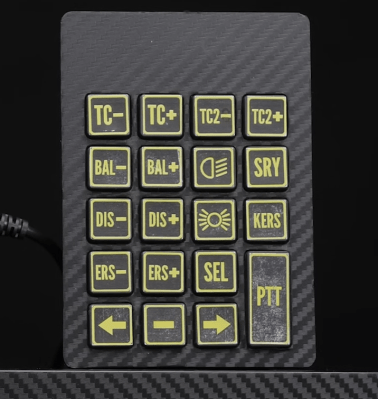
Sim racing is a lot more complex than playing Need For Speed 3: Hot Pursuit. You need buttons for all kinds of stuff, from headlights to brake balance to traction control. If you want to control all that in an intuitive and realistic manner, you’ll want to build yourself a decent button pad like [Chris Haye] has done. It’s surprisingly easy, too!

Very cool.

[Chris] is quite a serious racer, and needed four button boxes. He wanted to do this on the cheap, so he decided to build his first three boxes around the Zero Delay Arcade USB Encoder, a cheap controller board available on eBay for around £7. Arcade buttons were sourced off Amazon to populate the black project boxes which acted as the housings.

His final button pad looks straight out of a GT3 race car, but it’s the simplest of the bunch. It’s literally just a USB numpad with a carbon vinyl wrap applied and some home-printed labels. One suspects the feel isn’t particularly high-quality but the look is top tier. If you’re a streamer that wants to build a hardcore-looking setup, this is a great way to go.

[Chris] estimates that each box took maybe an hour to build, tops. It’s a great example of solution-focused design. He could have gotten out his own microcontroller and done a custom PCB and all that, and the results surely would have been good. But it would have taken far longer! It’s hard to beat the speed of wiring together Amazon arcade buttons with the Arcade USB Encoder’s pre-terminated wire harness. If you’re more interested in sim racing than building button boxes, it’s a great way to do a custom pad fast.

Best of all? [Chris] says he managed to put these all together for £60—quite a feat of bargain engineering. We’ve featured some other builds along these lines before, too—even using vintage aircraft controls! Video after the break.

Continue reading “Handsome Sim Racing Button Box Is A Super Easy Build”

Handheld Oscilloscope Meter Reviewed

We live in a time where there’s virtually no excuse not to have some kind of oscilloscope. As [IMSAI Guy] shows in a recent video, for what you might expect to pay for a decent meter, you can now get one that includes a scope. There are several options out there but it is hard to know how much to spend to get the best possible product. The Zoyi ZT-702S that he looks at costs under $80. But is it worth it?

Scopes that connect to your PC are often very inexpensive. You can also find little toy scopes that use a microcontroller and a little LCD screen. Even though the specs on these are usually appalling, they will still let you visualize what’s happening in a circuit. Sure, you want an expensive bench scope with lots of channels sometimes, but often, you just need to see a signal in broad strokes. Having a scope and a meter together is very handy.

Continue reading “Handheld Oscilloscope Meter Reviewed”

FLOSS Weekly Episode 796: Homebrew, I’m More Of A Whopper Guy

This week Jonathan Bennett and David Ruggles chat with John Britton and Mike McQuaid about Homebrew! That’s the missing package manager for macOS; and Workbrew, the commercial offering built on top of it. We cover lots of territory, like why the naming scheme sounds like it was conceived during a pub visit, how Workbrew helps businesses actually use Homebrew, and why you might even want to run Homebrew on a Linux machine!

Continue reading “FLOSS Weekly Episode 796: Homebrew, I’m More Of A Whopper Guy”

A Really Low Level Guide To Doing Ethernet On An FPGA

With so much of our day-to-day networking done wirelessly these days, it can be easy to forget about Ethernet. But it’s a useful standard and can be a great way to add a reliable high-throughput network link to your projects. To that end, [Robert Feranec] and [Stacy Rieck] whipped up a tutorial on how to work with Ethernet on FPGAs. 

As [Robert] explains, “many people would like to transfer data from FPGA boards to somewhere else.” That basically sums up why you might be interested in doing this. The duo spend over an hour stepping through doing Ethernet at a very low level, without using pre-existing IP blocks to make it easier. The video explains the basic architecture right down to the physical pins on the device and what they do, all the way up to the logic blocks inside the device that do all the protocol work.

If you just want to get data off an embedded project, you can always pull in some existing libraries to do the job. But if you want to really understand Ethernet, this is a great place to start. There’s no better way to learn than doing it yourself. Files are on GitHub for the curious. Continue reading “A Really Low Level Guide To Doing Ethernet On An FPGA”