Quantum Computing On A Commodore 64 In 200 Lines Of BASIC

The term ‘quantum computer’ gets usually tossed around in the context of hyper-advanced, state-of-the-art computing devices. But much as how a 19th century mechanical computer, a discrete computer created from individual transistors, and a human being are all computers, the important quantifier is how fast and accurate the system is at the task. This is demonstrated succinctly by [Davide ‘dakk’ Gessa] with 200 lines of BASIC code on a Commodore 64 (GitHub), implementing a range of quantum gates.

Much like a transistor in classical computing, the qubit forms the core of quantum computing, and we have known for a long time that a qubit can be simulated, even on something as mundane as an 8-bit MPU. Ergo [Davide]’s simulations of various quantum gates on a C64, ranging from Pauli-X, Pauli-Y, Pauli-Z, Hadamard, CNOT and SWAP, all using a two-qubit system running on a system that first saw the light of day in the early 1980s.

Naturally, the practical use of simulating a two-qubit system on a general-purpose MPU running at a blistering ~1 MHz is quite limited, but as a teaching tool it’s incredibly accessible and a fun way to introduce people to the world of quantum computing.

A Commodore 128 with a video capture device attached

Hacking The Commodore 128 To Capture Almost Real-Time Video

Although watching and editing videos may be among the primary tasks of many PCs today, it wasn’t that long ago that working with video required powerful processors and expensive video capture hardware. Even in the 1980s, home computer users were looking for ways to connect video sources to their Commodores and Ataris despite their hardware limitations. [Cameron Kaiser] has a mid-1980s consumer-grade video capture device, which he has managed to turn into an almost real-time video capture system.

A distorted video image on a C128's monitor
Allowing the graphics chip to interrupt the CPU mid-capture results in a severely distorted image

His work revolves around a device called “ComputerEyes”, a 1984-vintage hardware interface that made it possible to connect a composite video source to a home computer. The limitations of mid-1980s CPUs meant that it took around six seconds for the computer to do a quick scan of a single video frame, or a multiple of that if you wanted a higher-quality image. Another limitation, at least on Commodore machines, was that the screen had to be turned off during video capture – otherwise, the video chip would interrupt the CPU halfway through the process, causing it to lose its synchronization with the video source.

[Cameron] however, plugged his ComputerEyes into a Commodore 128. This machine, largely designed by Hackaday contributor [Bil Herd], has an unusual hardware architecture consisting of two different CPUs and, crucially, two separate video chips. The primary 8564 “VIC-II” graphics chip is used to keep compatibility with existing Commodore 64 programs, while the secondary 8563 “VDC” is mainly aimed at newer high-resolution text-based software. The VDC is also much more independent from the main system bus than the VIC-II, allowing it to display an image without disturbing the CPU.

More after the break.

Continue reading “Hacking The Commodore 128 To Capture Almost Real-Time Video”

Creating A Commodore 64 Cartridge On Single-Sided Stripboard

The DIY Commodore 64 cartridge. (Credit: Linus Åkesson)

When you want to write software for a system like the Commodore 64, the obvious and safe choice is to create an image that can be used with a tape or floppy drive emulator. Yet these come with the obvious disadvantage of loading time and manual steps, much like with the original hardware. Unfortunately, if you crave that instant-on experience that cartridges offer – courtesy of them being plugged directly into the system’s CPU bus – you better get an EE diploma to figure it all out. Or maybe not, as [Linus Åkesson] found out when he created a custom cartridge to boot his Commodordian project from.

For the core of the cartridge a bit of stripboard was sufficient to interface with the C64’s cartridge slot. Despite being single-sided, all the required signals were on one side of the slot. These include the EXROM line that informs the system that a cartridge is present, the ROML line that informs the cartridge when the system is trying to read from it, and of course the data bus. After this the interaction gets somewhat interesting, due to the use of the single-sided stripboard, as the address bus and other signals are on the non-connected side.

Working around this was the biggest challenge, but by creatively using the ROML and DotClk lines and by disabling the display output, the ATmega88 and 74HC541-based cartridge a working solution was created. There is still room for improvement here, naturally, but it would appear that if the goal is simply to autoload software on boot, this is definitely a workable solution. One could also splurge on double-sided stripboard, but that would strip away most of the fun of this solution.

Commodore Floppy Drive Fixing Chaos

One of the best parts of retrocomputing is that you can obtain so many broken systems and peripherals for repairing and other assorted fun. This was the wholesome activity that [Drygol] embarked on recently with a gaggle of Commodore floppy disk drives that he obtained, involving a lot of cleaning, soldering, calibrating and other assorted entertainment. This follows cold on the heels of an earlier repair session of a stash of Commodore 1541 FDDs.

Testing Commodore FDD head alignment using the 1541 diagnostic cartridge.

As with any such devices, the first thing to do is to clean the heck out of them, to remove forty-odd years of dust and other debris, followed by testing of functionality, replacing dead ICs and the usual round of (electrolytic) capacitor replacement. Retrobrighting gives it that fresh-out-of-packaging look, which leaves just the calibrating of these drives. This procedure is essential to make sure the read/write head is aligned with the tracks on the disks, and is the most fiddly part of the process.

What helps a lot here is the 1541 diagnostic cartridge by [World of Jani] that displays real-time information on the drive while you are tweaking its speed and head alignment. All you have to do is tweak the speed potentiometer, and adjust the position of the drive motor, which takes a bit of patience and a steady hand. After this repair session a few Mitsumi drives unfortunately remained dead due to busted coils. Despite a valiant repair attempt on the heads by manually rewinding the coils, this remains a topic for a potential part III.

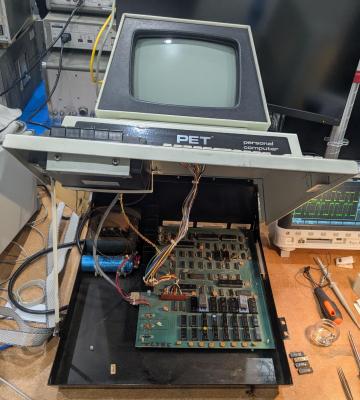
This Rohde & Schwarz Computer Is A Commodore PET

The IEE-488 or GPIB bus for controlling instruments by computer has existed now for many decades. It’s often implemented over USB or Ethernet here in 2023, but the familiar connector can still be found on the backs of pricey instruments. In the earlier days of GPIB when a powerhouse Linux laptop was decades away, what computer did the would-be GPIB user reach for? If they were a Rohde and Schwarz customer in the late 1970s the chances are it would have been the R&S PUC process controller, an 8-bit microcomputer that under its smart exterior turns out to be an enhanced Commodore PET. [NatureAndTech] has one for teardown, and you can see it in the video below the break.

Readers with long memories will remember that the PET had an IE-488 bus on a card edge connector, and it’s possible that’s why R&S took it as the basis for their machine. But this isn’t merely a PET in a fancy box, instead it’s a fully new PET-compatible computer, and it has some interesting features. There’s more memory than the original, a set of disk drives, and an expansion bus complete with a high-res graphics card allowing pixel graphics rather than text. Surprisingly though it has a BASIC interpreter it’s a hardware clone of the PET only, the ROM is unique to Rohde & Schwarz.

We think this machine is probably rare enough that we’re unlikely to see one in the flesh, but it’s been a fascinating thing to examine. You can join in with the video below the break, or you can look at the PET’s impact on a more recent scene.

Continue reading “This Rohde & Schwarz Computer Is A Commodore PET”

Using Excel To Manage A Commodore 64

The “save” icon for plenty of modern computer programs, including Microsoft Office, still looks like a floppy disk, despite the fact that these have been effectively obsolete for well over a decade. As fewer and fewer people recognize what this icon represents, a challenge is growing for retrocomputing enthusiasts that rely on floppy disk technology to load any programs into their machines. For some older computers that often didn’t have hard disk drives at all, like the Commodore 64, it’s one of the few ways to load programs into computer memory. And, rather than maintaining an enormous collection of floppy discs, [RaspberryPioneer] built a way to load programs on a Commodore using Microsoft Excel instead.

The Excel sheet that manages this task uses Visual Basic for Applications (VBA), an event-driven programming language built into Office, to handle the library of applications for the Commodore (or Commodore-compatible clone) including D64, PRG, and T64 files. This also includes details about the software including original cover art and any notes the user needs to make about them. Using VBA, it also communicates to an attached Arduino, which is itself programmed to act as a disk drive for the Commodore. The neceessary configuration needed to interface with the Arduino is handled within the spreadsheet as well. Some additional hardware is needed to interface the Arduino to the Commodore’s communications port but as long as the Arduino is a 5V version and not a 3.3V one, this is fairly straightforward and the code for it can be found on its GitHub project page.

With all of that built right into Excel, and with an Arduino acting as the hard drive, this is one of the easiest ways we’ve seen to manage a large software library for a retrocomputer like the Commodore 64. Of course, emulating disk drives for older machines is not uncommon, but we like that this one can be much more dynamic and simplifies the transfer of files from a modern computer to a functionally obsolete one. One of the things we like about builds like this, or this custom Game Boy cartridge, is how easy it can be to get huge amounts of storage that the original users of these machines could have only dreamed of in their time.

Well Documented Code Helps Revive Decades-Old Commodore Project

In the 1980s, [Mike] was working on his own RPG for the Commodore 64, inspired by dungeon crawlers of the era like Ultima IV and Telengard, both some of his favorites. The mechanics and gameplay were fairly revolutionary for the time, and [Mike] wanted to develop some of these ideas, especially the idea of line-of-sight, even further with his own game. But an illness, a stint in the military, and the rest of life since the 80s got in the way of finishing this project. This always nagged at him, so he finally dug out his decades-old project, dusted out his old Commodore and other antique equipment, and is hoping to finish it by 2024.

Luckily [Mike’s] younger self went to some extremes documenting the project, starting with a map he created which was inspired by Dungeons and Dragons. There are printed notes from a Commodore 64 printer, including all of the assembly instructions, augmented with his handwritten notes to explain how everything worked. He also has handwritten notes, including character set plans, disk sector use plans, menus, player commands, character stats, and equipment, all saved on paper. The early code was written using a machine language monitor since [Mike] didn’t know about the existence of assemblers at the time. Eventually, he discovered them and attempted to rebuild the code on a Commodore 128 and then an Amiga, but never got everything working together. There is some working code still on a floppy disk, but a lot of it doesn’t work together either.

While not quite finished yet, [Mike] has a well-thought-out plan for completing the build, involving aggregating all of the commented source code and doing quarterly sprints from here on out to attempt to get the project finished. We’re all excited to see how this project fares in the future. Beyond the huge scope of this pet project, we’d also suggest that this is an excellent example of thoroughly commenting one’s code to avoid having to solve mysteries or reinvent wheels when revisiting projects months (or decades) later. After all, self-documenting code doesn’t exist.

Continue reading “Well Documented Code Helps Revive Decades-Old Commodore Project”