Using Excel To Manage A Commodore 64

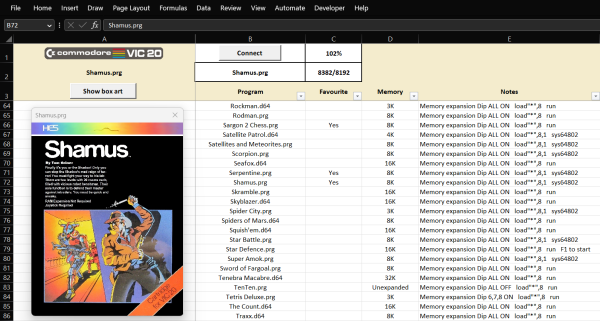
The “save” icon for plenty of modern computer programs, including Microsoft Office, still looks like a floppy disk, despite the fact that these have been effectively obsolete for well over a decade. As fewer and fewer people recognize what this icon represents, a challenge is growing for retrocomputing enthusiasts that rely on floppy disk technology to load any programs into their machines. For some older computers that often didn’t have hard disk drives at all, like the Commodore 64, it’s one of the few ways to load programs into computer memory. And, rather than maintaining an enormous collection of floppy discs, [RaspberryPioneer] built a way to load programs on a Commodore using Microsoft Excel instead.

The Excel sheet that manages this task uses Visual Basic for Applications (VBA), an event-driven programming language built into Office, to handle the library of applications for the Commodore (or Commodore-compatible clone) including D64, PRG, and T64 files. This also includes details about the software including original cover art and any notes the user needs to make about them. Using VBA, it also communicates to an attached Arduino, which is itself programmed to act as a disk drive for the Commodore. The neceessary configuration needed to interface with the Arduino is handled within the spreadsheet as well. Some additional hardware is needed to interface the Arduino to the Commodore’s communications port but as long as the Arduino is a 5V version and not a 3.3V one, this is fairly straightforward and the code for it can be found on its GitHub project page.

With all of that built right into Excel, and with an Arduino acting as the hard drive, this is one of the easiest ways we’ve seen to manage a large software library for a retrocomputer like the Commodore 64. Of course, emulating disk drives for older machines is not uncommon, but we like that this one can be much more dynamic and simplifies the transfer of files from a modern computer to a functionally obsolete one. One of the things we like about builds like this, or this custom Game Boy cartridge, is how easy it can be to get huge amounts of storage that the original users of these machines could have only dreamed of in their time.

Op-Amp Challenge: A Logic-Free BCD

Of digital electronics, a wise man once said that “Every idiot can count to one.” Truer words have rarely been spoken, because at the end of the day, every digital circuit is really just an analog circuit with the interesting bits abstracted away. And to celebrate that way of looking at things, we’re pleased to present this BCD to seven-segment converter that uses no logic chips.

With cheap and easily available chips that perform this exact job, it might seem a little loopy to throw 20 LM324 op-amps at the job. But as [gschmidt958] explains, this is strictly for the challenge, plus it made a nice entry in the recently concluded Op-Amp Challenge contest. His work began in simulation, exploring op-amp versions of the basic logic gates — NAND, AND, OR, and NOT — all of which rely on using the LM324s as comparators. There were real-world curveballs, of course, not least of which was running out of the 10k resistors used for input averaging. Another plot twist was running out of time to order a PCB, which required designing one using MS Paint and etching it at home.

The demo video below shows the circuit at work, taking the BCD output of a 74HC393 counter — clocked by a 555, naturally — and driving a seven-segment LED.  It’s honestly a lot of work for such a simple task, but there’s something satisfying about the whole project. We think [Widlar] would be proud.

Continue reading “Op-Amp Challenge: A Logic-Free BCD”

Robotic Fox Is Part Dog, Part Cat — Just Like The Real Thing

Foxes are cat software running on dog hardware, or so they say. And [Will Cogley] seems to have taken that to heart with this 3D-printed robotic fox, which borrows heavily from projects like Boston Dynamics Spot robodog. True, the analogy breaks down a bit when you include MIT’s Cheetah on the inspiration list, but you get the point.

Very much a work in progress — [Will]’s RoboFox lacks both a head and a tail, which he aims to add at some point — there are some interesting design elements on display here. Whereas commercial quadruped robots tend to use expensive harmonic drives for the legs, [Will] chose simpler, cheaper hobby servos for his fox’s running gear. Each leg has three of them — one each for the upper and lower leg, and another that moves the whole leg in and out relative to the body. The dual-servo design for the leg is particularly interesting — one servo drives the upper leg directly, while the other servo drives the lower leg through a gear drive and a captive bearing arrangement connected to a parallelogram linkage. The result is a quite compact assembly that still has twelve degrees of freedom, and isn’t anywhere near as “floppy” as you might expect from something driven by hobby servos.

The video below shows off the design details as well as some of the fox’s construction, including some weirdly anatomically correct poses while it’s on its back. The fox is still getting its legs — you can see a few times when the servos get the jitters, and the umbilical is clearly a hindrance for such a lightweight robot. But [Will] has made a great start here, and we’re keen to see RoboFox progress. Although we’re not sure about giving the future head animatronic eyes.

Continue reading “Robotic Fox Is Part Dog, Part Cat — Just Like The Real Thing”

Nissan 300zx Dash Given A New Language

You don’t have to be a car enthusiast to recognize that the 1984 Nissan 300x dash is a work of art. The graceful swoops and multisegment VFDs evoke an aesthetic that reminds us of a particular era. Rather than replace his dash with something drab and modern, [Evan] modified his dash to accept input from newer devices. Many of the sensors that feed directly into the dash are becoming harder to find as the years wear on, and rather than spoof every old device, [Evan] looked at each gauge.

Temperature and oil pressure are variable resistance sensors, and by removing half the voltage divider, it becomes a variable voltage sensor, as modern temperature sensors can output a voltage from 0 to 5. The tachometer required tracing the signal through the PCB as it expects a pulse every time a cylinder fires. By simulating cylinder pulses with a function generator, [Evan] found the filtering circuit and the microcontroller pin monitoring it. An optoisolator to protect the delicate MCU makes it easy to pipe the signal directly in.

Of course, not everything needed to be modified. A vacuum sensor provides a signal to the dash to indicate how much power the engine produces, which is pretty easy to spoof with a teensy connected to the CAN bus. All these mods are easily reversible and allow [Evan] to keep rocking the iconic dash with a more modern engine.

It’s an incredible hack that offers a view into how to trace, understand, and hack old electronics. Of course, if you’re keeping old built-in car bits, why not keep the carphone but connect it to your smartphone?

Op-Amp Challenge: Measuring PH, No Code Required

When you see a project with a digital display these days, you’ll be forgiven for assuming that there’s some kind of microcontroller behind the scenes. And while that’s often the easiest way to get a project from idea to completion, it’s rarely the most interesting way.

This digital pH meter is a great example of that “no-code” design philosophy. According to [chris], the main use for this meter will be to measure soil pH in his garden, and the reason for eschewing a microcontroller was more or less for the challenge. And quite a challenge it was. Understanding the concept of pH isn’t always easy, and many a budding chemist has fallen victim to its perils. Actually measuring pH isn’t much easier, with the need to account for a lot of variables while measuring small voltages. Adding to the challenge was the fact that pretty much every skill on display here — from using KiCad to SMD soldering — was the first time [chris] had tackled them.

To amplify the voltage from the off-the-shelf pH probe, [chris] chose an LMV358A, a high-impedance FET-input version of the venerable LM358 op-amp, so as not to load down the probe. A negative temperature coefficient (NTC) resistor in the feedback path provides temperature compensation. He also designed a split power supply to provide positive and negative rails from a single 9-volt battery. The 3.5-digit LCD display is driven by an ICL7106 integrated A/D converter and BCD driver chip. Everything went into a nice-looking plastic enclosure that’s very suitable for a portable instrument.

As of this writing, the Op-Amp Challenge has officially wrapped, and there’s a slew of last-minute entries we need to go through. Check out the competition and stay tuned to find out who the judges pick for op-amp design glory!

Bye Bye Ubuntu, Hello Manjaro. How Did We Get Here?

Last week I penned a cheesy fake relationship breakup letter to Ubuntu, my Linux distribution of choice for the last 15 years or so. It had well and truly delivered on its promise of a painless Linux desktop for most of that time, but the most recent upgrades had rendered it slow and bloated, with applications taking minutes to load and USB peripherals such as my film scanner mysteriously stopping working. I don’t have to look far to identify the point at which they adopted Snap packages as the moment when it all went wrong. I’d reached the point at which I knew our ways must part, and it was time to look for another distro.

Continue reading “Bye Bye Ubuntu, Hello Manjaro. How Did We Get Here?”

Apple Invent The Mechanical Watch

The Apple Watch has been on the market for long enough that its earlier iterations are now unsupported. Where some see little more than e-waste others see an opportunity, as has [NanoRobotGeek] with this mechanical watch conversion on a first-generation model.

What makes this build so special is its attention to detail. Into the Apple Watchcase has gone a Seiko movement, but it hasn’t merely been dropped into place. It uses the original Apple watch stem which is offset, so he’s had to create a linkage and a tiny pulley system to transfer the forces from one to the other. The rotor is custom-machined with am Apple logo, and the new watch face is a piece of laser-cut and heat treated zirconium. Even the watch movement itself needed a small modification to weaken the stem spring and allow the linkage to operate it.

The build is a long one with many steps, and we’re being honest when we say it would put our meager tiny machining skills to an extreme test. Sit down and take your time reading it, it really is a treat. Apple Watches may head to the tip after five years, but not this one!

See more in the video below the break, and of course long-time readers may remember we’ve considered the Apple Watch versus mechanical watches before.

Continue reading “Apple Invent The Mechanical Watch”