Fun-Size Geiger Counter Sits Atop A 9-Volt Battery

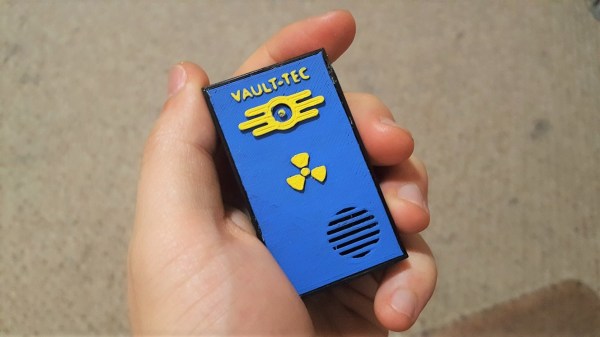
Want a little heads-up before walking into a potentially dangerous radioactive area? Sure, we all do. But the typical surplus Civil Defense Geiger counter is just too bulky to fit into the sleek, modern every-day carry of the smartphone age. So why not slim down your first line of defense against achieving mutant status with this tiny Geiger counter (Facebook)?

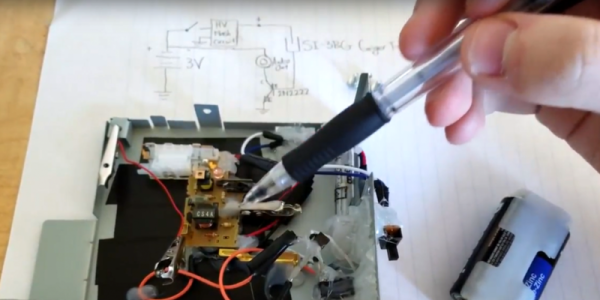
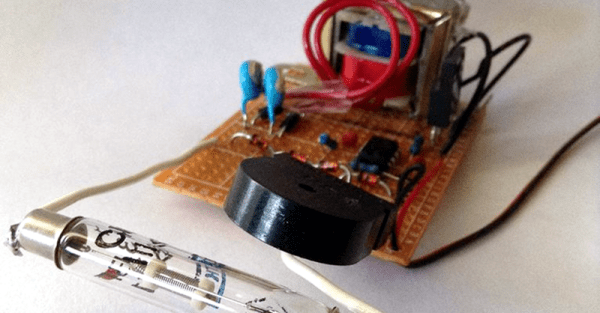
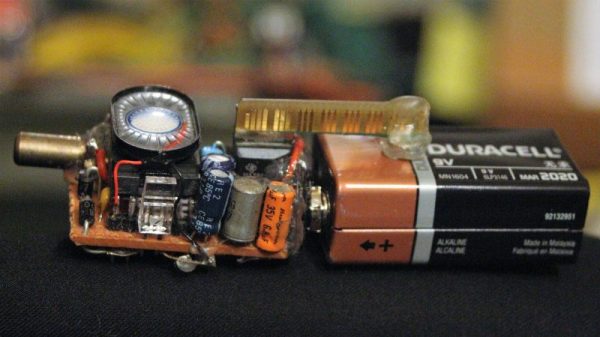
We jest about the use cases for a personal-sized Geiger counter, as [Ian King]’s inspiration for this miniaturized build was based more on a fascination with quantifying the unseen world around us. Details are thin in his post, but [Ian] kindly shared the backstory for this build with us. Working on a budget and mostly with spare parts, the big outlay in the BOM was $20 for a Soviet-era SBM-10 tube, itself a marvel of miniaturization. While waiting the two months needed for the tube to arrive, [Ian] whipped up a perf board circuit with a simple oscillator and a CFL transformer to provide the 400 volts needed for the tube. The whole circuit, complete with tiny speaker and an LED to indicate pulses, sits neatly on top of a 9-volt battery. The video below shows it in action with a test source.

Geiger counters are not exactly rare projects on Hackaday, and with good reason. Take a look at this no-solder scrap bin counter or this traveling GPS Geiger counter built dead-bug style.

Continue reading “Fun-Size Geiger Counter Sits Atop A 9-Volt Battery”

Roam The Wastelands With This Fallout-Themed Mini Geiger Counter

For anyone who has worked with radioactive materials, there’s something that’s oddly comforting about the random clicks of a Geiger counter. And those comforting clicks are exactly why we like this simple pocket Geiger counter.

Another good reason to like [Tim]’s build is the Fallout theme of the case. While not an item from the game, the aesthetic he went for with the 3D-printed case certainly matches the Fallout universe. The counter itself is based on the popular Russian SBT-11A G-M tubes that are floating around eBay these days. You might recall them from coverage of this minimalist Geiger counter, and if you were inspired to buy a few of the tubes, here’s your chance for a more polished build. The case is stuffed with a LiPo pack, HV supply, and a small audio amp to drive the speaker. The video below shows it clicking merrily from a calibration source.

We can see how this project could be easily expanded — a small display that can show the counts per minute would be a great addition. But there’s something about how pocketable this is, and just the clicking alone is enough for us.

Continue reading “Roam The Wastelands With This Fallout-Themed Mini Geiger Counter”

A No-Solder, Scrap-Bin Geiger Counter For $15

Scenario: your little three-hour boat tour runs into a storm, and you’re shipwrecked on a tropic island paradise. You’re pretty sure your new home was once a nuclear test site, but you have no way to check. Only your scrap bin, camera bag, and hot glue gun survived the wreck. Can you put together a Geiger-Müller counter from scrap and save the day?

Probably not, unless your scrap bin is unusually well stocked and contains a surplus Russian SI-3BG miniature Geiger tube, the heart of [GH]’s desert island build. These tubes need around 400 volts across them for incident beta particles or gamma rays to start the ionization avalanche that lets it produce an output pulse. [GH]’s build uses the flash power supply of a disposable 35mm camera to generate the high voltage needed, but you could try using a CCFL inverter, say. The output of the tube tickles the base of a small signal transistor and makes a click in an earbud for every pulse detected.

You’ll no doubt notice the gallons of hot glue, alligator clips, and electrical tape used in the build, apparently in lieu of soldering. While we doubt the long-term robustness of this technique, far be it from us to cast stones – [GH] shows us what you can accomplish even when you find yourself without the most basic of tools.

Continue reading “A No-Solder, Scrap-Bin Geiger Counter For $15”

A Cheap, 555-Based Geiger Counter

Every mad scientist’s lair needs a Geiger counter. After all, if that UFO crashes on the back patio, you might need to know if it is hot. [Tanner_Tech] shows you how to build a cheap one that will get the job done.

You do need a Geiger tube, but a quick search of a popular auction site shows plenty of Russian surplus for a few bucks. The other thing you need is a source of high voltage (about 400V), which is the heart of the circuit using a 555-based DC to DC converter. You can see a video of the device working, below.

The DC to DC converter needs a transformer that [Tanner] swiped out of an alarm clock. A piezo transducer (stolen from a junk microwave) gives you the characteristic click. If you prefer solid state over hollow state, there’s an open source project that uses a PIN diode as a sensor. Or you could add an Arduino and some LEDs.

Continue reading “A Cheap, 555-Based Geiger Counter”

LED Matrix Plus Geiger Counter

A lot of projects get made because someone just has the parts lying around. In this case, [Ed Nisley] got given a nice 8×8 RGB LED matrix, and needed something to display. [Ed] details the transformation of stuff-lying-on-the-desk into a unique matrix display for a Geiger counter (which he also presumably had sitting around somewhere). The result is a lightshow that’s as random as radioactive decay, and that’s pretty darn random.

img_5583-random-led-dots-circuit-layout-rb-smd-resistorsThe first post covers the hardware layout. It’s build on protoboard, but ends up looking a lot nicer than our projects because [Ed] spent some time hiding the shift-register ICs and row-driver transistors underneath the matrix itself, which was nicely socketed above. A sweet touch is the use of SMT resistors soldered upright underneath the board to save space. Cute.

The second post covers the circuit design, and is worth a look if you’re new to driving many LEDs from a minimum number of microcontroller pins. There are eight rows, and three colors each for eight LEDs per row. Without using shift registers, this would require 8*8*8*8 = way too many pins to control. If you want a worked example of how to do this with just four microcontroller pins, have a look. (Spoiler: cascaded shift registers driven by the AVR’s hardware SPI peripheral.)

The third post starts to flesh out the software. [Ed] settled on seven colors (and off) for the display, so the matrix’s total state can be crammed into just 32 bytes, which fits nicely in even a tiny microcontroller, much less the gargantuan ATmega328. Wrapping this all up in an array of structs and providing a couple of helper functions makes quick work of the software side. The addition of a sync pulse to trigger an oscilloscope at the end of a row is a nice touch.

aware-rm-60-geiger-pulseNext up is the Geiger counter interface software post. When a radioactive decay event is detected, the code reads out the time in milliseconds and uses that as the source of randomness. To whiten the noise, the times are run through a simple hash function: the Jenkins hash (link). This hash function was new to us and seems pretty useful for quick-and-dirty microcontroller applications.

The last post details pre-loading the matrix on startup and running a test sequence that blinks each LED to make sure they’re all working. Using a single random value to seed a software pseudo-random number generator ensures that it will (almost) never start off with the same display twice.

Phswew! That’s a lot of well-documented writeup of a well-polished project! Hope it inspires you to dig out something cool from your junk drawer and build.

A Deadbugged GPS/GLONASS/Geiger Counter

So you think you’re pretty good at soldering really tiny parts onto a PCB? You’re probably not as good as [Shibata] who made a GPS/GLONASS and Geiger counter mashup deadbug-style with tiny 0402-sized parts.

The device uses an extremely small GPS/GLONASS receiver, an AVR ATxmega128D3 microcontroller, a standard Nokia phone display and an interesting Geiger tube with a mica window to track its location and the current level of radiation. The idea behind this project isn’t really that remarkable; the astonishing thing is the way this project is put together. It’s held together with either skill or prayer, with tiny bits of magnet wire replacing what would normally be PCB traces, and individual components making up the entire circuit.

While there isn’t much detail on what’s actually going on in this mess of solder, hot glue, and wire, the circuit is certainly interesting. Somehow, [Shibata] is generating the high voltage for the Geiger tube and has come up with a really great way of displaying all the relevant information on the display. It’s a great project that approaches masterpiece territory with some crazy soldering skills.

Thanks [Danny] for sending this one in.

Continue reading “A Deadbugged GPS/GLONASS/Geiger Counter”

Use A Cheap PIN Diode As A Geiger Counter

After the Fukushima nuclear power plant disaster, radiation measurement became newly relevant for a lot of people. Geiger-Müller tubes, previously a curiosity, became simultaneously important and scarce.

Opengeiger.de (English-language version here) has complete instructions for making a Geiger counter without a Geiger-Müller tube. Instead, this counter uses a PIN photodiode and some carefully chosen operational amplifiers. The total cost of such a device is significantly cheaper than the alternative: under $1 for the diode and around $5 for the rest. And since the PIN photodiode in question is used in many other devices, it’s not a niche component like a Geiger tube is.

The secret sauce is in component selection and tuning. Opengeiger uses the BPW34 diode because it is relatively common and has a large surface area, but also because it has a very low capacitance when reverse-biased. The first-stage opamp choice is also fairly critical. Considering that an average gamma radiation event produces only around 10 nanoamps for about 50 microseconds, a lot of amplification (100,000x), low noise, and high bandwidth are a must.

If you want to get started with this project, you could first browse through the explanation (PDF) to get an overview of the project’s goals, read up on all the technical considerations (PDF) or just head straight for the DIY instructions for the “Stuttgarter Geigerle” (PDF, schematic is on the last page). All of the documentation is chock-full of relevant references and totally worth the read.