Whether it is motivated by a dream of superhuman strength courtesy of a mech suit or of mobility for those with impaired muscle function, the powered exoskeleton exerts a curious fascination among engineers. The idea of a machine-augmented human body achieving great things is thwarted though by the difficulty of the task, actuators and power sources small enough to be worn comfortably represent a significant challenge that is not easily overcome. It’s a subject that has captivated [Kristjan Berce] since at a young age seeing his grandmother struggling with lifting, and he presents a working powered exoskeleton arm as a proof of his ideas.
It’s a wonderful exercise in low-tech construction with hand tools and a drill press on pieces of aluminium and wood. Motive power comes from an automotive windscreen wiper motor, and electrical power comes from a hefty LiPo attached to the device’s harness. There is a feedback potentiometer incorporated into the elbow joint, and an Arduino oversees the operation under the direction of a pair of glove-mounted buttons. It’s certainly impressive to see it in the video below lifting a bicycle, though we wonder how its weight might affect someone with less muscle function than average.
Projects like this one are very good to see, because there’s a chance that somebody out there may be helped by building one of these. However there is always a note of caution to be struck, as the best solutions come from those who need them and not those who merely think they have the solution. We have written about the Engineer Saviour Trap here in years past.
If I were to ask you what is the oldest man-made orbiting satellite still in use, I’d expect to hear a variety of answers. Space geeks might mention the passive radar calibration spheres, or possibly one of the early weather satellites. But what about the oldest communication satellite still in use?
The answer is a complicated one. Oscar 7 is an amateur radio satellite launched on November 5th 1974, carrying two transponders and four beacons, all of which operate on bands available to amateur radio operators. Nearly 45 years later it still provides radio amateurs with contacts just as it did in the 1970s. But this bird’s history is anything but ordinary. It’s the satellite that came back from the dead after being thought lost forever. And just as it was fading from view it played an unexpected role in the resistance to the communist government in Poland.
Hackaday Editors Elliot Williams and Mike Szczys geek out over the latest hacks. This week we saw a couple of clever CNC builds that leverage a great ESP32 port of GRBL. The lemonade-pitcher-based submarine project is everything you thought couldn’t work in an underwater ROV. Amazon’s newest Dot has its warranty voided to show off what 22 pounds gets you these days. And there’s a great tutorial on debugging circuits that grew out of a Fail of the Week. Plus, we get the wind knocked out of us with an ambitious launch schedule for airless automotive tires, and commiserate over the confusing world of USB-C.
Take a look at the links below if you want to follow along, and as always tell us what you think about this episode in the comments!
Take a look at the links below if you want to follow along, and as always, tell us what you think about this episode in the comments!
[Thomas] does a lot of interesting experiments with 3D printing and lately, he’s been using the free version of Fusion 360 to do topology optimization. He started with a blocky bookshelf bracket and let the software analyze the loads so it can remove pieces that don’t contribute a lot to the bracket’s strength. This uses less material, prints faster, and — [Thomas’] biggest goal — looks cool.
If you know [Thomas] you know he didn’t just hope the brackets would be strong enough. He made prototypes and destroyed them in testing. Despite being printed in a poor orientation for strength, the models held a good bit of weight.
This has been an interesting week. First off, security researchers at Armis discovered a set of serious vulnerabilities in the vxWorks Real Time Operating System (RTOS). Released under a name that sounds like the title of a western or caper movie, Urgent/11. Not familiar with vxWorks? It’s a toss-up as to whether vxWorks or Linux is more popular for embedded devices. Several printer brands, Arris modems, Sonicwall firewalls, and a whole host of other industrial and medical devices run the vxWorks RTOS.
Several of these vulnerabilities are in the network stack, rather than in applications. The worst offender is CVE-2019-12256, a vulnerability in error handling. An ICMP error response is generated from an incoming packet, and assumptions are made about that incoming packet. When data is copied from that packet into the ICMP error, the length is not first checked, allowing unconfined memory write. If this sounds familiar, it should. We covered a similar vulnerability in Apple’s XNU kernel not long ago.
This particular vulnerability can compromise a vxWorks machine even without an opened port. The saving grace of that vulnerability applies here: a maliciously crafted packet is necessarily malformed, and won’t navigate public routing. In other words, it’s LAN only, and can’t be sent over the internet.
They come in through the firewall.
A second class of vulnerability, where the name comes from, is related to the TCP urgent pointer. This rarely used TCP feature was intended to allow more up-to-date information to supersede data still being processed. Not only has TCP urgent not been widely used, the specifications were not written particularly well, with the various RFC documents describing conflicting implementations. It’s surprising that vxWorks supports it at all, but isn’t particularly surprising that their implementation is flawed. Manipulation of the data stream can cause a length integer to underflow. The nature of binary arithmetic means that underflowing an unsigned integer causes it to wrap around to maximum value, which can lead to writing packet data in the buffer in unexpected memory locations. These vulnerabilities require an established TCP connection, but the researchers describe several scenarios where that could be accomplished by an attacker.
The last RCE vulnerability they describe is in the DHCP client, ipdhcpc. This is a very simple vulnerability. One section of code allocates a buffer for DHCP options, but allocates 24 bytes fewer than the maximum size. An attacker could use this 24 byte overflow to manipulate the data structure and potentially jump execution into manipulated memory.
Update (2019-08-02 09:15 UTC-7): Hackaday received a statement from SonicWall that they made a patch for this vulnerability back on July 19th:
Ensuring the security of our customers is a responsibility we take seriously at SonicWall and we work vigilantly to always keep our customers secure. SonicWall physical firewall appliances running certain versions of SonicOS contain vulnerabilities in code utilized for remote management. At this time, there is no indication that the discovered vulnerabilities are being exploited in the wild. The patches are available now and we strongly advised our partners and end users July 19 th to apply the SonicOS patch immediately.
Capital One made use of Amazon AWS for storing customer data. This isn’t surprising, many companies have turned to Amazon’s seemingly inexhaustible cloud computing platform for storing large data sets. It seems, however, that Capital One failed to configure the security properly on that bucket. (As many other companies have done.) Information was leaked for over an estimated 100 million customers. A former Amazon employee has been arrested, and seems to have posted at least a portion of that data in a Github gist.
Reading between the lines, it seems that this was a very simple mistake. Perhaps credentials were leaked, or the S3 bucket was publicly available. That particular detail has not been released. There is something to be said for Capital One’s response to the incident. They were anonymously informed of the existence of the gist on July 17, using their responsible disclosure process. By the 29th, they had fixed the misconfiguration, coordinated with law enforcement, and publicly announced the breach. A twelve day turn-around is an impressive response, particularly when so many companies have tried to hide or ignore similar breaches.
Cabarrus County, NC
It seemed simple enough. The general contractor for the county’s new school building needed to update bank account information. The appropriate forms were signed and filed, and the information was updated. Nothing seemed amiss unto two months later, when the contractor notified the county that they had missed a scheduled payment of 2.5 million dollars. But the transaction went through, and the money was transferred to the account on file.
Yes, the transfer went through, but the the county had been hit with a social engineering scam. The report refers to it as an Email Account Compromise (EAC) scam, which seems to indicate that the scammer first gained access to a legitimate email account of the contractor in question. Alternatively, an attacker could simply spoof the sender’s email address, and set a different reply-to field. Unless a user was particularly watching for such a scheme, it would be easy to overlook the discrepancy. In any case, even after recovering some of the transferred money, the county seems to be out about $1.7 million. These scams are becoming more and more popular, so remember, don’t believe anything you read in an email.
The Weird and Wacky
And to round out this week’s news, yet another [Satoshi Nakamoto] candidate has been found: Linus Torvalds. While it appears to be a serious suggestion, I’ll just note that the author doesn’t have his name attached to this article. He does make one interesting observation — git is the killer blockchain app. You see, I tend to compare blockchain to the laser. Both were very clever inventions, but didn’t have any immediate uses. They were solutions in search of a problem. This article points out that core concepts of blockchain are present in git, which seems to be an accurate and clever observation. So what is blockchain good for? Git!
You’ve got to hand it to marketers – they really know how to make you want something. All it takes is a little parental guilt, a bit of technical magic, and bam, you’re locked into a product you never knew you needed.
This prototype flight tracking nightlight for kids is a great example. Currently under development by Canadian airline WestJet, the idea is to provide a way for traveling parents to let kids know how long it is until Mommy or Daddy gets home from their trip. The prototype shows a stylized jet airliner with Neopixel lighting in the base. A pair of projectors in the wings shine an animated flight path on the child’s darkened bedroom ceiling, showing them when the wayward parent will return. Get past the schmaltz in the video below, and perhaps get over your jealousy of parents with kids who still eagerly await their return, and it’s actually a pretty good idea.
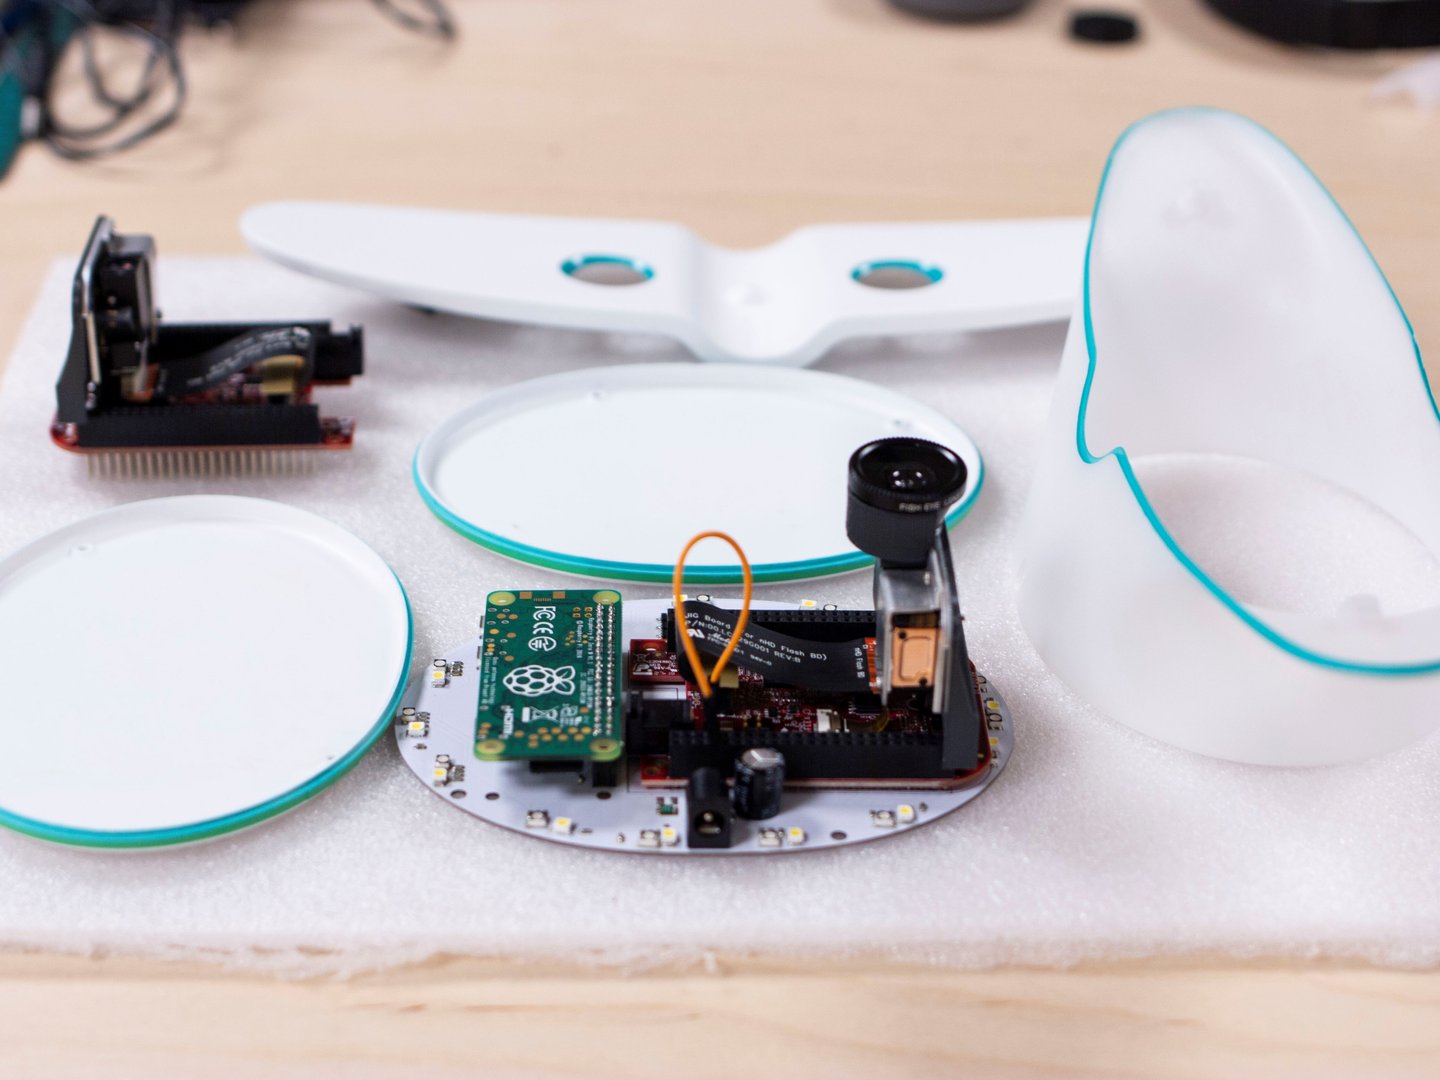
Now for the ask: how would you go about building something like this? And more importantly, how would you make it work for any plane, train, or automobile trip, and not just a WestJet flight? A look at the “How it will work” section of the page shows several photos of the prototype, which suggests the hardware end is dead easy. A Raspberry Pi Zero W features prominently, and the projectors appear to be TI’s DLP2000EVM, which we’ve featured before, mounted to a riser card. The Neopixels, a 3D-printed case, and the superfluous flashlight fuselage would be pretty easy, too.
On the software side, a generic version that tracks flight from any airline would need an interface for the traveler to define a flight, and something to check an API like FlightAware’s, or similar ones for whatever mode of transportation you’re using.
Seems like a pretty straightforward project. WestJet claims they’ll have their Flight Light ready sometime this summer; think we can beat them to it?
When shopping online, there’s plenty of great deals out there on modern graphics hardware. Of course, if you’re like [Dawid] and bought a GTX1050 Ti for $48 from Wish, you probably suspect it’s too good to be true. Of course, you’d be correct.
[Dawid] notes from the outset that the packaging the card ships in is unusual. While it’s covered in NVIDIA and GeForce branding, there’s no note of the model number or even the overarching series. The card is loosely packed in bubblewrap, free to bounce around in transit. Upon installation, the card reports itself as a GTX1050 Ti, but refuses to properly work with NVIDIA drivers and routinely causes a Blue Screen of Death.
Upon disassembly, it becomes apparent that the card is merely a poorly manufactured GTS450 Revision 2, over five generations older than the card it was advertised as. Thanks to the mismatch between the actual hardware and what the card reports as, the drivers are unable to properly work with the card.
For those that have been scammed, there is some hope. [Phil] has had experience with several of these cards, which similarly misreport their actual hardware. To correct this, the cards need to have their BIOS flashed to reflect reality, but the fake cards don’t work with NVIDIA’s NVFlash tool. Instead, they must be flashed manually using an EEPROM programmer. Once the cards are flashed with an appropriate BIOS, they can be used with the proper drivers and will function properly, albeit with much less performance than was advertised.
It’s an interesting insight into the state of online shopping platforms, and the old adage remains true – if it’s too good to be true, it probably is. Plus, hacking GPUs can often have great results. Video after the break.