When you think of unconventional aircraft, flying wings have had plenty of time in the sun over the last few decades. With striking designs like the B-2 Spirit and F-117A Nighthawk on the flight line, it’s no surprise. The lifting body never really caught on, however, and it languishes in ignominy to this day. Despite their obscurity, [rctestflight] decided to 3D print a few lifting bodies for himself and take them out for a field test (YouTube video, embedded below).
Most aircraft have a body designed with low drag, and wings designed to provide lift. Lifting body aircraft focus the body design on providing that lift and often have no real wing to the design, needing only control surfaces to compliment the body. For this project, several different designs were constructed, with the craft being drop-launched from a multirotor at significant altitude. Initial tests were hamstrung by stability problems, both due to center of gravity issues and uncertain aerodynamic phenomena. The early designs were particularly prone to suddenly entering an unrecoverable flat spin. Later modifications included the addition of further stabilizers, which helped performance somewhat.
3D printing is a great way to experiment with aerodynamic phenomena, as it’s easy to create all manner of complicated geometries to tinker with. [rctestflight] has done solid work developing a basic craft, and we’d love to see the work continue with powered tests and more development. If flying wings are more your jam, though, you can 3D print those too. Video after the break.
We’ve always had a love-hate relationship with 3DBenchy, the tugboat-shaped 3D printer calibration target. On one hand, it’s incredibly useful to have a common, widely used, and challenging benchmark object to evaluate printer performance and improve tuning, but we’d somehow like to get back the countless frustrated hours we’ve spent trying to get the damn thing perfect with various printers. So, it was with no little joy that we watched the video below by [Eric R Mockler], in which he uses 3DBenchy prints to benchmark his newest acquisition: a new-in-box garbage disposal he scored off Craigslist. Take that, tugboat!
[Eric] is considering using the disposal as the first step in a failed-print-recycling method to ultimately turn the waste back into filament, presumably to print more tugboats. The tiny bits produced by the disposal should provide a reasonable substitute for pelleted plastic feedstock going into a filament extruder, if the disposal is up to the task, that is. Reasoning that any device capable of grinding chicken bones should handle little plastic tugboats just as well, [Eric] gave it shot, and found that the ⅓-horsepower disposal had no problem grinding even 100%-infill PLA prints.
The video is short and to-the-point, so we’ll even excuse the portrait orientation, just this once. If you’re considering recycling your failed prints, too, you’ll also need a filament extruder, and we’ve got you covered with a low-cost version, or a high-throughput one.
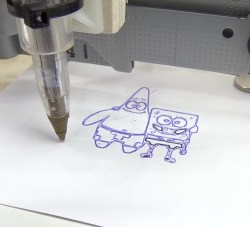
It’s a capable plotter, able to nicely reproduce both graphics and text.
The build gains X and Y axes by virtue of two salvaged DVD drives. The tray mechanisms come ready to go with stepper motors and lead screws already assembled, and make a great basis for a compact plotter. A wooden frame is constructed to hold everything together. The pen is held against the paper with a rubber band which helps the ballpoint to draw a nice dark line, with a servo used as a pen retract mechanism. An Arduino Uno with a stepper driver shield is then employed to run the show.
It’s a tidy build, with neat cable management and smart design choices giving it a pleasing aesthetic. The CNC fundamentals are good, too – with minimal backlash and slop, the plotter is able to draw quite effectively. Old optical drives are a popular choice for plotter builds, as it turns out. Video after the break.
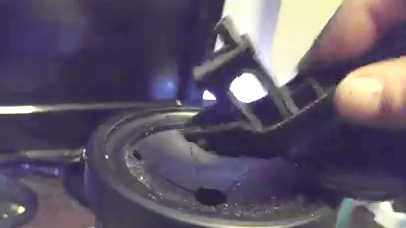
Fixed-wing planes and helicopters are no longer the darling of the RC world. Even quadcopters and other multirotors are starting to look old hat, as the community looks to ever more outrageous designs. [rctestflight] has slimmed things down to the extreme with this coaxial bicopter build, also known as the Flying Stick (Youtube video, embedded below).
The initial design consists of two brushless outrunner motors fitted with props, rotating in opposite directions to cancel out their respective torques. Each is mounted on a gimbal, setup to provide control authority. iNav is used as a flight controller, chosen due to its versatile motor mixing settings. The craft was built to test its ability at recovery from freefall, as a follow-on from earlier attempts at building a brushless “rocket” craft.
Performance is surprisingly good for what is fundamentally two props on a stick. Initial tests didn’t quite manage a successful recovery, but the repaired single-gimbal version almost achieves the feat. Multirotors in general struggle with freefall recovery, so more research in this area is definitely worthwhile. Video after the break.
While it might not be the most traditional design, there’s no debating that Nintendo created something truly special when they unleashed the GameCube controller on an unsuspecting world back in 2001. Hardcore fans are still using the controller to this day with current-generation Nintendo consoles, and there’s considerable interest in adding modern conveniences like USB support to the nearly 20-year-old design.
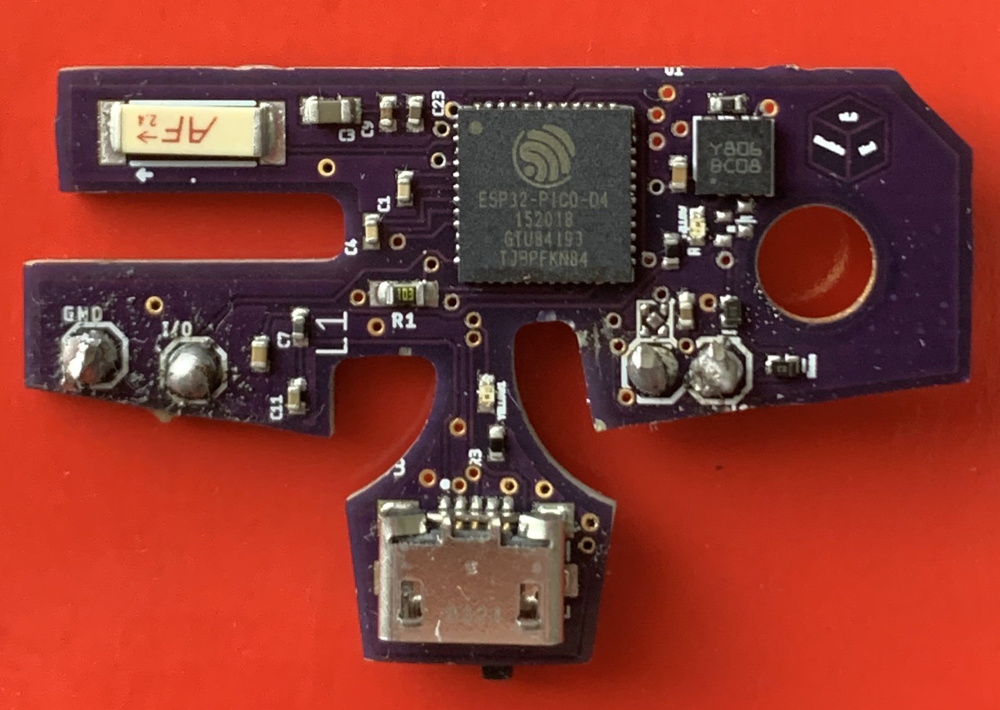
One particularly promising project is the BlueCubeMod created by [Nathan Reeves]. He’s developed a small custom PCB that can be installed into an official GameCube controller to turn it into a Bluetooth device. You do have to sacrifice the original cord and force feedback for this mod, but we think many will see the ability to use this iconic controller with their computer or phone as a pretty fair trade.
The PCB holds an ESP32-PICO-D4 which is operating as a standard Bluetooth HID controller for maximum compatibility with modern systems. Control signals are pulled directly from the controller’s original PCB with just two wires, making the installation very simple. Wondering where the power comes from? As the rumble motor isn’t supported anyway, that gets tossed and in its places goes a 700 mAh battery which powers the controller for up to six hours. Overall it’s a very clean modification that [Nathan] believes even beginners will be capable of, and he ultimately plans to turn this design into a commercial kit.
Currently you still need a receiver if you want to use the BlueCubeMod with the Nintendo Switch, but [Nathan] says he’s working on a way to get around that requirement by potentially switching out the ESP32 for a STM32 with a CC256x radio. He says this will give him more direct control over the Bluetooth communications, which should allow him to take into tackle the intricacies of talking to the Switch directly.
Earlier this month a single person pleaded guilty to taking down some computer labs at a college in New York. This was not done by hacking into them remotely, but by plugging a USB Killer in one machine at a time. This malicious act caused around $58,000 in damage to 66 machines, using a device designed to overload the data pins on the USB ports with high-voltage. Similar damage could have been done with a ball-peen hammer (albeit much less discreetly), and we’re not here to debate the merits of the USB Killer devices. If you destroy property you don’t own you should be held accountable.
But the event did bring an interesting question to mind. How robust are USB ports? The USB Killer — which we’ve covered off and on through the years — is billed as a “surge testing” device and operates by injecting -200 volts DC on the data lines of the USB connection. Many USB ports are not protected against this and the result is permanent damage to the computer hardware. Is protection for these levels of abuse necessary or would it needlessly add cost to our machines?
A chip like the TPD4S014 has ESD protection on the data lines that is rated up to +/- 1500 volts, clamping to ground to dissipate the energy. It’s a solution that should protect against repeated spikes on the data lines, as well as short circuits on the power lines and over/undervoltage situations.
ADUM4160 Functional Diagram
The ADuM4160 is an interesting step up from this. It’s designed to provide isolation between a USB host and the device connected to it. Rather than relying on clamping, this chip implements isolation through air core transformers. Certainly this would be overkill to install in every product, but for those of use building and testing USB devices this would save you from “Oops, wrong USB cable” moments at the work bench.
Speaking of accidents at the bench, there is certainly a demand for USB isolation outside of what’s built into our computers. Earlier this year we saw a fantastic take on a properly-designed USB power strip. Among the goals were current limiting, undervoltage protection, and a proper power disconnect switch for each port. The very need to design your own reminds us that consumer manufacturers are often lazy in their USB design. “Use a USB hub” is bad advice for protection at the workbench since quality of design varies so wildly.
We would be interested in hearing from anyone who has insight on standards applying to equipment continuing to survive over current or over voltage events and remain functional. There are standards like UL-60950 that should apply to USB. But that standard includes language about failing safe for the operator, not necessarily remaining functional:
After abnormal operation or a single fault (see 1.4.14), the equipment shall remain safe for an OPERATOR in the meaning of this standard, but it is not required that the equipment should still be in full working order. It is permitted to use fusible links, THERMAL CUT-OUTS, overcurrent protection devices and the like to provide adequate protection.
So, we’re here to ask you, the readers of Hackaday. Are our USB devices robust enough? Do you have a go-to USB protection chip, part, or other circuit you like to use? Have you ever accidentally killed a USB host device (if so, how)? Do you have special equipment that you depend on when developing projects involving USB? Let us know what you think in the comments below.
Join us Wednesday at noon Pacific time for the AI at the Edge Hack Chat with John Welsh from NVIDIA!
Machine learning was once the business of big iron like IBM’s Watson or the nearly limitless computing power of the cloud. But the power in AI is moving away from data centers to the edge, where IoT devices are doing things once unheard of. Embedded systems capable of running modern AI workloads are now cheap enough for almost any hacker to afford, opening the door to applications and capabilities that were once only science fiction dreams.
John Welsh is a Developer Technology Engineer with NVIDIA, a leading company in the Edge computing space. He’ll be dropping by the Hack Chat to discuss NVIDIA’s Edge offerings, like the Jetson Nano we recently reviewed. Join us as we discuss NVIDIA’s complete Jetson embedded AI product line up, getting started with Edge AI, and where Edge AI is headed.
Click that speech bubble to the right, and you’ll be taken directly to the Hack Chat group on Hackaday.io. You don’t have to wait until Wednesday; join whenever you want and you can see what the community is talking about.