3D Printing With Multiple Soluble Filaments

Complex 3D-printed designs often require the use of an automatically generated support structure around them for stability. While this enables some truly incredible results, it adds considerable time and cost to the printing process. Plus there’s the painstaking process of removing all the support material without damaging the object itself. If you’ve got a suitably high-end 3D printer, one solution to this problem is doing the supports in a water soluble filament; just toss the print into a bath and wait for the support to dissolve away.

But what if you’re trying to print something that’s complex and also needs to be soluble? That’s precisely what [Jacob Blitzer] has been experimenting with recently. The trick is finding two filaments that can be printed at the same time but are dissolved with two different solutions. His experimentation has proved it’s possible to do with consumer-level hardware, but it isn’t easy and it’s definitely not cheap.

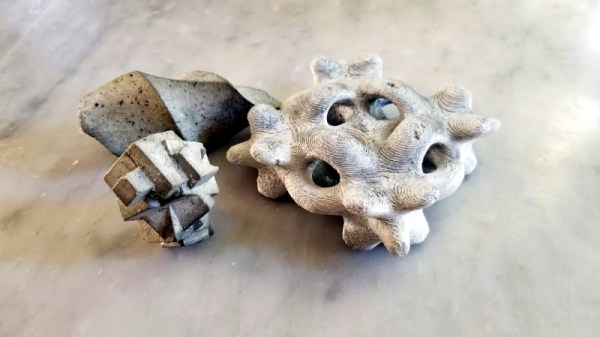
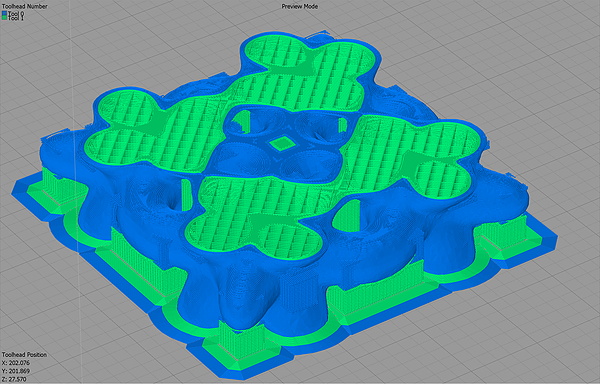
You might be wondering what the possible application for this technique is. For [Jacob], he wanted to be able to print hollow molds in complex geometric shapes that would ultimately be filled with concrete. The molds required extensive internal supports that would have been all but impossible to remove if they weren’t printed in a soluble filament. But he also wanted to be able to dissolve the mold once the concrete inside had cured. So he needed one easy to dissolve filament for the supports, and a harder to dissolve one for the actual mold.

For the mold itself, [Jacob] went with High Impact Polystyrene (HIPS) which can be dissolved with an industrial degreaser called Limonene. It’s expensive, and rather nasty to work with, but it does an excellent job of eating away the HIPS so that’s one problem solved. Finding a water-soluble filament for the supports that could be printed at similar temperatures to the HIPS took months of research, but eventually he found one called HyroFill that fit the bill. Unfortunately, it costs an eye-watering $175 USD per kilogram.

So you have the filaments, but what can actually print them at the same time? Multi-material 3D printing is a tricky topic, and there’s a few different approaches that have been developed over the years. In the end, [Jacob] opted to go with the FORMBOT T-Rex that uses the old-school method of having two individual hotends and extruders. It’s the simplest method conceptually, but calibrating such a machine is notoriously difficult. Running two exotic and temperamental filaments at the same time certainly doesn’t help matters.

After all the time, money, and effort put into the project (he also had to write the software that would create the 3D models in the first place) [Jacob] says he’s not exactly thrilled with the results. He’s produced some undeniably stunning pieces, but the failure rate is very high. Still, it’s fascinating research that appears to be the first of its kind, so we’re glad that he’s shared it for the benefit of the community and look forward to seeing where it goes from here.

Emulate A Paper Tape, To Be Life And Soul Of The Cyphercon Party

The recent Cyphercon badge featured a very clever integrated paper tape reader, and had the hidden feature of a party mode in which all its lights would flash. When [Gigawatts] discovered this after the conference had ended, it was too late to find the tape to activate it. The solution? Build a tape emulator with a microcontroller hooked into the badge’s tape sensors to send the data directly into it.

It was a Tweet from [AND!XOR] that revealed the flashing hidden mode, and in case you missed it you can find all about the amazing badge in our review. The emulator takes a TI Stellaris LaunchPad LM4F120 and a set of jumper wires soldered directly to the jumper wires on the badge’s reverse. Hex values are created from a tape through an in-browser HTML page with a checkbox interface, a sketch converts the hex to tape, and the badge runs the code. The GitHub readme includes a description of the paper tape format as well as some sample tapes including a badge reset one for when you tire of party mode.

Most of us weren’t lucky enough to make it to Cyphercon and receive a badge. But we’re still impressed by the ingenuity of the badge’s designer, and by the complexity of the CTF game of which it formed a part.

Hackaday Links Column Banner

Hackaday Links: April 28, 2019

Lego is releasing a series of Braille bricks. As near as we can tell, these Braille bricks are standard 2 x 4 bricks, with studs corresponding to Braille letters on the top. There are also screen/pad printed legends on top. I don’t mean to be a downer, but why, exactly, is this being created now? Did it really take fifty years for someone to say, ‘hey, if you don’t put some studs on top of a brick, it becomes Braille?’ How is this not already a thing? This isn’t me being facetious — how did it take so long for this to be invented?

KiCon is this weekend, so here’s a tip for everyone in Chicago right now: get a hot dog. Don’t put ketchup on it, or else someone will shoot you.

KiCon and Moogfest in one weekend? Yes, and that means new toys. The Matriarch is Moog’s latest synthy boi and the apparent successor to last year’s Moog Grandmother. The Matriarch is a four-note paraphonic synth that is semi-modular; no, you don’t need patch cables to make noises, but there are ninety-odd patch points for modular fun. It’s two grand, which is getting up there in the synth game. If only Radio Shack were still around and sold Moog synths…

We’re all aware that Russia launches rockets out of Baikonur cosmodrome, and the first stages eventually make their way onto the steppes of Kazakhstan. The locals, few there are, end up recycling these rockets, scrapping them, and sometimes taking space tourists and photojournalist out to the crash site of these boosters. Russia has other spaceports, and now we’re getting pictures of booster crashes from the frozen north. These rockets came from the Plesetsk cosmodrome and fell in the boreal forests near Arkhangelsk where hunters discovered them. Yes, these boosters are carcinogenic, but that’s what you do when a few tons of aluminum and titanium fall in your backyard.

No spoilers, but oh man the after-credits scene in Endgame was hilarious.

A Retro Handheld Console As They Used To Be Made

Before there were Nintendo Switches, there were Game Boys. And before that there were all the successive generations of Game Boys and other consoles right back to the Game and Watch, and then those handheld Simon and Space Invaders games of the late 1970s. These devices typically packed a 4-bit microcontroller and an array of discrete LEDs, and movements in-game were simply created by alternate LEDs on the game field being flashed.

The TeleBall from [sv2002] is a handheld game in the vein of those early handheld games, in that it features a matrix of LEDs as a screen on which it can display simple games. So far it plays Breakout, and Tennis for Two, which might seem odd were it not for its built-in radio for two-person play with two consoles.

Inside the TeleBall is an Arduino Nano, a Maxim display driver for the LED matrix, and the familiar Nordic Semiconductor RF module. Control is via a potentiometer, and everything sits in a smart 3D-printed case. Everything is open-source, so should you wish to have your own you can head over to the project’s web site and grab all the files. You can watch it in action playing tennis with two consoles in the video below the break.

The original Tennis for Two created in 1958 was an oscilloscope game using an analogue computer, and is credited as the first video game created purely for entertainment purposes. If you’d like to see a recreation of it, we covered one over a decade ago.

Continue reading “A Retro Handheld Console As They Used To Be Made”

Cold Plasma Torch Produces A Cleansing Flame That Never Consumes

It’s basically a lightsaber. Except smaller. And with an invisible blade. And cold to the touch. But other than that, this homebrew cold plasma torch (YouTube, embedded below) is just like the Jedi’s choice in elegant weaponry.

Perhaps we shouldn’t kid [Justin] given how hard he worked on this project – seventeen prototypes before hitting on the version seen in the video below – but he himself notes the underwhelming appearance of the torch without the benefit of long-exposure photography. That doesn’t detract from how cool this build is, pun intended. As [Justin] explains, cold plasma or non-equilibrium plasma is an ionized stream of gas where the electron temperature is much hotter than the temperature of the heavier, more thermally conductive species in the stream. It’s pretty common stuff, seen commercially in everything from mercury vapor lamps to microbial sterilization.

It’s the latter use that piqued [Justin]’s interest and resulted in a solid year of prototyping before dialing in a design using a flyback transformer to delivery the high voltage to a stream of argon flowing inside a capillary tube. The quartz tube acts as a dielectric that keeps electrons from escaping and allows argon to be ionized and wafted gently from the tube before it can reach thermal equilibrium. The result is a faint blue glowing flame that’s barely above room temperature but still has all the reactive properties of a plasma. The video shows all the details of construction and shows the torch in action.

Hats off to [Justin] for sticking with a difficult build and coming through it with an interesting and useful device. We’ve no doubt he’ll put it to good use in his DIY biohacking lab in the coming months.

Continue reading “Cold Plasma Torch Produces A Cleansing Flame That Never Consumes”

A Chrome Extension For Configuring RGB LEDs

Like pretty much all of us, [Andy Schwarz] loves RGB LEDs. Specifically he likes to put them on RC vehicles, such as navigation lights on airplanes or flashers and headlights on cars. He found himself often rewriting very similar Arduino code for each one of these installations, and eventually decided he could save himself (and all the other hackers in the world) some time by creating a customizable Arduino firmware specifically for driving RGB LEDs.

The software side of this project, which he’s calling BitsyLED, actually comes in two parts. The first is the firmware itself, which is designed to control common RGB LEDs such as the WS2812 or members of the NeoPixel family. It can run on an Arduino Pro Mini with no problems, but [Andy] has also designed his own open hardware control board based on the ATtiny84 that you can build yourself. Currently you need a USBASP to program it, but he’s working on a second version which will add USB support.

With your controller of choice running the BitsyLED firmware, you need something to configure it. For that, [Andy] has developed a Chrome extension which offers a very slick user interface for setting up colors and patterns. The tool even allows you to create a visual representation of your LEDs so you can get an idea of what it’s going to look like when all the hardware is powered up.

RGB LEDs such as the WS2812 are some of the most common components we see in projects today, mainly because they’re so easy to physically interface with a microcontroller. But even though it only takes a couple of wires to control a large number of LEDs, you still need to write the code for it all. BitsyLED takes a lot of the hassle out of that last part, and we’re very interested to see what the hacker community makes of it.

Continue reading “A Chrome Extension For Configuring RGB LEDs”

FemtoBeacon Is A Tiny ESP32 Coin-Shaped Dev Board

Our single board microcontroller platforms have become smaller over the years, from the relatively large classic Arduino and Beagleboard form factors of a decade ago to the postage stamp sized Feather and ESP boards of today. But just how small can they go? With current components, [Femtoduino] think they’ve cracked it, delivering an ESP32-based board with WiFi and Bluetooth, and an LDO regulator for 5 V operation in a circular footprint that’s only 9 mm in diameter.

There are some compromises from such a paucity of real-estate, of which perhaps the most obvious is a lack of space to make I/O lines available. It has SPI, a UART, and a couple of I/O lines, and aside from an onboard RGB LED that’s it. But SPI is versatile well beyond its number of lines, and even with so little there is much that can be done. Another potential compromise comes from the antenna, a Molex surface-mount component, which is an inevitable consequence of a 9 mm circular board.

There has to come a point at which a microcontroller platform becomes so small as to be unusable, but it’s clear that there is a little further for this envelope to be pushed. We’d love to see what other designers do in response to this board.