800+ LED Wall With Diffuser Panel Is A Work Of Art

LED Wall

What happens when you take over 800 individually addressable super bright RGB LEDs and house them in a giant diffused panel? You get awesome. That’s what you get.

[Epoch Rises] is a small electronic music and interactive technology duo who create cool interactive projects (like this wall) for their live shows and performances. They love their WS2812B LEDs.

The cool thing about this wall is that it can take any video input, it can be controlled by sound or music, an iPad, or even generate random imagery by itself. The 800 LEDs are controlled by a Teensy 3.0 using the OctoWS2811 library from Paul Stoffregen which is capable of driving over 1000 LEDs at a whopping 30FPS using just one Teensy microcontroller. It works by using Direct Memory Access to send data over serial into the Teensy’s memory and directly out to the LEDs with very little overhead — it is a Teensy after all!

Continue reading “800+ LED Wall With Diffuser Panel Is A Work Of Art”

Billiards Concepts Plied To Position Acoustic Panels

If you know your way around a pool table you should be able to apply those skills to improving the sound of your home theater. [Eric Wolfram] put together a post that discusses the issues caused by unwanted sound reflections and shows how to position acoustic tiles to solve the problem.

This is a companion post to his guide on building your own acoustic tiles. Don’t worry if you haven’t gotten around to doing that yet. With just a wood frame, dense fiberglass, and some fabric they’re simple to build. They’re also easy to hang but until now you might have just guessed on where they should go.

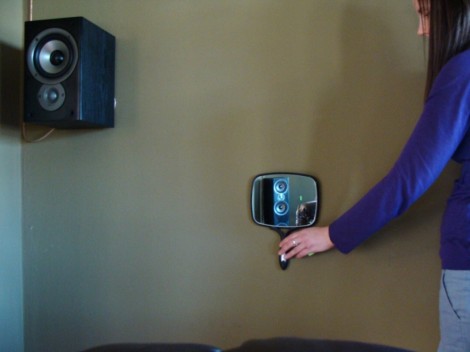
Once you have all of your speakers and seats in position grab a mirror and some post-it notes. Take a seat as the viewer and have a friend operate the mirror as seen above. With it flat against the wall, mark each spot with a sticky-note where you can see a reflection of one of the speakers. Finding the reflection points is just like lining up a bank shot in Billiards. With five speakers (5.1 Surround Sound) and six surfaces (walls, ceiling, and floor) you should be able to mark 30 reflections points. Now decide how wild you plan to go with the project. The best result will address all 30 reflection points, but you can get by with just the front marks if you’re a bit more conservative.

Add-on Panel Brings Automated Vents Flaps To A PC

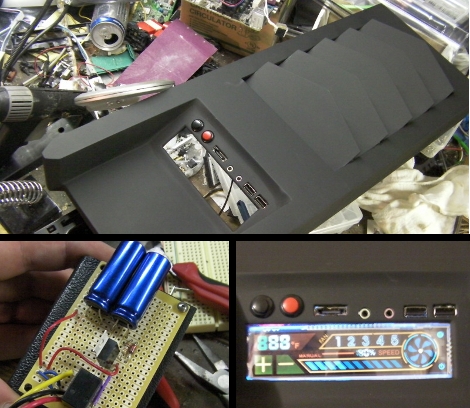
[SXRguyinMA] built a replacement top bezel for his computer case. He wanted to add vents that would automatically open or close based on the cooling needs of the computer. With some careful measurements he modeled the parts in Sketchup and sent out for them to be cut from styrene with a water jet cutter. The parts came back looking great and the assembly of the shutters went swimmingly. The bezel also includes a lighted screen for temperature information, as well as the front USB ports, headphone and mic jacks, etc. Hidden underneath is an Arduino board and servo motor. The Arduino polls the temperature and drives the servo to adjust the fins accordingly. There’s even a supercap in the circuit that will close the vents when the PC powers down or when power is unexpectedly lost. See it in action after the break.

Continue reading “Add-on Panel Brings Automated Vents Flaps To A PC”

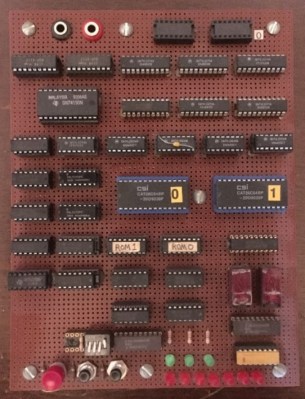
Photo showing the wire-wrapped version and PCB version of MyCPU side-by-side.

This Homebrew CPU Got Its Start In The 1990s

[Sylvain Fortin] recently wrote in to tell us about his Homebrew CPU Project, and the story behind this one is truly remarkable.

He began working on this toy CPU back in 1994, over thirty years ago. After learning about the 74LS181 ALU in college he decided to build his own CPU. He made considerable progress back in the 90s and then shelved the project until the pandemic hit when he picked it back up again and started adding some new features. A little later on, a board house approached him with an offer to cover the production cost if he’d like to redo the wire-wrapped project on a PCB. The resulting KiCad files are in the GitHub repository for anyone who wants to play along at home.

An early prototype on breadboard

The ALU on [Sylvain]’s CPU is a 1-bit ALU which he describes as essentially a selectable gate: OR, XOR, AND, NOT. It requires more clock steps to compute something like an addition, but, he tells us, it’s much more challenging and interesting to manage at the microcode level. On his project page you will find various support software written in C#, such as an op-code assembler and a microcode assembler, among other things.

For debugging [Sylvain] started out with das blinkin LEDs but found them too limiting in short order. He was able to upgrade to a 136 channel Agilent 1670G Benchtop Logic Analyzer which he was fortunate to score for cheap on eBay. You can tell this thing is old from the floppy drive on the front panel but it is rocking 136 channels which is seriously OP.

The PCB version is a great improvement but we were interested in the initial wire-wrapped version too. We asked [Sylvain] for photos of the wire-wrapping and he obliged. There’s just something awesome about a wire-wrapped project, don’t you think? If you’re interested in wire-wrapping check out Wire Wrap 101.

Volume Controller Rejects Skeumorphism, Embraces The Physical

The volume slider on our virtual desktops is a skeuomorphic callback to the volume sliders on professional audio equipment on actual, physical desktops. [Maker Vibe] decided that this skeuomorphism was so last century, and made himself a physical audio control box for his PC.

Since he has three audio outputs he needs to consider, the peripheral he creates could conceivably be called a fader. It certainly has that look, anyway: each output is controlled by a volume slider — connected to a linear potentiometer — and a mute button. Seeing a linear potentiometer used for volume control threw us for a second, until we remembered this was for the computer’s volume control, not an actual volume control circuit. The computer’s volume slider already does the logarithmic conversion. A Seeed Studio Xiao ESP32S3 lives at the heart of this thing, emulating a Bluetooth gamepad using a library by LemmingDev. A trio of LEDs round out the electronics to provide an indicator for which audio channels are muted or active.

Those Bluetooth signals are interpreted by a Python script feeding a software called Voicmeeter Banana, because [Maker Vibe] uses Windows, and Redmond’s finest operating system doesn’t expose audio controls in an easily-accessible way. Voicmeeter Banana (and its attendant Python script) takes care of telling Windows what to do. 

The whole setup lives on [Maker Vibe]’s desk in a handsome 3D printed box. He used a Circuit vinyl cutter to cut out masks so he could airbrush different colours onto the print after sanding down the layer lines. That’s another one for the archive of how to make front panels.

If volume sliders aren’t doing it for you, perhaps you’d prefer to control your audio with a conductor’s baton. 

Continue reading “Volume Controller Rejects Skeumorphism, Embraces The Physical”

The Most Satisfying Way To Commit

Have you ever finished up a bit of code and thought that typing “git push” in a terminal is just not a satisfying finish? So did [penumbriel], so he built a big red button he could smash instead.

This is a very simple hack: an Arduino sits inside a 3D-printed case that holds a big, red button. The case itself is very sturdily made to withstand a good satisfying smack: it has thick walls, brass insets, and rubber feet to protect the de The code for the Arduino is very, very simple: it spoofs a USB HID using the standard keyboard library, and automatically types out “git push” whenever the button is pressed. Or smashed, because you know you’re going to want to slam that thing. So far, so good– very innovative for 2006, right?

The detail that made this project stand out in 2025 was the technique [penumbriel] used for lettering– we’re always looking

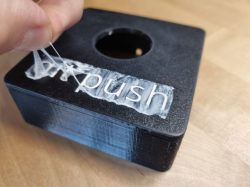
With a simple soap-and-water mask, the cured silicone peels right off, leaving a clean label.

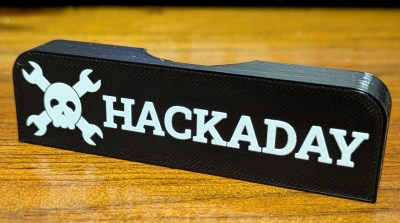
for new ways to make a good front panel. In this case, the letters were printed as a valley and filled with silicone adhesive. To protect the top surface of the print, soapy water was used as a mask. The silicone would not adhere to the wet plastic, so all [penumbriel] had to do was peel it off after it had cured, leaving solid white inside. It’s a neat trick, and a great way to use up an old tube of silicone before it goes hard. You could also use it for injection molding, but this is a great use for the dregs.

This might go well next to the programmer’s macro pad we featured a while back, but it really needs to stay as a big red button for maximum satisfaction.


Hands-On: EufyMake E1 UV Printer

The modern hacker and maker has a truly incredible arsenal of tools at their disposal. High-tech tools like 3D printers, laser cutters, and CNC routers have all become commonplace, and combined with old standbys like the drill press and mini lathe, it sometimes seems like we’ve finally peaked in terms of what the individual is realistically capable of producing in their own home. But occasionally a new tool comes along, and it makes us realize that there are still avenues unexplored for the home gamer.
After spending the last few weeks playing with it, I can confidently say the eufyMake E1 UV printer is one of those tools. The elevator pitch is simple: with a UV printer, you can print anything on anything. As you can imagine, the reality is somewhat more complex, but the fact that you can toss a three dimensional object in the chamber and spray it with a high-resolution color image with a few button presses holds incredible creative potential. Enough that the Kickstarter for the $1,700 printer has already raised a mind-boggling $27 million at the time of this writing, with more than a month yet to go before crossing the finish line.

If you’re on the fence about backing the campaign, or just have doubts about whether or not the machine can do what eufyMake claims, I’ll put those concerns to rest right now — it’s the real deal. Even after using the machine for as long as I have, each time a print job ends, I find myself momentary taken aback by just how good the end result is. The technology inside this machine that not only makes these results possible, but makes them so easily obtainable, is truly revolutionary.

That being said, it’s not a perfect machine by any stretch of the imagination. While I never ran into an outright failure while using the eufyMake E1, there’s a fairly long list of issues which I’d like to see addressed. Some of them are simple tweaks which may well get sorted out before the product starts shipping this summer, while others are fundamental to the way the machine operates and could represent an opportunity for competitors.

Continue reading “Hands-On: EufyMake E1 UV Printer”