Nixie Tube Energy Meter Dresses Up Front Hall

When you move into a new house, there’s always something that needs fixing up. A bit of paint and some new drapes may help freshen up the place and put your mark on it, but things like exposed wiring and a very utilitarian looking electrical panel in your front hall are altogether different. Unwilling to live with the mess, [John Whittington] decided to enclose his utility panel and add a Nixie tube IoT watt meter to dress things up while monitoring energy usage.

IMG_8991-e1451227735242
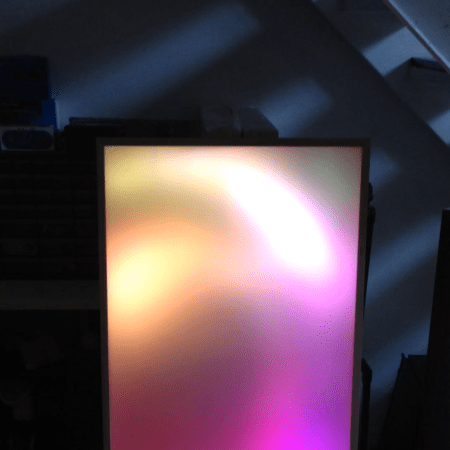
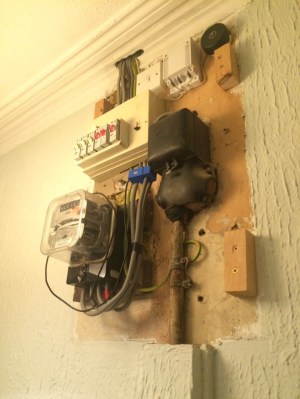
Looking at the “before” pictures on [John]’s blog, we can see why he’d want to invest the effort – not exactly an attractive way to greet guests at the front door. A simple wooden box to replace the previous cover would have sufficed, but why pass up the opportunity to add value? [John] opted for a Nixie tube display to complement the glass of the electric meter. The Nixie modules were a bit on the pricey side, though, so with only a pair of tubes to work with, [John] came up with a clever system to indicate the scale of the display. We doubt he’ll ever see megawatt-level instantaneous power draw, but the meter is also capable of totalling energy use, and as a bonus an ESP-8266 gives lets him stream data to the web.

We’ve featured tons of Nixie projects before – everything from clocks to cufflinks. We have to agree that [John]’s Nixie project turned out great, and it’s sure to be a conversation starter with arriving guests.

Continue reading “Nixie Tube Energy Meter Dresses Up Front Hall”

You Can’t Call It A Battlestation Without This Overhead Control Panel

Modern computers are rubbish. Why, they barely have a switch or a blinky light on them. What’s the point in having a computer if you don’t have the thrill of throwing a switch or eight and watching lights blink in response? [Smashcuts] obviously agrees because he built a control panel filled with heavy-duty switches and blinking wonderfulness to augment his battlestation. This piece of mechanical wonderment has buttons for useful features such as typing several levels of derisive laughter in chat windows, playing odd sound effects and a large red panic button that… well, I won’t spoil the surprise. The whole thing is hand-wired and fronted with laser-cut panels that make it look really authentic. [smashcuts] built it “because it didn’t exist and I felt like it needed to”, which is a perfect justification for this piece of industrial scale awesomeness.

It does have some more practical uses, though: he has set several of the switches to trigger actions in Photoshop and other programs, so this could be easily adapted for those who have the odd belief that things need a practical use to exist. He used USB controllers from Desktop Aviator, and a Mac program called Controller Mate to set up the sequencing for the blinkies. Unfortunately, [smashcuts] didn’t produce a how-to guide for this panel, claiming that “I don’t really have blueprints or schematics. I REALLY didn’t know what I was doing, so all the notes I do have wouldn’t make sense to anyone. It’d be like reading an owners manual to a car written by a caveman”. Either way, it is an impressive build, and you can find more details from the creator on this reddit thread.

Restoring A PDP-10 Console Panel

The PDP-10 was one of the first computers [Jörg] had gotten his hands on, and there are very, very few people that can deny the beauty of a panel full of buttons, LEDs, dials, and analog meters. When one of the front panels for a PDP-10 showed up on eBay, [Jörg] couldn’t resist; a purchase that would lead him towards repairing this classic console and making it functional again with a BeagleBone.

The console [Jörg] picked up is old enough to have voted for more than one Bush administration, and over the years a lot of grime has covered the beautiful acrylic panels. After washing the panel in a bathtub, [Jörg] found the dried panel actually looked worse, like an old, damaged oil painting. This was fixed by carefully scraping off the clear coat over two weeks; an important lesson in preserving these old machines. They’re literally falling apart, even the ones in museums.

With the front panel cleaned, [Jörg] turned his attention to the guts of this panel. The panel was wired up for LEDs, and each of the tiny flashlight bulbs in the pushbuttons were replaced. The panel was then connected to a BlinkenBone with a ton of wiring, and the SIMH simulator installed. That turns this console into a complete, working PDP-10, without sucking down kilowatts of power and heating up the room

This isn’t the first time we’ve seen [Jörg] with a BeagleBone and some old DEC equipment; earlier he connected the front panel of a PDP-11 variant to one of these adapters running the same software.

What’s Next On The Raspberry Pi Front

Raspberry Pi founder [Eben Upton] recently sat in an uncomfortable chair in London to discuss all things Pi. Having sold about four million units over the last 2.5 years, he feels the future is bright for his original vision of inspiring and helping kids to learn programming.

[Eben] is quite pleased with the Pi-Top, a B+ based laptop kit that’s pulling in backers left and right while completely unaffiliated with the Pi foundation. The kit includes a 13.3″ HD LCD screen, keyboard, trackpad, and an injection molded case, though you can print your own with the included STL files. Kits start at $249 without a Pi and $285 with a B+ included. Robot and home automation HATs are also available separately or bundled with the Pi-Top kit.

The most exciting news is that the $600,000 spent on DSI connectors for those four million Raspis is about to pay off. [Eben] hopes that an official touchscreen will be available for purchase before the end of 2014 or in early 2015. He showed off a 7″ capacitive touch panel that will attach to a display board stacked on a Pi, effectively turning it into a tablet.

[Eben] said that they will not be making a Model C and instead are working on revision A+. He hopes to make an official announcement in the near future.

Finally, [Eben] discussed the importance of community, which played a large part in the birth and evolution of the Pi. He also spoke of Pi Academy, a sort of professional workshop for teachers in the UK who’ve recently been tasked with teaching computer science as demanded by changes in the mandatory UK school curriculum. He hopes that these 2-day seminars will help educators achieve the high expectations recently laid out for students to achieve by age ten.

800+ LED Wall With Diffuser Panel Is A Work Of Art

LED Wall

What happens when you take over 800 individually addressable super bright RGB LEDs and house them in a giant diffused panel? You get awesome. That’s what you get.

[Epoch Rises] is a small electronic music and interactive technology duo who create cool interactive projects (like this wall) for their live shows and performances. They love their WS2812B LEDs.

The cool thing about this wall is that it can take any video input, it can be controlled by sound or music, an iPad, or even generate random imagery by itself. The 800 LEDs are controlled by a Teensy 3.0 using the OctoWS2811 library from Paul Stoffregen which is capable of driving over 1000 LEDs at a whopping 30FPS using just one Teensy microcontroller. It works by using Direct Memory Access to send data over serial into the Teensy’s memory and directly out to the LEDs with very little overhead — it is a Teensy after all!

Continue reading “800+ LED Wall With Diffuser Panel Is A Work Of Art”

Billiards Concepts Plied To Position Acoustic Panels

If you know your way around a pool table you should be able to apply those skills to improving the sound of your home theater. [Eric Wolfram] put together a post that discusses the issues caused by unwanted sound reflections and shows how to position acoustic tiles to solve the problem.

This is a companion post to his guide on building your own acoustic tiles. Don’t worry if you haven’t gotten around to doing that yet. With just a wood frame, dense fiberglass, and some fabric they’re simple to build. They’re also easy to hang but until now you might have just guessed on where they should go.

Once you have all of your speakers and seats in position grab a mirror and some post-it notes. Take a seat as the viewer and have a friend operate the mirror as seen above. With it flat against the wall, mark each spot with a sticky-note where you can see a reflection of one of the speakers. Finding the reflection points is just like lining up a bank shot in Billiards. With five speakers (5.1 Surround Sound) and six surfaces (walls, ceiling, and floor) you should be able to mark 30 reflections points. Now decide how wild you plan to go with the project. The best result will address all 30 reflection points, but you can get by with just the front marks if you’re a bit more conservative.

Add-on Panel Brings Automated Vents Flaps To A PC

[SXRguyinMA] built a replacement top bezel for his computer case. He wanted to add vents that would automatically open or close based on the cooling needs of the computer. With some careful measurements he modeled the parts in Sketchup and sent out for them to be cut from styrene with a water jet cutter. The parts came back looking great and the assembly of the shutters went swimmingly. The bezel also includes a lighted screen for temperature information, as well as the front USB ports, headphone and mic jacks, etc. Hidden underneath is an Arduino board and servo motor. The Arduino polls the temperature and drives the servo to adjust the fins accordingly. There’s even a supercap in the circuit that will close the vents when the PC powers down or when power is unexpectedly lost. See it in action after the break.

Continue reading “Add-on Panel Brings Automated Vents Flaps To A PC”