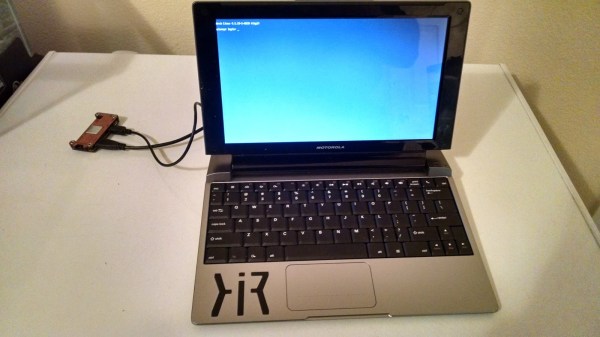
Do you remember the Motorola Lapdock 100? It was a CPU-less laptop designed for plugging in your smartphone that enabled you to use your phone as a computer! Perhaps a bit ahead of its time, they never really caught on — but now you can buy them pretty cheap, and with the release of the Raspberry Pi Zero, it was only a matter of time before someone combined the two.
The Lapdock 100 has long been a useful accessory for the Raspberry Pi, but until the Zero came out, it was always a messy bundle of wires running to and from the devices, making it a less than ideal solution. The Zero changes everything. [Ax0n] knew he had to try combining the two.
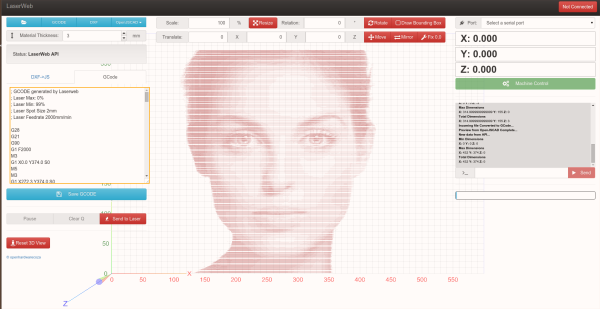
Laser cutters are fantastic pieces of equipment, and thanks to open-source improvements in recent years, are getting even cheaper to make. It can be as simple as throwing a high-powered laser diode onto the head of your 3D printer! With so many home-brew designs out there, wouldn’t it be nice if there was some all-encompassing open-source, laser-cutter controller software? Well, as it turns out — there is, and it’s called LaserWeb.
What started as a simple personal project by [Peter van der Walt] has recently grown into a very formidable piece of software with over 10 contributors in just three months. It even supports four different firmwares, from grbl, to smoothieware, marlin and even lasaurgrbl!
It’s designed to support home-made laser cutters, diode based laser engravers, and even converted Chinese laser cutters. With built-in CAM for PolyLine DXF, and SVG, it can even create rasters from images. Stick around after the break to see a quick video demo — we’re going to have to try this out!
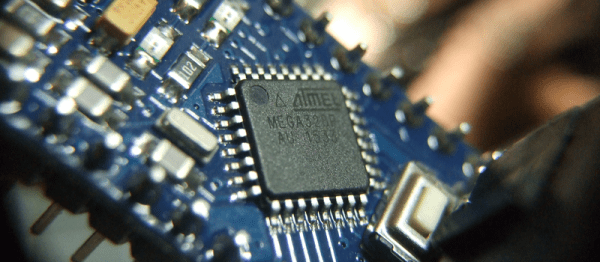
We never have enough peripherals on a microcontroller. Whether it’s hardware-driven PWM channels, ADCs, or serial communication peripherals, we always end up wanting just one more of these but don’t really need so many of those. Atmel’s new version of the popular ATmega328 series, the ATmega328PB, seems to have heard our pleas.
We don’t have a chip in hand, but the datasheet tantalizes. Here’s a quick rundown of the new features:
Two more 16-bit timer/counters. This is a big deal when you’re writing code that’s not backed up by an operating system and relies on the hardware for jitter-free timing.
Two of each USART, SPI, and I2C serial instead of one of each. Good when you use I2C devices that have limited address spaces, or when you need to push the bits out really fast over SPI.
Ten PWM channels instead of six. This (along with the extra 16-bit timers) is good news for anyone who uses PWM — from driving servos to making music.
Onboard capacitive sensing hardware: Peripheral Touch Controller. This is entirely new to the ATmega328PB chip, and looks like it’ll be interesting for running capacitive sense buttons without additional ICs. It relies on Atmel’s QTouch software library, though, so it looks like it’s not a free-standing peripheral as much as an internal multiplexer with maybe some hardware-level filtering. We’ll have to look into this in detail when we get our hands on one of the chips.
So what does this mean for you? A quick search of the usual suspects shows the chips in stock and shipping right now, and there’s an inexpensive dev kit available as well. If you write your own code in C, taking advantage of the new features should be a snap. Arduino folks will have to wait until the chips (and code support) work their way into the ecosystem.
Sometimes words just have to be spelled for others. I’ve been on phone conversations where the person on the other end is spelling for me and it’s painful. “Was that a ‘b’ or a ‘p’?” Sometimes they’ll try on the fly to use words with the beginning letter trying to convey the letter: “B as in boy”. Then they’ll get stumped mumbling while they think desperately for ‘k’ words… ‘ketchup’. Okay, but is that really ketchup or catsup? Now think how much easier spelling is on a phone than over a poor quality radio channel. What we say, and how we say it is the key to our brain’s ability to error correct human speech. It’s a solved problem that was built into radio etiquette long ago.
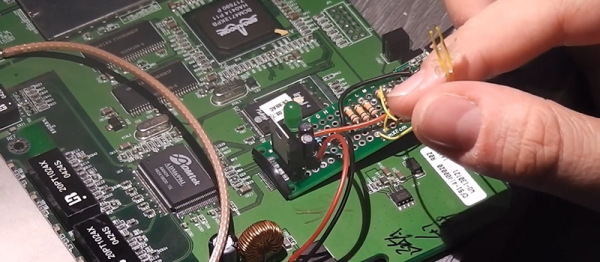
The hack itself is simple. [daffy] locates unused USB data lines, adds in a 5V voltage regulator to supply USB bus power, and then connects it all to a USB sound card. Hardware side, done! And while he doesn’t cover the software side of things in this first video, we know where he’s headed.
The WRT54G router was the first commodity Linux-based router to be extensively hacked, and have open-source firmware written for it. If you’re using OpenWRT or dd-wrt on any of your devices, you owe a debt to the early rootability of the WRT54G. Anyway, it’s a good bet that [daffy] is going to find software support for his USB sound card, but we remain in suspense to see just exactly how the details pan out.
Our favorite WRT54G hack is still an oldie: turning a WRT54G into the brains for a robot. But that was eight years ago now, so surely there’s something newer and shinier. What’s the coolest device that you’ve seen a WRT router hacked into?
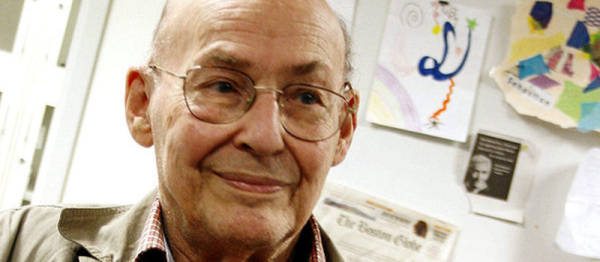
Marvin Minsky, one of the early pioneers of neural networks, died on Sunday at the age of 88.
The obituary in the Washington Post paints a fantastic picture of his life. Minsky was friends with Richard Feynman, Isaac Asimov, Arthur C. Clarke, and Stanley Kubrick. He studied under Claude Shannon, worked with Alan Turing, had frequent conversations with John Von Neumann, and had lunch with Albert Einstein.
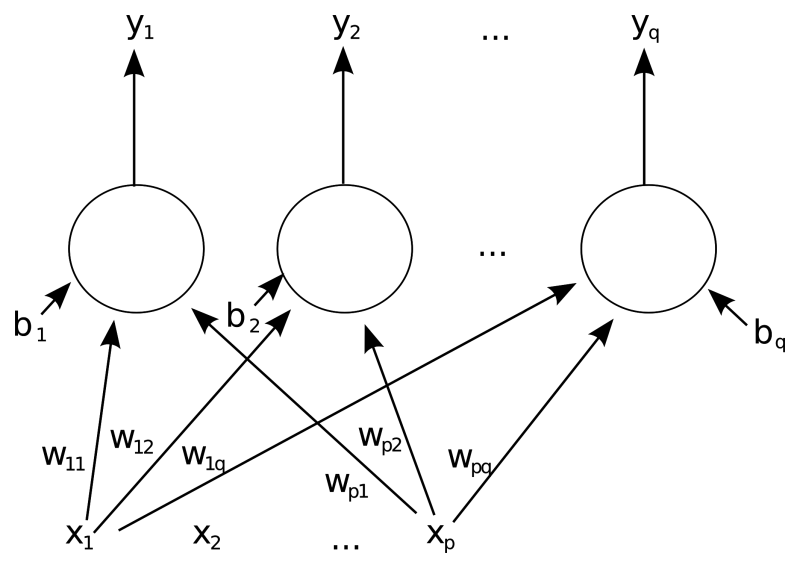
“Single layer ann” by Mcstrother
Minsky’s big ideas were really big. He built one of the first artificial neural networks, but was aiming higher — toward machines that could actually think rather than simply classify data. This was one of the driving forces behind his book, Perceptrons, that showed some of the limitations in the type of neural networks (single-layer, feedforward) that were being used at the time. He wanted something more.
Minsky’s book The Society of Mind is interesting because it reframes the problem of human thought from being a single top-down process to being a collaboration between many different brain regions, the nervous system, and indeed the body as a whole. This “connectionist” theme would become influential both in cognitive science and in robotics.
In short, Minksy was convinced that complex problems often had necessarily complex solutions. In research projects, he was in for the long-term, and encouraged a bottom-up design procedure where many smaller elements combined into a complicated whole. “The secret of what something means lies in how it connects to other things we know. That’s why it’s almost always wrong to seek the “real meaning” of anything. A thing with just one meaning has scarcely any meaning at all.”
Minsky was a very deep thinker, but he kept grounded by also being a playful inventor. Minsky is credited with inventing the “ultimate machine” which would pop up in modern geek culture and shared numerous times on Hackaday as the “most useless machine”. He inspired Claude Shannon to build one. Arthur C. Clarke said, “There is something unspeakably sinister about a machine that does nothing — absolutely nothing — except switch itself off.”
He also co-designed the Triadex Muse, which was an early synthesizer and sequencer and “automatic composer” that creates fairly complex and original patterns with minimal input. It’s an obvious offshoot of his explorations in artificial intelligence, and on our bucket list of must-play-with electronic instruments.
Minsky’s web site at MIT has a number of his essays, and the full text of “The Society of Mind”, all available for your reading pleasure. It’s worth a bit of your time, not just in memoriam of a great thinker and a wacky inventor, but also because we bet you’ll see the world a little bit differently afterwards. That’s a legacy that lasts.
It’s difficult to say if [Aaron Barr], then CEO of software security company HBGary Federal, was in his right mind when he targeted the notorious hacking group known as Anonymous. He was trying to correlate Facebook and IRC activity to reveal the identities of the group’s key figures. In the shadowy world of black-hat hacking, getting your true identity revealed is known as getting doxed, and is something every hacker fears. Going after such a well-known group would be sure to get his struggling company some needed publicity. It would also have the most unfortunate side effect of getting the hacking groups attention as well.
Aaron Barr
Perhaps [Aaron Barr] expected Anonymous to come after him…maybe he even welcomed the confrontation. After all, he was an ‘expert’ in software security. He ran his own security company. His CTO [Greg Hoglund] wrote a book about rootkits and maintained the website rootkits.com that boasted over 80 thousand registered users. Surely he could manage a few annoying attacks from a couple of teenage script kiddies playing on their parent’s computer. It would have been impossible for him to know how wrong he was.
It took the handful of hackers less that 24 hours to take complete control over the HBGary Federal website and databases. They also seized [Barr’s] Facebook, Twitter, Yahoo and even his World of Warcraft account. They replaced the HBGary Federal homepage with this declaration – with a link to a torrent file containing some 50,000 emails resting ominously at the bottom. At the same time, they were able to use social engineering techniques to SSH into the rootkit.com site and delete its entire contents.
It became clear that these handful of Anonymous hackers were good. Very good. This article will focus on the core of the HBGary hackers that would go on to form the elite LulzSec group. Future articles in this new and exciting Dark Arts series will focus on some of the various hacking techniques they used. Techniques including SQL injection, cross-site scripting, remote file inclusion and many others. We will keep our focus on how these techniques work and how they can be thwarted with better security practices.
[Jake Davis] – aka [Topiary] – might have been the least technically skilled of the group, but he made up for it in his ability with words. He was by far the most articulate of the group and commanded the official LulzSec Twitter feed, where he taunted the group’s victims and appeased their ever-growing fan base. [Topiary] goes back to the days of Anonymous and its origin on the popular image board 4chan. Being articulate and quick-witted, he was exceptionally good at doing prank calls while streaming them live to eager fans. His talent did not go unrecognized and the role of “mouthpiece” for Anonymous was his for the taking. Whenever a home page was defaced and replaced with an official Anonymous message, he was the author. The hacked HBGary homepage linked above was [Topiary’s] work.
Lest we leave you with the impression that [Topiary] was not a hacker, he learned a great deal of technical skills during his involvement with Anonymous and later Lulzsec. When he was arrested at his home on the Shetland Islands, he had 17 virtual machines running on an encrypted drive. His last tweet before his arrest – “You cannot arrest an idea”.
[Mustafa Al-Bassam] – aka [Tflow] – was a bit socially awkward, but you would have never known it based on his demeanor in the secluded chat rooms of the Lulzsec hackers. Cool, calm and collected, [Tflow] never got involved with the many arguments that took place. The ability to check his emotions combined with advanced coding skills led his fellow hackers to believe he was much older than he really was. [Pwnsauce], another Lulzsec member whom we will not cover due to lack of information, believed he was at least 30 years old.
It was [Tflow] who first shed light on [Aaron Barr’s] plans to dox the Anonymous “leaders”. It was [Tflow] who wrote an advanced piece of code that allowed the citizens of Tunisia to get past their government’s ISP restrictions during the Arab Spring and post on social media. Let that sink in for a minute…a 16-year-old teenager had empowered an entire nation of people with a PHP script. [The Jester], a hacker who commanded a massive bot-net, once tried to hoodwink [Tflow] and his fellow hackers with a malicious script. [Tflow] took the script, reduced it from a few dozen lines to only two lines without limiting functionality, and sent it back to [The Jester] with the following note: Try this instead.
[Ryan Ackroyd] was big into computer video games as a teen. He liked hacking them and hung out online with other like-minded people. A girl by the name of [Kayla] joined their circle of friends and [Ryan] enjoyed her company. A rival video game hacking group tried to hack [Ryan’s] group, and targeted the weakest link – 16-year-old [Kayla]. They destroyed her social networks and even got into her parent’s bank account. [Ryan] and his friends were furious. They all went after their rival, using the alias [Kayla] in her honor. Their retribution was so devastating that “Kayla” earned a reputation across this particular corner of the internet as someone not to cross. Over the years, the group fell apart, but [Ryan] remained and kept the alias of a 16 year old girl named [Kayla] who shouldn’t be messed with.
It was [Kayla] who socially engineered her way into rootkit.com. It was [Kayla] who discovered the SQL injection insecurity on the HBGary Federal website. She later wrote a program that scanned URLs many times per second looking for zero days. She’s a self-taught reverse engineer and was arguably the most skilled hacker on the Lulzsec team. She even had a trip wire in her apartment that wiped all hard drives when the police entered, and was branded by the courts as “highly forensically aware”. That’s legalese for “This guy knows his stuff”. She has some wise words in this reddit thread.
[Hector Monsegur] – aka [Sabu] – was the oldest and most mature of the Lulzsec hackers. He was the recognized leader of the group. He drove daily operations and squashed arguments. He was also a very skilled hacker himself, coming from a background of hacking government websites in his native Puerto Rico. [Sabu] was a hactivist, and believed in hacking for a social cause, while many of his team were still beholden to their 4chan/b/ days of hacking “for the lulz”. [Sabu] was not only a hacker of computers, he was a hacker of people, and highly skilled in the art of social engineering. Using his skills, he was able to steer LulzSec in the direction he wanted it to go.
[Sabu] was the first of the LulzSec hackers to get doxxed. When he was confronted by the FBI with a 100+ year prison sentence, he could not bear the idea of his kids growing up without him and turned informant. He has only recently returned to twitter, much to the annoyance of Anonymous.
Now What?
You have met the core of the LulzSec hackers. There are two more that we did not talk about due to lack of information: [Pwnsauce] and [AVUnit]. As of today, no one knows the true identity of [AVUnit]. It’s possible there are even more that we don’t know about. However, it is generally recognized that the hackers covered here were the core members.
Now that we know a little bit about the people behind some of the most remarkable hacks of modern times, we will go into detail about how they were able to carry these hacks out. If you’re looking for a “How to Hack a Website 101” tutorial, this series of articles will disappoint you. But if you want to know how these former hackers were able to do what they did, you will find this series quite enjoyable. We’re not just going to talk about the various techniques used, we’re going to understand how they work on a fundamental level. So stay tuned and keep your virtual machines on standby.
Sources
We Are Anonymous: Inside the Hacker World of LulzSec, Anonymous, and the Global Cyber Insurgency, by Parmy Olsen. ISBN-978-0316213523


 Name: Jake Davis

 Name: Hector Monsegur


