3D Printering: Where Can I Get The Cheapest Filament?

printering

We’ve complained about the price of 3D printing filament, and cheered at the machine that makes filament out of plastic pellets. Still, the price of filament for our 3D printers is climbing ever higher, leaving us to wonder, where can I get the cheapest filament?

Now, I’m going to start this of by saying this is a work in progress. Canvassing suppliers on every continent for 1.75 and 3mm ABS and PLA for every possible color while accounting for different amounts of filament and shipping is a whole lot of work. Therefore, we’re going to do this in parts, first starting with how much it will cost me to get a kilogram of PLA shipped to my door. This should be a valid test for just about everyone in the USA.

The test criteria is simple: find a supplier of PLA on the Reprap wiki printing material suppliers page and figure out how much it would cost me to get 1 kg of white or natural PLA shipped to my front door. I’ve organized this in a spreadsheet (below) that contains the supplier, size (1.75 mm or 3mm), weight (usually 1 kg although some suppliers are about three ounces short), color, and price with shipping included.

Continue reading “3D Printering: Where Can I Get The Cheapest Filament?”

Cyclone PCB Factory: 3d Printable Circuit Board Mill

printable-cyclone-pcb-factory

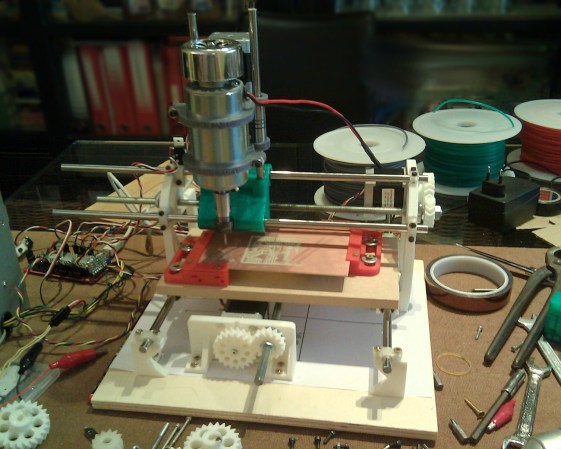
If you can 3D print most of the parts for another 3D printer, why not also for a PCB mill? That’s the question answered by the Cyclone PCB Factory. It will help you kiss those toner transfer or photo resist days goodbye.

Homemade circuit boards tend to be rather small, which really helps keep the cost and scope of this project down. Most of the mounting parts, as well as the gears, are 3D printed. Of course there’s the usual machine tool items which you pretty much have to purchase: the ball screws, precision rod, stepper motors, and a motor to spin the routing tool.

Check out the video below to see where the project is right now. One of the crucial aspects of PCB milling is to have a level build table. The cutter head tends to be ‘V’ shaped so cutting just a bit too deep can blow out the traces you’re trying to isolate. The demo shows that this can automatically calibrate the software to account for any variances in the height of the copper clad.

We remember seeing a snap-together PCB mill. But we’re pretty sure that that one used parts milled from HDPE rather than 3D printed components.

Continue reading “Cyclone PCB Factory: 3d Printable Circuit Board Mill”

We’ve Found The Awesome Singularity

tardis

Yes, that’s exactly what you think it is. A Transformer. That transforms into the TARDIS.

This masterpiece of pop culture is the work of [Nonnef] over on Instructables. After the inspiration to create this work of art struck, [Nonnef] started modeling this Transformer and TARDIS in clay to make everything fit together just right. After a good bit of 3D modelling, the Doctor’s robotic wife was ready for printing.

If you’re going to print one of these for yourself, be prepared for a very long print. [Nonnef] says the latest version took about 30 hours on his RepRap with a .35 mm nozzle. In the end nearly the entire Transformer came directly from a 3D printer, the only additional parts needed being a pen spring and a small screw. Paint is, of course, optional.

All the files are available on the Instructable.

An Interview With [David] Of Ultimaker

cura

After interviewing the creator of Slic3r and the folks at Shapeways, [Andrew] is back again with his adventures in 3D printer videography and an interview with [David Braam] of Ultimaker

About a year ago, [David] looked at the state of the art in 3D printer control and Replicator G. While Replicator G, along with Pronterface and Repetier-Host both convert 3D models into G-code files as well as control the printer while its squeezing plastic out onto a bed. [David] thought the current state of these RepRap host programs were janky at best, and certainly not the best user experience for any home fabricator. This lead him to create Cura, a very slick and vastly improved piece of host software for the Ultimaker.

Cura isn’t just a fancy front end on an already existing slicer engine; [David] created his own slicing algorithm to turn .STL files into G-code that’s immensely faster than skeinforge. Where skeinforge could take an hour to slice a complex model, Cura does the same job in minutes.

There are also a bunch of cool features available in Cura: you can rotate any part before sending it to the printer, as well as pulling voxels directly from your Minecraft world and sending them to your printer. Very, very cool stuff, and if you’re running a Ultimaker or any other RepRap, you might want to check it out.

Continue reading “An Interview With [David] Of Ultimaker”

Using Electrical Conduit For A 3D Printer Frame

electrical-conduit-for-cnc-frame

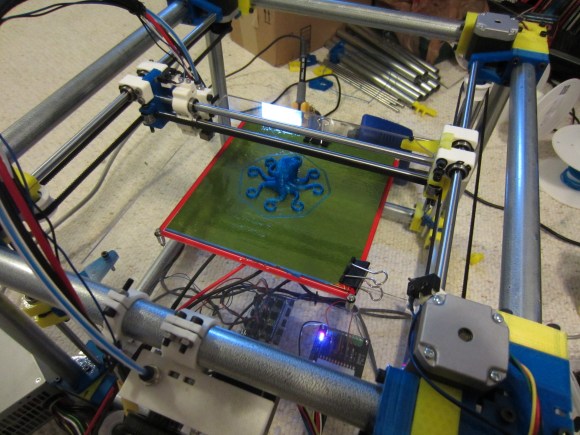
We’re always on the lookout for parts that can be source locally and that don’t cost a bundle. This hack fits both of those criteria. [Lee Miller] came up with a way to use steel electrical conduit as a 3D printer frame. He recently finished building the device seen above, and has been showing it off at Solid State Depot, a Hackerspace in Boulder, Colorado where he is a member.

Look closely at the corners of the frame in this image and you’ll see the 3D printed parts that make up the clamping mechanism. Each has three components that screw together. The two gaps in between each have a rubber ‘O’ ring. When the plastic clamps are screwed together they squeeze the rings which hold the electrical conduit firmly. This also has the side benefit of dampening vibrations.

It’s certainly easy to find this type of conduit which is sold at every home store (and most hardware stores). Just make sure that you check that a piece is straight when you pick it out. The SCAD files for the parts are available from his Github repo.

Continue reading “Using Electrical Conduit For A 3D Printer Frame”

An Interview With Shapeways

shape

It seems [Andrew] is an up and coming historian for the world of 3D printing. We’ve seen him interview the creator of Slic3r, but this time around he’s headed over to Eindhoven, Netherlands to interview the community manager for Shapeways, [Bart Veldhuizen].

Unlike the RepRaps, Ultimkers, and Makerbots, Shapeways is an entirely different ecosystem of 3D printing. Instead of building a machine that requires many hours of tinkering, you can just upload a model and have a physical representation delivered to your door in a week. You can also upload objects for others to buy. Despite these competing philosophies, [Bart] doesn’t see Shapeways as encroaching on the homebrew 3D printers out there; they serve different markets, and competition is always good.

Unfortunately, [Andrew] wasn’t allowed to film on the Shapeways factory floor. Proprietary stuff and whatnot, as well as a few certain ‘key words’ that will speed your customer support request up to the top of the queue.

As for how Shapeways actually produces hundreds of objects a day, [Andrew] learned that individual orders are made in batches, with several customer’s parts made in a single run. While most of the parts made by Shapeways are manufactured in-house, they do outsource silver casting after making the preliminary positive mold.

As for the future, a lot of customers are asking about mixed media, with plastic/nylon combined with metal being at the top of the list. It’s difficult to say what the future of 3D printing will be, but [Bart] makes an allusion to cell phones from 10 years ago. In 2003, nobody had smartphones, and now we have an always-on wireless Internet connection in our pockets. Given the same rate of technological progress, we can’t wait to see what 3D printing will be like in 10 years, either.