Hackaday editors Mike Szczys and Elliot Williams discuss the greatest hacks of the week that was. Antennas aren’t rocket science, so this week we really enjoyed a video that demystifies antenna designs and a project that tunes up the antennas on cheap wireless modules in the simplest of ways. Google’s in the news this week with the end to project Loon, and a dust-up with the volunteer package maintainers who have spent years making sure Chromium browser is in the Linux repos. Elliot is gaga for magic eye tubes and crazy musical instruments, while Mike is over the moon for a chain-based clock display. We close up the episode talking about the Concorde, and the math behind cable mechanisms.
Take a look at the links below if you want to follow along, and as always, tell us what you think about this episode in the comments!
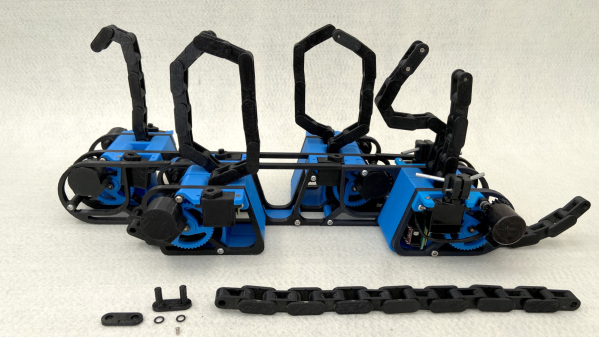
When it comes to building quirky clocks that also double up as beautiful animated sculptures, [Ekaggrat Singh Kalsi] is a master par excellence. His latest offering is the Getula, a time piece inspired by an old, discarded bicycle chain, while the name seems inspired by the chain kingsnake — Lampropeltis getula – due to its snake like movements. Getula shows time by manipulating eight short pieces of chain to show four digits representing hours and minutes. But wrangling a flexible piece of chain to morph in to numerals turned out to be a far more complex endeavour than he bargained for, and he had to settle for a few compromises along the way.
He could not use real bicycle chains because they are too flexible and heavy, which made it impossible for them to hold the shapes he desired. Instead, he designed custom 3D printed chains similar to drag link chains used for cable management. For rigidity, he added O-rings in the chain joints to increase friction. But even this was not sufficient to completely form each digit using a single piece of chain.
The compromise was to use two pieces of chain per digit, which results in a more artistic expression of time keeping. Each piece of chain is pushed or pulled using stepper motors, and bent in to shape using servos. The end result is a mesmerising dance of chain links, steppers and servos every minute, around the clock.
Designing the clock was no trivial exercise, so [Ekaggrat] improved it over a couple of iterations. There are four modular blocks working in synchronism — each consisting of an Arduino Nano, two stepper motor drives with motors and two servos. Each chain has an embedded magnet at its start, which is sensed by a hall sensor to initialise the chain to a known position. A DS1307 RTC module provides timekeeping. The project is still work in progress, and [Ekaggrat] has managed to finish off just one module out of four — giving us a tantalizing glimpse of Getula welcoming 2021.
With the aim of reducing virus transmission due to gatherings during the pandemic, the Dutch government have banned fireworks. The people of the Netherlands like their noisy things so we’re told that the ban has been widely flouted, but [Build Comics] are a law-abiding group of workshop tool heroes. For their lockdown noise, they created an entirely-legal pulsejet. The interesting part is that it was made entirely using fairly basic tools on a minimalist budget, with TIG and MIG eschewed in favour of a mundane stick welder.
The form of the pulse jet will probably be familiar as it has been taken from other published designs. A long tube is bent back upon itself with a combustion chamber placed in one of its arms such that the jet forms a resonant chamber that produces continuous pulses of exhaust gas. This one is made from stainless steel tube, and the exhaustive documentation should be worth a look for anyone tempted to make their own. Welding thin sheet with a stick welder requires quite a bit of skill, and in a few places they manage to burn a hole or two. One requires a patch, but the time-honoured technique of running a bead around the edge manages to successfully close another.
Their first attempt to fire it up using a leaf blower with a 3D-printed adapter fails, but following the construction of a more resilient part and a more efficient gas injector the engine starts. It’s then taken out on a farm for some serious noise without too many angry neighbours, as you can see in the video below the break.
The hero tools of Build Comics have appeared here before, most recently with an analogue meter clock.
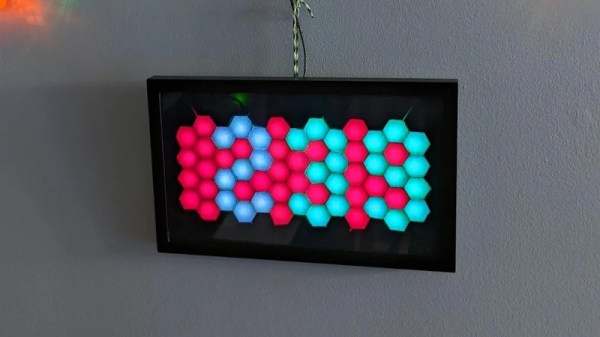
LED matrixes were once a total headache, requiring careful consideration to make the most of limited I/O pins and available microcontroller resources. These days, addressable LED strings have made it all a cinch. Thus, going a little out of the box isn’t so daunting. [w.r.simpson] did just that with this hex-matrix clock.
Relying on hexes instead of a normal Cartesian grid requires some attention to how the rows and columns are laid out, but the Instructable goes through the necessary coordinate system to address the display. The whole display was built without a 3D printer, instead relying on some basic craft skills and a picture frame as the enclosure. Strips of WS2812B LEDs were used to build the hexagonal matrix, run by a Adafruit Metro Mini 328. To give each hexagonal pixel, or hexel, a crisp outline, a shadow grid was built using black paper to stop the light bleeding between the display segments when switched on. Smoked plexiglas wasn’t available, so instead, tinted window film was used to darken the front of the display.
The result is impressive; while some glue marks from the shadow grid are visible closeup, from a distance the final product looks incredibly futuristic thanks to the hexagonal layout. We can imagine this would make a great set dressing in a futuristic film clip; we fully expect to see this concept in the background of the next Ariana Grande single. If this build isn’t enough six-sided fun to sate your appetite, consider getting into Super Hexagon too!
When [Kenneth Keiter] took apart his Starlink dish back in November, he did his best to explain the high-level functionality of the incredibly complex device in a video posted to his YouTube channel. It was a fascinating look at the equipment, but by his own admission, he wasn’t the right person to try and explain the nuances of how the phased array actually functioned. But he knew who could do the technology justice, which is why he shipped the dismembered dish over to [Shahriar Shahramian] of The Signal Path.
Don’t be surprised if you can’t quite wrap your head around his detailed analysis after your first viewing. You’ll probably have a few lingering questions after the second re-watch as well. But that’s OK, as [Shahriar] still has a few of his own. Even after cutting out a section of the dish and putting it under an X-ray, it’s still not completely clear how the SpaceX engineers managed to cram everything into such a tidy package. Though there seems to be no question that the $500 price for the early-access hardware is an absolute steal, all things considered.
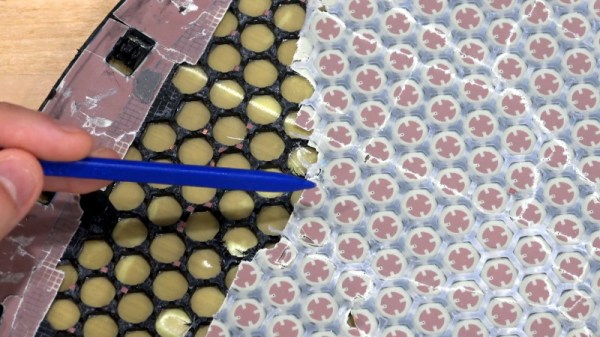
The layered antenna works on multiple frequencies.
Most of the video is spent examining the stacked honeycomb construction of the phased antenna array, which as expected, holds a number of RF secrets if you know what to look for. Put simply, there’s no such thing as an insignificant detail to the trained eye. From the carefully sized injection molded spacer sheet that keeps the upper array a specific distance from the RF4-like radome, to the almost microscopic holes that have been bored through each floating patch to maintain equalized air pressure through the stack up, [Shahriar] picks up on fascinating details which might otherwise seem like arbitrary design decisions.
But a visual inspection will only get you so far. Eventually [Shahriar] has to cut out a slice of the PCB so he can fit it into the X-ray machine, but don’t feel too bad, the dish was long dead before he got his hands on it. While he hasn’t yet completed his full analysis, an initial examination indicates that each large IC and the eight chips surrounding it make up a 16 channel beam forming module. Each channel is further split into two RX and TX pairs, which provides the necessary right and left hand polarization. That said, he admits there’s some room for interpretation and that further work would be necessary before any hard conclusions could be made.
Between this RF analysis and the initial overview provided by [Kenneth], we’ve already learned a lot more about this device than many might have expected considering how rare and expensive the hardware is. While we admit it’s not immediately clear what kind of hijinks hardware hackers could get into once this device is fully understood, we’re certainly eager to find out.
Very few people want to invent the universe before they blink their first LED. Sure, with enough interest a lot of folks will drill-down to the atomic level of technology and build their way back up. But there’s something magical about that first time you got your blinky to blink, and knowing how to write makefiles plays no part in that experienc). Now apply that to projects using smartphone as wireless interfaces… how simple can we make it for people?
Meta_Processing can translate the instructions into any of 14 languages
Jose David Cuartas is working to answer that very question and gives us a guided tour of his progress in this Meta_Processing workshop held during the Hackaday Remoticon. Meta-Processing is an IDE based on — as you’ve probably guessed — Processing, the programming language that unlocked higher-level functionality to anyone who wanted to perform visually-interesting things without becoming software zen masters. The “Meta_” part here is that it can now be done with very limited typing and interchangeably between different spoken languages.
The approach is to take the best of text programming and block programming languages and mash them together. In that way, you don’t type new lines, you add them with a click of the mouse and select the instruction you want to use on that line from a list. It means you don’t need to have the instructions memorized, and avoids typos in your code. The docs for that instruction will be shown on the bottom bar of the IDE to help you with parameters. And the kicker is that since you’re selecting the instructions, choosing any of the IDE’s 14 available spoken languages will update your “code” with translations into the new language.
In the workshop, video of which is included below, Jose demonstrates a number if interesting examples including audio, video, and user input, using a surprisingly small amount of code. The IDE even spawns a server on the network so that the apps you’ve written can be loaded by a smartphone. It has support for communicating with Arduino-compatible devices with digital read/write, analog read, and servo control. There’s even a fork of the project called Meta_Javascript that rolls in the ability to work with REST-like APIs.
People learn in many different ways. Having options like this to help people get to blinky very quickly is a great way to break down barriers to understanding and using computers.
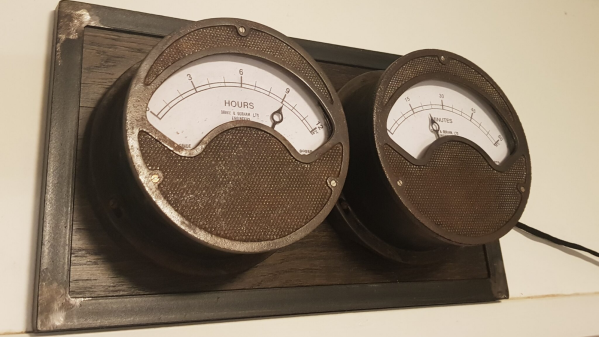
[Build Comics], purveyors of comic strips “where tools are heroes”, have saved another pair of old, vintage, analog meters from the junkyard by converting them into a Meter Clock. The real heroes of the story are their trusty tools – Mac X the knife, Mr. TS the table saw and his trusty band of clamps, G. Rinder the angle grinder, Weldy the welder, Sharp Eye the marker, rounded up by Sandy the Sander and Jiggy Saw. The Drake & Gorham (London) meters going under the knife appear similar to vintage hardware from just after the end of World War II, such as this Ferranti Ammeter found at the Science Museum Group, making them at least 75 years old.
A small cam is used to engage the DST switch.
As you might expect, the conversion process is reminiscent of their previous projects. The original moving-coil movements are discarded, and the pointer is attached to a servo which will act as the new movement. Fresh dials are prepared to replace the original ampere markings with hours and minutes. To retain some of the original charm, the new dials have discoloration and blemishes replicated from the old dials.
The set screw which was once used to align the pointer with the zero mark on the dial is now used to activate a micro switch that enables daylight savings time. Two additional buttons provide a convenient interface to adjust the time. Precision time signals are derived from a DS3231 RTC module connected to an Arduino. A pair of seven segment displays are connected to the Arduino to make it easier to set the time. A piece of oak plank, surrounded by a metal angled frame, is used as a base for mounting the two meters so that the clock can be hung up on the wall.