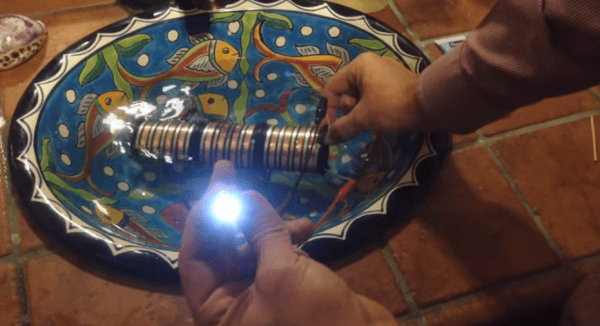
A Smart Clothes Dryer

dryer6 Here’s a question that will rack your brain: does your clothes dryer stop when the clothes are dry? It seems if you have a machine that guzzles power for one single purpose, you’d like it to stop when its job is done, or for the sake of convenience, keep going until the clothes are dry. Temperature and humidity sensors are cheap, and if you don’t have an auto sensing clothes dryer, a DIY smart clothes dryer seems both efficient and convenient. [Editor from the future: link rot, seems to be here now.]

[Andy] figured when clothes are dry, they stop emitting moisture. Based on that premise, he could monitor the operation of a clothes dryer and either shut off the machine or send a message that it’s time to take the clothes out. It’s a simple enough idea, and with an Arduino and a DHT11 temperature and humidity sensor, it was pretty easy to put together.

The clothes dryer used for this experiment was a self-ventilating model that doesn’t vent to the outside. Instead, it condenses the water in your towels and jeans into a tub to be emptied by hand later. This might introduce a little error into tests, but [Andy] did come up with a way to mount the temperature sensor without modifying his dryer in any way. From the initial data, the ventless dryer might be introducing a little experimental error, but it’s still too good of an idea to not try out with a traditional dryer that vents to the outside. Here’s the code should you want to try this yourself.

Mechanical Clock Relies On Marbles To Tick

As fun as micro-controllers and RTCs are, sometimes it’s truly fascinating to see a completely mechanical clock. Using only gravity this Pendulum Marble Clock (German version) by [Turnvater Janosch] runs for 12 hours at a time and has an accuracy error of less than one second per day!

It works by raising a 2.5kg weight which sinks approximately 1 meter during that 12 hours. A series of steel ball bearings count the minutes, 5 minute increments, and hours. Every minute one ball is released on the track — when the track fills up, trap doors open releasing the balls to the next level. The first level is minutes, the second, 5 minutes, and the third, hours.

The entire thing is made out of wood, plastic gears, brass and steel wire, and an old flat iron (although we’re really not too sure what that’s used for…)

Continue reading “Mechanical Clock Relies On Marbles To Tick”

A Huge, Lightweight Wooden Quadrotor

quad_1

[Robert] once built a quadcopter frame by sawing laminate floor tile. It worked, we’re taking the lack of pictures of this build as evidence of how ugly it was. His latest design used a much better looking material – laser cut plywood – and the finished product is very strong and lightweight, even compared to commercial frames made with glass or carbon fiber and epoxy.

Although the design went smoothly thanks to some Solidworks skills, actually cutting the frame from 3mm birch ply resulted in a few issues. The cheap laser cutter used for cutting include some bottom of the line software called LaserWorksV5. There is a kerf compensation feature, called ‘sew compensation’ in the software’s native Chinglish. The software would always crash whenever it tried to calculate the compensation for circles. [Robert] spent two hours figuring this problem out, and in the end needed to break out a piece of sand paper to get a nice interlocking fit.

The completed frame bolts together without any glue at all, and the best part about it is the weight – only 167 grams. Compare that to a similarly sized glass fiber frame, and [Robert]’s shaved at least 200 grams off his finished build.

Overkill Phone Charger, Because, Well, Why Not?

ATX Phone Charger

There are times in a tinkerer’s existence where it is convenient to have the ability to plug in and power a lot of USB devices. Sure, you could use a USB hub but this may not be satisfactory if your devices require a lot of current. A computer may work but is not really a stand alone solution.

[Jeff] and the crew over at Make Lehigh Valley ran into this predicament. They were putting on an Adafruit Trinket class and needed a USB power supply to power all of the Trinkets that were going to be used. As any makerspace would do, they built their own USB Power Station, and the final product is certainly overkill for what they needed (that’s not a bad thing).

An old ATX computer power supply is a logical component to use for this type of project. These power supplies are usually available in abundance and will provide all the amperage any reasonable amount of 5v USB devices can ask for. The 5v output from the ATX power supply was wired to 8 USB jacks. Keeping up with the project’s resourcefulness, those USB jacks were scavenged from a couple of old PCI-slot USB hub panels. Not satisfied with only USB outputs, the guys also wired up some banana jacks so that 3.3, 5 and 12 volts were available for whatever project was being worked on. A 3D printed enclosure keeps everything neat and tidy.

This project used a bunch of recycled parts and solved a problem faced by the group. If you’re interested in using an ATX power supply to make a more bench-top style power supply then check out this build.

[Lenore] Eviscerates Her Racing Snail

[youtube=https://www.youtube.com/watch?v=pzymwuPdQp4&w=580]


You may have walked past [Lenore’s] unassuming card table at Maker Faire this year. But we’re really glad we stopped for a little chat. She went so far as to pull the working parts out of her racing snail to show them to us!

Wait, wait… racing snail? Yeah, this is a pretty neat one from a few years ago. The snail is a relatively large version of a bristlebot (incidentally, we believe bristlebots were originated by EMSL). The thing that’s missing here are the bristles. Instead of using a scrub-brush for this large version, [Lenore] discovered that velvet has a somewhat uni-directional grain. But using a piece of mouse-pad cut to the same footprint as the velvet she was able to get the flat-footed snail to move in a forward direction purely through the jiggle of a vibrating motor.

If this sparked your interest there are tons of other bristlebot variations to be found around here. One of our favorites is still this abomination which shifts weight to add steering.

Using State Machines In Your Projects

arduino, 16 button keypad and LCD display


[Tony] has developed a method of using a state machine to validate keypad inputs. His method checks the commands character by character as they are entered in by a 16 button keypad. State machines are often used to break down complex problems into sequential tasks, making code development easier. While [Tony’s] example uses the keypad, Arduino Uno, and a character LCD, the theory can be applied to numerous projects, such as this Dahlander motor switch.

As you see, state machines can be very versatile. Stick around after the break as we take a look at [Tony’s] state machine and provide a brief explanation of how it all works.  Continue reading “Using State Machines In Your Projects”

OLED display, blue LED and Smartcard

Developed On Hackaday: Front Panels And Beta Testers Program

mooltipass front panel

We’re pretty sure that most of our readers already know it by now, but we’ll tell you anyway: the Hackaday community (writers and readers) is currently developing an offline password keeper, the Mooltipass. As it has been more than two weeks since we wrote an article about our progress, today’s will be about the Mooltipass front panels and our beta testers program.

At the end of our mechanical design rundown article we showed that we were originally planning to put a slightly tinted acrylic panel on top of our device. We however could still make out the Mooltipass’ insides, which wasn’t in line with the nice professional look we wanted. We then designed another front panel, one which was transparent above the OLED screen/LEDs and opaque (black) on top of the rest. To our surprise the result still wasn’t as good as we had hoped, as the contrast between the front panel and the screens/LEDs was too big. We finally came up with the panel shown above (see GitHub repository folder) which combines the two techniques previously described. As it is still in China, we’ll show you the final result when we get it in our hands.

We launched around 10 case prototypes in production, they will soon be shipped to our current contributors/advisers together with the smart cards chosen by Hackaday readers. In the meantime we sent our official call for beta testers to our mailing list recipients and hackaday.io followers, in which we asked them to fill a small form that will allow us to know them a bit better. We asked about their home/work computer setup, their level of expertise, their willingness to contribute to the prototype cost and finally specifics about who would use the Mooltipass they’d receive. We are targeting a broad range of users but also testers that will provide us with detailed feedback and clear bug reports.

We also spent quite a while searching for cheaper alternate parts that could be sourced in relatively big quantities. This is usually an overlooked aspect of a project so we preferred to tackle this as soon as possible. In a few weeks the contributors and I will receive all the components required to assemble our final prototype (front panels / case / top & bottom PCBs / smart cards) and it will be time to write a new update. Want to stay informed? You can join the official Mooltipass Google Group or follow us on Hackaday Projects.