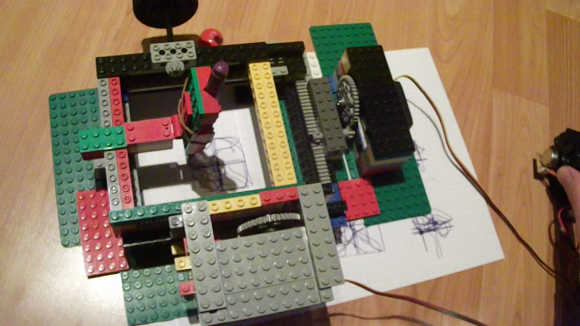
Pseudo-Random Flickering Jack-O-Lantern LED Using ATtiny13

Pseudo_Random_Flicker_ATtiny13

It’s time to get those jack-o-lanterns twinkling for Halloween. If you don’t want to use candles or buy a jack-o-lantern light this Halloween you can do like [Johannes Bauer] and code your own pseudo-random flickering super bright LED. His wife wanted their pumpkin to be illuminated this year and he knew it would be easy to do with an Arduino, but that would be overkill for such a simple project. Plus, he doesn’t have an arduino. [Johannes] used very few components; 4 slightly depleted AA batteries, a super bright LED, 680 ohm resistor and a little custom code on an 8 pin ATtiny13. The circuit does work great for a pumpkin lantern but his video is more of a tutorial on coding linear congruential generator (LCG) for the 8 bit pseudo-random LED flickering.

The code is short and can be gleaned from the YouTube video. [Johannes] used avr-gcc to compile and has packaged his code and build scripts for download. The hex file can be flashed over to the chip using avrdude or AVR Studio. If you have any ATtiny13s lying around you should cobble this hack together just in time to emulate that real look of a pumpkin candle without the hassles and hazards of real flames.

If you want something with a lot more light that still has that candle like flicker then checkout “Flickering Pumpkin Lanterns” that used the signal from LED tea lights to power some 12 V lamps.

Follow along after the break to watch [Johannes Bauer’s] video.

Continue reading “Pseudo-Random Flickering Jack-O-Lantern LED Using ATtiny13”

Cracking GSM With RTL-SDR For Thirty Dollars

Theoretically, GSM has been broken since 2003, but the limitations of hardware at the time meant cell phone calls and texts were secure from the prying ears of digital eavesdroppers and all but the most secret government agencies. Since then, the costs of hardware have gone down, two terabytes of rainbow tables have been published, and all the techniques and knowledge required to listen in on cell phone calls have been available. The only thing missing was the hardware. Now, with a super low-cost USB TV tuner come software defined radio, [domi] has put together a tutorial for cracking GSM with thirty dollars in hardware.

Previous endeavours to listen in and decrypt GSM signals used fairly expensive software defined radios – USRP systems that cost a few thousand dollars a piece. Since the advent of RTL-SDR, the price of software defined radios has come down to about $30 on eBay, giving anyone with a Paypal account the ability to listen in on GSM calls and sniff text messages.

The process of cracking GSM first involves getting the TMSI – Temporary Mobile Subscriber Identifier – a unique ID for each phone in a certain cell. This is done by sending a silent SMS that will send back and acknowledgement an SMS has been received on the victim’s phone, but won’t give the victim any indication of   receiving a message.

From there, the attacker listens to the GSM signals in the cell, receiving bursts attached to a TMSI, and cracking the encrypted stream using 1.6 TB of rainbow tables.

[domi] put up a four-part tutorial series (part 1 above; part 2, part 3, and part 4) that goes over the theory and the actual procedure of cracking text messages and voice calls with a simple USB TV tuner. There are a few limitations; the attacker must be in the same cell as the victim, and it looks like real-time voice decoding isn’t yet possible. Cracking GSM for $30, though, that’s good enough for us.

USB Implementers Forum Says No To Open Source

For the longest time. one of the major barriers to hobbyists and very small companies selling hardware with a USB port is the USB Implementers Forum. Each USB device sold requires a vendor ID (VID) and a product ID (PID) to be certified as USB compliant. Adafruit, Sparkfun, and the other big guys in the hobbyist market have all paid the USB Implementers Forum for a USB VID, but that doesn’t help the guy in his garage hoping to sell a few hundred homebrew USB devices.

Arachnid Labs had an interesting idea to solve this problem. Since other USB device vendors such as Microchip and FTDI give away USB PIDs for free, a not for profit foundation could buy a VID, give PIDs away to foundation members making open source hardware, and we would all live in a magical world of homebrew devices that are certified as USB compliant.

This idea did not sit well with VTM Group, the people serving as the management, PR, legal, and membership and licensing department of the USB Implementers Forum. In a slightly disproportionate response, the VTM Group told Arachnid Labs to,

Please immediately cease and desist raising funds to purchase a unique USB VID for the purpose of transferring, reselling or sublicensing PIDs and delete all references to the USB-IF, VIDs and PIDs for transfer, resale or sublicense from your website and other marketing materials.

Interestingly, Arachnid Labs’ and scores of other requests for an open source USB VID haven’t hit the desk of anyone at the USB Implementers Forum, the people who are actually in charge of designating USB VIDs and PIDs. There are a number of ideas to get around VTM Group that include squatting on USB VID 0xF055, but we’re at a loss why there couldn’t be a foundation that gives out open source USB PIDs. Microchip, FTDI, and Openmoko do the same, so perhaps it’s time to email some key people at HP, Intel, and Microsoft

Turn A PC On With A Knock And An ATTiny

knockAttiny

Pressing the power button on your computer usually isn’t too much trouble, unless your computer is stored away somewhere hard to reach. [Joonas] has been hard at work on a solution that would also impress his friends, building a knock sensor to turn on his PC.

For around $10 in parts he put together an ATTiny45 that emulates a PS/2 device, which takes advantage of his computer’s ability to boot upon receiving PS/2 input. The build uses a Piezo buzzer and a 1M Ohm resistor as a knock sensor exactly as the official Arduino tutorial demonstrates, and one of those PS/2-to-USB adapters that are most likely lurking in the back corner of every drawer in your office.

[Joonas] used AVRweb to disable the 8X clock divider so there’d be enough clock cycles for PS/2 communication, then loaded some test code to make sure the vibrations were being detected correctly. You can check out his Github for the final code here, and stick around after the break for a quick video demo. Then check out a similar hack with [Mathieu’s] home automation knock sensor.

Continue reading “Turn A PC On With A Knock And An ATTiny”

CAN Hacking: Introductions

We’re introducing a new series on CAN and automotive hacking. First, we’ll introduce CAN and discuss how in-vehicle networks work.

In 1986, Bosch introduced the Controller Area Network protocol. It was designed specifically for in-vehicle networks between automotive controllers. CAN became a popular option for networking controllers in automotive, industrial, and robotics applications. Starting in 2008, all vehicles sold in the US must use CAN.

Modern vehicles are distributed control systems, with controllers designed to handle specific tasks. For example, a door control module would take care of locks and windows. CAN allows these controllers to communicate. It also allows for external systems to perform diagnostic tasks by connecting to the in-vehicle network.

Some examples of CAN communication in a vehicle include:

  • The engine control module sending the current engine speed to the instrument cluster, where it is displayed on a tachometer.
  • The driver’s door controller sending a message to another door controller to actuate the window.
  • A firmware upgrade for a controller, sent from a diagnostics tool.

CAN is usually used with little or no security, except for the obscurity of the communications. We can use CAN to USB interfaces to listen to the traffic, and then decode it. We can also use these tools to send forged messages, or to perform diagnostic actions. Unfortunately, most of the tools for dealing with CAN are proprietary, and very expensive. The diagnostics protocols are standards, but not open ones. They must be purchased from the International Organization for Standardization.

Next time, we’ll get into the structure of CAN frames, and how traffic is encoded on the bus.

 [Image via Wikipedia]

CAN Hacking

The Most Minimal Homebrew Computer

Perfection is achieved not when there is nothing more to add, but when there is nothing left to fail. Going by that metric, [Stian]’s three-chip 6502 homebrew computer is the epitome of perfection. It’s a real, working, homebrew retrocomputer using only three chips: a CPU, some RAM, and a microcontroller to bootstrap the computer and provide a video output,

The key to this minimalist build is having the entire boot process controlled by an ATMega16 microcontroller, This interfaces to the 6502 through a dual-port SRAM, a 1 kilobyte Cypress CY7C130. This dual-port RAM allows the CPU and microcontroller to access the same bit of memory, making it easy to bootstrap a computer from a bit of AVR code.

Output is provided with [Stian]’s ATMega video text generator putting a 37×17 characters on any television with an RCA jack. While input isn’t handled yet, [Stian] says it should be possible with his AVR PS/2 keyboard library.

While other 6502 homebrew computers such as [Quinn Dunki] Veronica can reach unparalleled heights of complexity, there is a lot to be said about the minimalism of [Stian]’s three-chip computer. With some clever coding and a modified parts list, it may well be possible to put a retrocomputer in the hands of everyone with a bare minimum of cost and parts.

Introducing The Shapeoko 2

For all the 3D printers that hit the Hackaday tip line, it’s surprising we don’t see more CNC routers. They’re arguably more useful tools, and with the ability to mill wood, plastic, and non-ferrous metals, open up the door to a whole bunch more potential builds. One of the most popular – and certainly one of the least expensive – CNC routers out there, the Shapeoko, just received a huge update that makes this minimal machine even more capable.

The new Shapeoko 2 keeps the same V wheel on an aluminium extrusion design with Makerslide, but fixes a few problems that limited the original Shapeoko. There’s a larger work area on this version, and the Y axes feature dual stepper motors. The biggest feature, we think, is the ability to handle materials larger than the machine itself thanks to its open front and back.

The Shapeoko 2 is available in two versions, a $300 mechanical kit that requires you to go out and get some motors, a power supply, and a grblShield, the full version, for $650, includes everything you’ll need to start routing wood metal and plastic at home.