 [Texane] had been thinking about how to monitor the state of his garage door from a remote place. The door itself isn’t around any power outlets, and is a few floors away from where his server would be located in his apartment. This presented a few design challenges – namely, the sensor itself should have a wireless connection to the server, and being low power would be a great idea. This led to the development of a minimalist framework for wireless communication that allows a sensor to run for weeks without a battery swap.
The wireless protocol itself is based on a simple key value pair; each individual sensor, coupled with a NRF905 radio, has passes an address, a key, and a value. There are allowances for checksums and acknowledgement, but as the PDF says, this is a very minimal protocol.
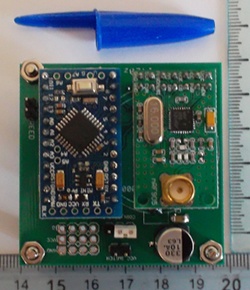
With the software out of the way, [Texane] turned to the hardware. The microcontroller is a simple Arduino clone, paired with a radio and a coin cell on a small board. The micro spends most of its time in a low power state, with the sensor, in this case a reed switch, tied to an interrupt pin.
There was a problem with the power consumption of the radio, though: when the short 17-byte message was transmitting, there was a significant voltage drop. This was okay with a fully charged battery, but with a partially drained coin cell, the possibility of brownouts was high. A big cap in parallel was enough to offset this voltage drop.
It’s still a little expensive for an all-in-one home automation and monitoring system, but developing a functional wireless protocol and the hardware to go with it is no small feat. It’s actually a great piece of kit that [Texane] is sure to find a few uses for.