Galaga Mini-Cabinet Using A Nintendo DS

galaga-cabinet-from-nintendo-ds

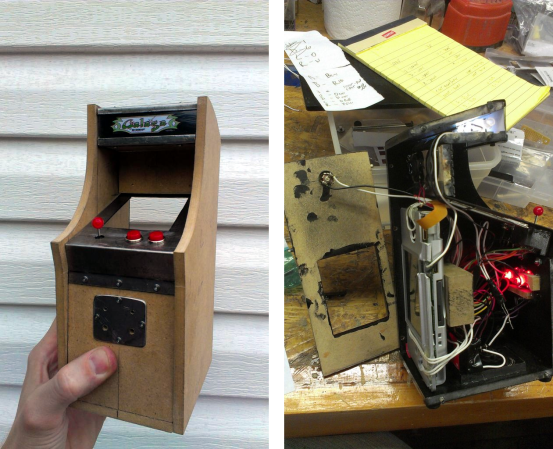
We’re not showing you the finished version of this tiny Galaga arcade cabinet because it doesn’t really testify to the awesome that was packet into this hack. In regards to the features the build is just nuts!. The user controls were customized to look like the real thing, and the attention to detail would make craftsmen from the gilded age of dollhouses proud.

Update: [eLRIC] left a link to an even better forum thread build log as a comment. Among other thing it fully details the joystick modifications.

The machine is driven by a Nintendo DS, which donates its upper screen as the cabinet display. In the image to the right you can see that the lower display is still accessible through an opening in the back of the cabinet. The joystick is a small multi-directional switch which was altered by adding the red ball. It was also housed in a custom metal bracket that includes a washer to limit the movement of the stick. Also shown on the right are the lights for the marquee as well as the two coin-slots.

Check out the video after the break to see the game play. Despite its size it still seems really playable, but if you need something larger you could model your own build off of this project.

Continue reading “Galaga Mini-Cabinet Using A Nintendo DS”

Making Asteroids Miniature

Asteroids

Mini arcade cabinet builds are fairly common, but we’ve never seen anything like [Jurgen]’s mini vector Asteroids cabinet that takes an original Asteroids circuit board and a true vector monitor and shrinks it down to table top size.

Unlike the raster monitors of a later generation’s arcade games, the original Asteroids cabinet used a vector monitor just like one would find in an oscilloscope. [Jurgen] found the perfect CRT in, of all places, a broken Vectrex console. The video circuitry in the Vectrex was rather primitive and the beam deflection was far too slow for the video signals generated by the Asteroids PCB. To get around this, [Jurgen] added a custom XY driver board. While the Asteroids game – and other vector Atari games – were designed for a screen with 1 MHz of bandwidth, [Jurgen] found that 300 kHz was ‘good enough’ to display proper Asteroids graphics.

While the cabinet isn’t a miniaturized version of any proper cabinet, [Jurgen] did manage to build a rather nice looking case for his luggable version of Asteroids. The exposed PCB on the back is a great touch, and an awesome project for any ancient video game aficionado.

The Tiniest Arcade Cabinets You’ve Ever Seen

After perusing Amazon one day, [Dave] found a very interesting piece of kit: a small, 1.5″ digital picture frame. They’re not very complex, just an LCD, a few buttons to cycle the picture, and a battery to keep everything portable. He decided the best use of this tech would be a tiny arcade cabinet, featuring screen shots of the best games a darkly neon lit arcade of the late 80s had to offer.

After sourcing a few of these digital picture frames on eBay, [Dave] set to work disassembling the frames and designing a custom enclosure. He wanted a few specific features: controls in the right place, replaceable sides, and the glowing red eyes of a coin acceptor slot. [Dave] whipped a model up in OpenSCAD and sent the parts over to his printer.

The controls for the digital picture frame were connected to a quartet of tact switches on the control panel, and a red LED provides the glow from the coin acceptor. With a USB plug and the frame’s memory loaded up with screen shots, [Dave] has a fabulous desk toy.

All the relevant files are up on Thingiverse if you’d like to build your own.

Building A Tiny Arcade Cabinet From A Game Boy Advance

[Jani ‘Japala’ Pönkkö] found a way to make his old Game Boy Advance exciting again. He poured a ton of time and craftsmanship into building a miniature arcade cabinet. He did such a good job it’s easy to think this is a commercial product. But when you open the back of the case to switch games one look at what’s crammed inside let’s you know this is custom work.

What’s most surprising to us is that he didn’t draw out a full set of plans before beginning. He simply measured the circuit board and LCD screen from the Game Boy and went with his gut for everything else. The case itself is crafted from baltic birch plywood, which was primed and painted before applying the decals. There is also a screen bezel made of acrylic with its own decal like you’d find on coin-op machines. These were made using printable sticker paper. The electronic part of the build involves no more than extending contacts from the circuit board to buttons mounted on the case. But he did also replace the stock speaker for one that produces better audio.

CRT Vector Graphics Arcade Game Built From An FPGA Board

[Sprite_TM] wanted to challenge his VHDL skills, and there’s no more satisfying way of doing this than making something that will be playable when you’re done. He decided to try his hand at creating a vector-based CRT arcade. The distinction here is that vector-based games take control of the magnetic ring that guides the electron path toward the screen. This technique allows point-to-point graphic generation rather than the pixel-based scanning that CRT televisions use.

He had a small color CRT on hand and decided to grab a VHDL version of asteroids from the Internet to see if he could get it to work. But upon further inspection of the source he found that it had a chunk of code which rasterized the vectors for use with a scanning monitor. After removing that chunk, and giving it a spin he had enough confidence that he knew what he was doing to start implementing his own game. The choice of what title really came down to the hardware the original arcade cabinets used. He was not interested in implementing a soft-process for the math chips used in games like Star Wars and Tempest. In the end he got a version of Black Widow up and running, and even built a miniature cabinet for the thing. Check out some of the gameplay in the clip after the break.

Continue reading “CRT Vector Graphics Arcade Game Built From An FPGA Board”

Adding Digital Game Indicators To A Neo Geo Arcade Cabinet

neogeo

[George] is a Neo Geo aficionado, and among his collection of paraphernalia, he has a MVS-Mini game console. His mini “Multi Video System” is a 2-slot model, meaning that it can hold two game cartridges at a time, which are indicated by plastic cards inserted in the cabinet’s face plate. Instead of swapping those cards out each time he changed cartridges, he thought it would be far cooler to install digital displays instead.

He scoured just about every retail store he could before finding a handful of small 5” digital picture frames that looked to fit the bill. After some careful cabinet modifications he had them wired up and ready for display. The frames don’t hold a ton of pictures, but they do support the use of SD cards. [George] says that he’ll likely just buy a ton of small SD cards, swapping them out whenever he changes games, though over time that might become as tedious as swapping out the plastic cards.

We would love to see [George] take his new digital display up a level, so be sure to share your ideas in the comments. Perhaps we can persuade him to automate things a bit.

Open Source Makes This USB Arcade Controller Build A Breeze

[Jamie] built his own USB connected arcade controller. We’ve been seeing a lot of these lately, and they usually involve soldering buttons to a keyboard PCB. But [Jamie] decided to go a different route and use his own microcontroller. This method always gets a bit hairy when it comes to deciding how to connect it to a computer. Dealing with the USB stack used to be quite tricky, but the LUFA project is slowly taking the pain out of the process.

The Lightweight USB Framework for AVRs is an open source project that handles the hard work associated with USB capable AVR microcontrollers. [Jamie] knew that they already had a sample implementation of a hardware joystick. He’s not using one of the supported boards and so wasn’t able to just compile and go. But porting the code to work with his minimus board was simple enough. With the code in place, the physical build was quite simple. The buttons and joystick were mounted on the surface of an overturned drawer. Each is connected to one pin of the controller board and to ground. LUFA makes sure that the device enumerates as a joystick, and [Jamie] was gaming in no time.