You Can Use LEDs As Sensors, Too

LEDs are a wonderful technology. You put in a little bit of power, and you get out a wonderful amount of light. They’re efficient, cheap, and plentiful. We use them for so much!

What you might not have known is that these humble components have a secret feature, one largely undocumented in the datasheets. You can use an LED as a light source, sure, but did you know you can use one as a sensor?

Continue reading “You Can Use LEDs As Sensors, Too”

Hackaday Podcast Episode 277: Edible Robots, A Personal Eclipse, And DIY PCBs To Die For

This week on the Podcast, it’s Kristina’s turn to ramble on alongside Editor-in-Chief Elliot Williams. First up in the news: Paul Allen’s Living Computers Museum + Labs is being liquidated at auction after just 12 years of being open to the public. In Hackaday news, the 2024 Business Card Challenge ends next Tuesday, July 2nd, so this is your weekend to shine! Also, you’ve got about two weeks to get your talk proposals in for this year’s Supercon. (Can you believe it’s only four months away?)

Then it’s on to What’s That Sound, at which Kristina made a couple of close-but-no-cigar guesses. Can you get it? Can you figure it out? Can you guess what’s making that sound? If you can, and your number comes up, you get a special Hackaday Podcast t-shirt.

Then it’s on to the hacks, beginning with a $3 smartwatch that can run Python, and a completely DIY analog tape recording solution. We’ll talk about making your wireless keyboard truly low power, all the steps you can take to produce perfect PCBs at home, and AI in a font. Finally, we talk about the dangers of a curious childhood, and talk about a dotcom hardware solution that could have gone far, given the right business model.

Check out the links below if you want to follow along, and as always, tell us what you think about this episode in the comments!

Download and savor at your leisure.

Continue reading “Hackaday Podcast Episode 277: Edible Robots, A Personal Eclipse, And DIY PCBs To Die For”

Design Review: USB-C PD Input For Yaesu FRG7700

Today is another board from a friend, [treble], who wants to convert a Yaesu FRG7700 radio to USB-C PD power. It’s yet another review that I’ve done privately, and then realized I’ve made more than enough changes to it, to the point that others could learn from this review quite a bit. With our hacker’s consent, I’m now sharing these things with you all, so that we can improve our boards further and further.

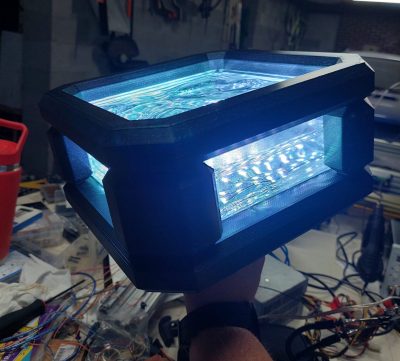
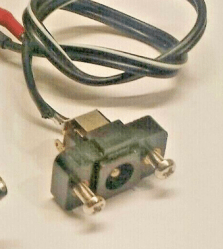
This board’s idea is thought-out and executed well – it replaces a bespoke barrel jack assembly, and is mechanically designed to fit the screw holes and the free space inside the chassis. For USB-PD, it uses a CH32V003 coupled with FUSB302 – I definitely did help pick the latter! For mechanical reasons, this board is split into two parts – one has the USB-C port, whereas the other has the MCU and the PD PHY.

In short, this board is a PD trigger. Unlike the usual PD triggers, however, this one is fully configurable, since it has a 32-bit MCU with good software support, plus, the PD PHY is also well known and easily controllable. So, if you want special behavior like charger-power-dependent profile selection for powering a static resistance load, you can implement it easily – or, say, you can do PPS for variable voltage or even lithium ion battery charging! With a bit of extra code, you could even do EPR (28 V = 140 W power) with this board, instantly making it into a pretty advanced PD trigger, beyond the ones available on the market.

Also, the board has some PCB art, and a very handy filter to get some of the USB-C charger noise out. Let’s take a look at all of these!

Current Flow Improvements

Continue reading “Design Review: USB-C PD Input For Yaesu FRG7700”

Boneblocker Is A Big LED Wall That Rocks

[Nick Lombardy] took on a job almost every maker imagines themselves doing at some point. He built a giant LED wall and he did a damn fine job of it, too. Introducing BoneBlocker.

BoneBlocker is an 8 x 14 wall of glass blocks that lives at a bar called The Boneyard. Each block was given a length of WS2812B LED strip. 30 LED/meter strips were chosen, as initial maths on the 60 LED/meter strips indicated the whole wall would end up drawing 1.5 kW. Discretion, and all that.

The glowing game controller.

The whole display is run from a WT32-ETH01 board, which is a fast ESP32-based module that has onboard Ethernet to boot. [Nick] used the WLED library as he’d seen others doing great things with it, performance-wise. He ended up using one board per column to keep things fast, but he reckons this was also probably a little bit of overkill.

His article steps through the construction of the wall, the electronics, and the software required to get some games working on the display. The final result is quite something. Perhaps the best bit is his explanation of the custom controller he built for the game. Dig into it, you won’t be disappointed.

In particular, we love how the glass blocks elevate this display to a higher aesthetic level. We’ve seen other great projects tread this same route, too. Video after the break.

Continue reading “Boneblocker Is A Big LED Wall That Rocks”

DIY DNA Lamp

DIY Electronics Plus Woodworking Equal Custom Lamp

There is something about wooden crafts that when combined with electronics, have a mesmerizing effect on the visual senses. The Gesture Controlled DNA Wooden Desk Lamp by [Timber Rough] is a bit of both with a nice desk piece that’s well documented for anyone who wants to build their own.

Construction starts with a laser cutter being employed to add kerfs, such that the final strips can be bent along a frame tube to form the outer backbone of the DNA helix structure. Add to the mix some tung oil, carnauba wax, and some glue — along with skill and patience — and you get the distinct shape of sugar-phosphate backbone.

The electronics include an ESP8266 with the PAJ7620 gesture sensor that controls two WS2812B RGB LED Strips. The sensor in question is very capable, and comes with the ability to recognize nine human hand gestures along with proximity which makes it apt for this application. The sensor is mounted atop the structure with the LEDs twisting down the frame to the base where the ESP8266 is tucked away. Tiny glass bottles are painted with acrylic spray varnish and then glued to the LEDs to form the base pairs of the double helix. We thought that the varnish spray was a clever idea to make light diffusers that are quick and cheap for most DIYers.

We previously covered how this particular gesture sensor can be used to control much more than a lamp if you seek more ideas in that realm.

Continue reading “DIY Electronics Plus Woodworking Equal Custom Lamp”

Build Your Own RGB Fill Light For Photography

Photography is all about light, and capturing it for posterity. As any experienced photographer will tell you, getting the right lighting is key to getting a good shot. To help in that regard, you might like to have a fill light. If you follow [tobychui]’s example, you can build your own!

Colors!

The build relies on addressable WS2812B LEDs as the core of the design. While they’re not necessarily the fanciest LEDs for balanced light output, they are RGB LEDs, so they can put out a ton of different colors for different stylistic effects. The LEDs are under the command of a Wemos D1, which provides a WiFI connection for wireless control of the light.

[tobychui] did a nice job of building a PCB for the project, including heatsinking to keep the array of 49 LEDs nice and cool. The whole assembly is all put together inside a 3D printed housing to keep it neat and tidy. Control is either via onboard buttons or over the WiFi connection.

Files are on GitHub if you’re seeking inspiration or want to duplicate the build for yourself. We’ve seen some other similar builds before, too. Meanwhile, if you’re cooking up your own rad photography hacks, don’t hesitate to let us know!

Logic analyzer capture, showing the rails constantly oscillating at a high rate

When Your Level Shifter Is Too Smart To Function

By now, 3.3V has become a comfortable and common logic level for basically anything you might be hacking. However, sometimes, you still need to interface your GPIOs with devices that are 5 V, 1.8 V, or something even less common like 2.5 V. At this point, you might stumble upon autosensing level shifters, like the TXB010x series Texas Instruments produces, and decide that they’re perfect — no need to worry about pin direction or bother with pullups. Just wire up your GPIOs and the two voltage rails you’re good to go. [Joshua0] warns us, however, that not everything is hunky dory in the automagic shifting world.

During board bring-up and multimeter probing, he found that the 1.8 V-shifted RESET signal went down to 1.0V — and its 3.3 V counterpart stayed at 2.6V. Was it a current fight between GPIOs? A faulty connection? Voltage rail instability? It got more confusing as the debugging session uncovered the shifting operating normally as soon as the test points involved were probed with the multimeter in a certain order. After re-reading the datasheet and spotting a note about reflection sensitivity, [Joshua0] realized he should try and probe the signals with a high-speed logic analyzer instead.

Continue reading “When Your Level Shifter Is Too Smart To Function”