A UV Lightbox For Curing Prints

With resin printers slowly making their way to hackerspaces and garages the world over, there is a growing need for a place to cure these UV resin prints. No, they don’t come out of the machine fully cured, they come out fully solid. And no, we’re not just leaving them in the sun, because that’s not how we do things around here.

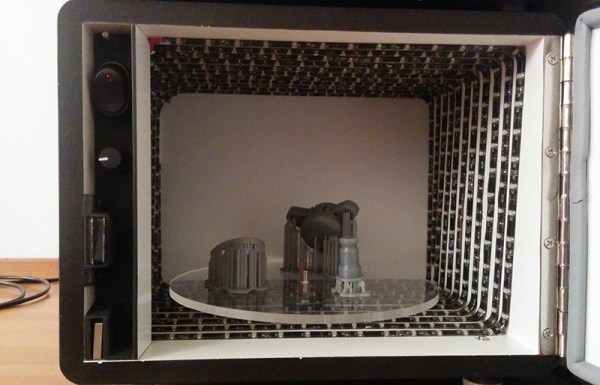
[Christopher] whipped up a post-cure lightbox meant to sit underneath his Form 1 printer. It’s made of 1/2″ MDF, with adjustable feet (something the Form 1 lacks), a safety switch to keep the lights off when the door is open, and a motor to rotate the parts around the enclosure.

The light source for this lightbox is 10 meters of ultraviolet LED strips. The LEDs shine somewhere between 395-405nm, the same wavelength as the laser diode found in the Form 1 printer. Other than a bit of wiring for the LEDs, the only complicated part of the build was the motor; [Christopher] bought a 2rpm motor but was sent a 36rpm motor. The vendor was out of 2rpm motors, so a PWM controller was added.

It’s a beautiful build that shows off [Christopher]’s ability to work with MDF. It also looks great sitting underneath his printer, and all his parts are rock solid now.

The Chibi-Mikuvan, Or A Power Wheels With A Ford Fusion Battery

At all the big Maker Faires, the Power Racing Series makes an appearance, turning old Power Wheels into race cars that whip around the track at dozens of miles an hour. [Charles] is somewhat famous in the scene – there’s even a clause in the official rules named after him – so of course anything he brings to race day will be amazing. It was. It used a battery pack from a Ford Fusion plugin hybrid, a custom body, and a water cooling unit from a dead Mac G5.

A few months ago, we saw [Charles] tear into the battery pack he picked up for $300. This is the kind of equipment that will kill you before you know you’ve made a mistake, but [Charles] was able to take the pack apart and make a few battery packs – 28.8v and 16Ah – enough to get him around the track a few times.

The chassis for the Chibi-Mikuvan was built from steel, and the bodywork was built from machined pink foam, fiberglassed, and finished using a few tips [Charles] gleaned from [Burt Rutan]’s book, Moldless Composite Sandwich Aircraft Construction. The motor? That’s an enormous brushless motor meant for a 1/5th scale RC boat. The transmission is from an angle grinder, and the electronics are a work of art.

The result? A nearly perfect Power Wheels racer that has a curb weight of 110 pounds and tops out at 25 mph. It handles well, too: in the videos below, it overtakes the entire field of hacky racers in the Power Wheels Racing competition at Maker Faire NYC, and afterwards still had enough juice to tear around the faire.

Continue reading “The Chibi-Mikuvan, Or A Power Wheels With A Ford Fusion Battery”

DIY UV Lamp Is The Cure For Nails And More

We must admit to wondering how Adafruit’s [Becky Stern] gets anything done with those fingernails of hers. They’re always long and beautifully painted without any chips, dings, or dents. As it turns out, she uses UV gel nail polish. It’s much more durable than standard air-dry polishes, but it requires UV light to cure. [Becky] bought a lamp to use at home, but it’s very bulky and must be plugged into the wall. She knew there was a better way and devised her DIY UV mini manicure lamp.

She really thought of everything. The open source 3D-printed enclosure includes a small compartment in the top for cuticle sticks, emery boards, and tweezers. The Li-poly battery is rechargeable over USB in conjunction with Adafruit’s PowerBoost 500c. The lamp itself is made from 30 UV LEDs and 100Ω resistors. [Becky] lined the inside of hers with silver sticky paper to help distribute the UV light evenly.

You know, this can also be used to erase EPROMs or to cure small DLP 3D prints. Do you have another use for it? Tell us in the comments. Introductory and partially hyperlapsed video after the break.

Continue reading “DIY UV Lamp Is The Cure For Nails And More”

Make Your Own UV Exposure Box For PCB Manufacture At Home

UV exposure box

[Shane] needed a UV exposure box to help speed up the process of making PCB’s at home. Not wanting to spend a few hundred on one, he decided to design and build his own, using a planter box!

Why a planter box? To be honest, it was simply the first opaque container [Shane] found, so he decided to base the design around it. Inside the planter box are two 15W fluorescent daytime bulbs which output a similar amount of UV to normal sunlight. A mirror is placed below them to help reflect all the useful light out of the box. A pane of glass was cut to fit on top of the planter box, giving you a nice surface to place curing PCB’s on.

All in all, it’s a pretty simple and inexpensive method to make your own UV exposure box. We’ve also seen it done before using UV LEDs and IKEA picture frames — just make sure you don’t start tanning your hands while you’re working!

Face Tanner PCB UV Lamp Is So Bright, You Gotta Wear Shades

There may be nothing new under the sun when it comes to etching PCBs with UV light, but [Heliosoph] has brought finer control to a used face tanner he bought that now exposes his boards in ~50 seconds.

The original system allowed for exposure times from 1-99 minutes to be programmed in 1-minute increments. [Heliosoph] though it would be perfect as-is, but the lamp is so powerful that even one minute of exposure was too much. He hoped to find TTL when he opened the thing and was pleasantly surprised to discover a COP410L microcontroller and an MM5484 display driver. Unfortunately, the COP410L’s clock range is too small and he didn’t want to overclock it.

[Heliosoph] built a new board based on the ATMega328P with a salvaged 16×2 LCD, which he was able to easily integrate using the library that ships with the Arduino IDE. He then replaced the BT136 triac lamp switch with a solid state relay, conveniently isolating the electronics from mains power. He re-purposed the unit’s push buttons using the M2tklib, which supports a plethora of common menu functions.

If you need some help with the whole UV PCB etching process, you can’t go wrong with this tutorial from [CNLohr].

3D Printering: You Want UV Resin?

printering

Just a few short months ago, 3D printing with stereolithography was an uncommon and very expensive proposition. Consumer-oriented SLA machines such as the Form1 and the B9Creator are as expensive as the upper echelons of squirting plastic printers and the community behind these machines isn’t even as diverse as the forums for the fly-by-night printers featured on Kickstarter every week.

This may be about to change with last month’s reveal of the Peachy Printer, a remarkably clever stereolithography printer that requires no special equipment, hardly any electronics, and costs $100. Even if the folks behind Peachy never ship a single unit, their clever engineering ensures that stereolithography will be a staple in the makers toolbox in the near future.

There is, of course, the problem of material. While plastic filament can be bought  just about everywhere, UV curing resin is a little harder to come by and much more expensive per kilogram or liter. Where then does the stereolithography experimenter get their hands on some of this magical material from the future?

Before we get to the article…

I’ve been writing a 3D Printing column once a week for a few months now, and I’m running out of ideas. If you have something in the 3D printer world you’d like to see covered in a little more depth than the standard Hackaday post, send in a tip. I’ll send you a few Hackaday stickers if it’s a good idea.

Continue reading “3D Printering: You Want UV Resin?”

Do Not Look Into 12 Watt UV Lamp With Remaining Eye

We’ve seen a couple of UV lamp builds for exposing photosensitive PCBs and erasing EPROMs, but [John] over at pcboard.ca decided if it’s worth doing, it’s worth overdoing. They designed a UV exposure board using twelve 1 Watt UV LEDs, an impressive amount ultraviolet light that you probably shouldn’t look at for too long.

We’ve seen UV exposure boxes before, usually made with a bunch of 5mm UV LEDs soldered to a piece of protoboard. These projects do their job, but the exposure time is on the order of minutes. The PCboard.ca UV lamp can expose a PCB in just 20 seconds.

The build began with four pieces of aluminum bar, 1 inch wide and 1/8″ thick. The 12 star LEDs were glued down to this bar with thermal adhesive and serve their purpose as a rather large heat sink.

[John] performed a little test to determine how long it would take this monstrous UV source to expose a PCB. By copying a PCB mask four times and placing it over an unexposed board, [John] made a PCB with exposure times of 60, 45, 30, and 15 seconds. After developing and etching, all but the 15-second exposure was fully etched, an amazing result that will probably lead to some very, very rapid prototyping.

All the more impressive is the fact that only four 1-watt LED drivers were used for this build. That’s right, this UV lamp is actually operating at about a quarter of its maximum rating, or about 285mA per LED. We’d hate to see this thing operate at full power, protective eyewear or not.