DIY Illuminator For UV Fluorescence Photography

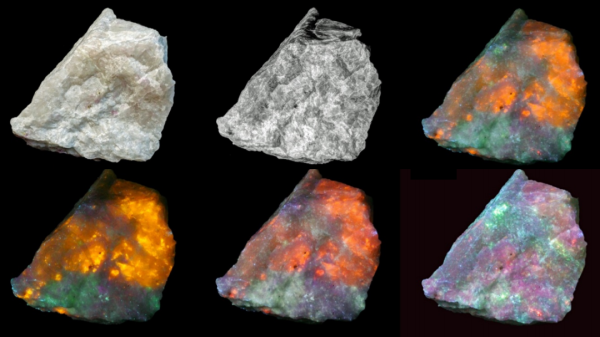
The image shown is the mineral Hackmanite, which fluoresces under ultraviolet lighting. However, not all UV is created equal, and that makes a difference if you’re into UV imaging. The image for this article is from [David Prutchi] and shows the striking results of using different wavelengths of UV. [David] goes into detail on how to make your own DIY Long, Medium, and Short-wave UV Illuminator complete with part numbers and wiring diagram. The device isn’t particularly complicated; the real work was determining the exact part numbers and models of lamp, filters, and ballasts required to get the correct results. [David] has done that work and shared it for anyone interested in serious UV fluorescence photography, along with a white paper on the process.

We’ve seen [David]’s work before. We featured his DIY short-wave UV imager in the past, and his DOLPi camera project was a 2015 Hackaday Prize finalist. It’s clear he really knows his stuff, and genuinely enjoys sharing his discoveries and work.

Extracting Sounds With Acid And UV

Toaplan was a Japanese video game developer in the 80s and early 90s, most famous for Zero Wing, the source of the ancient ‘All Your Base’ meme. Memeology has come a long way since the Something Awful forums and a pre-Google Internet, but MAME hasn’t. Despite the completionist nature of MAME aficionados, there are still four Toaplan games with no sound in the current version of MAME.

The sound files for these games is something of a holy grail for connoisseurs of old arcade games, and efforts to extract these sounds have been fruitless for three decades. Now, finally, these sounds have been released with the help of sulfuric acid and microscopes.

The sounds for Fire SharkVimanaTeki Paki, and Ghox were stored on their respective arcade boards inside the ROM for a microcontroller, separate from the actual game ROM. Since the fuse bits of this microcontroller were set, the only way to extract the data was decapsulation. This messy and precise work was done by CAPS0ff, who melted away the epoxy coating of the chip, revealing the microcontroller core.

Even without a microscope, the quarry of this hunt was plainly visible, but there was still no way to read out the data. The built-in read prevention bit was set, and the only way to clear that was to un-set a fuse. This was done by masking everything on the chip except the suspected fuse, putting it under UV, and checking if the fuse switched itself to an unburnt state.

The data extraction worked, and now the MAME project has the sound data for games that would have otherwise been forgotten to time. A great success, even if the games are generic top-down shooters.

Seeing The Truly Invisible With DIY Shortwave UV Imaging

We’ve all seen how to peel IR filters off digital cameras so they can see a little better in the dark, but there’s so much more to this next project than that. How about being able to see things normally completely outside the visual spectrum, like hydrogen combustion or electrical discharges?

UV Electrical Discharge

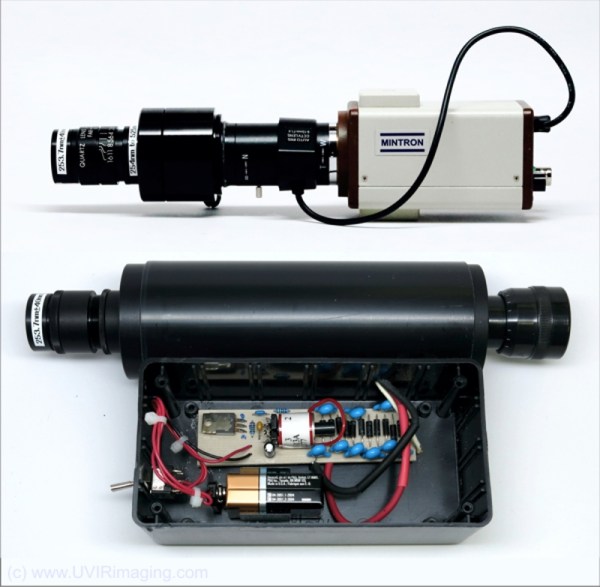
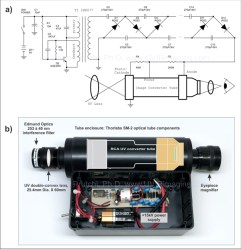
[David Prutchi] has just shared his incredible work on making his own shortwave ultraviolet viewers for imaging entirely outside of the normal visible spectrum – in other words, seeing the truly invisible. The project has not only fascinating application examples, but provides detailed information about how to build two different imagers – complete with exact part numbers and sources.

UV-Viewer-SmallIf you’re thinking UV is a broad brush, you’re right. [David Prutchi] says he is most interested in Solar Blind UV (SBUV):

Solar radiation in the 240 nm to 280 nm range is completely absorbed by the ozone in the atmosphere and cannot reach Earth’s surface…

Without interference from background light, even very weak levels of UV are detectable. This allows ultraviolet-emitting phenomena (e.g. electrical discharges, hydrogen combustion, etc.) to be detectable in full daylight.

There is more to the process than simply slapping a UV filter onto a camera, but happily he addresses all the details and the information is also available as a PDF whitepaper. [David Prutchi] has been working with imaging for a long time, and with his sharing of detailed build plans and exact part numbers maybe others will get in on the fun. He’s also previously shared full build plans for a Raspberry Pi based multispectral imager, [David’s] DOLPHi Polarization Camera was a finalist in the 2015 Hackaday Prize, and he spoke at the Hackaday SuperConference about the usefulness of advanced imaging techniques for things like tissue analysis in medical procedures, and landmine detection for the purposes of cleaning up hazardous areas.

UV Photographic Printer Lets You Use Strange Chemistries

There is a family of old photographic chemistries based on iron compounds which, like the blueprint, are exposed using UV light. Ironically, the digital camera revolution which has made everything else in our photographic lives much easier, has made it harder to experiment around with these alternative methods. [David Brown] is making a UV photographic printer to change that.

[David]’s application has a lot in common with PCB printers that use a UV-sensitive resist, only [David] needs greyscale, and it might also be nice if it could work with wet paper. This makes it a more challenging project than you might think, but we like the cut of [David]’s jib.

Like some of the other UV exposer projects, [David]’s uses a rotating mirror to scan across the to-be photograph’s surface. Unlike the other ones that we’ve seen, the exposer hangs from two linear rails. Other printers move the paper underneath a stationary scanning head, which seems a mechanically simpler arrangement. We’re excited to see how this goes.

There’s a lot of interest in UV PCB printers right now. We’ve seen one made from junked CD-ROM drives on one end of the spectrum to one made by retrofitting a delta robot on the other. And don’t disregard the work done by folks interested in UV-curing 3D printers, either.

Misleading Tech: Kickstarter, Bomb Sights, And Medical Rejuvinators

Every generation thinks it has unique problems and, I suppose, sometimes it is true. My great-grandfather didn’t have to pick a cell phone plan. However, a lot of things you think are modern problems go back much further than you might think. Consider Kickstarter. Sure, there have been plenty of successful products on Kickstarter. There have also been some misleading duds. I don’t mean the stupid ones like the guy who wants to make a cake or potato salad. I mean the ones that are almost certainly vaporware like the induced dream headgear or the Bluetooth tag with no batteries.

Overpromising and underdelivering is hardly a new problem. In the 30’s The McGregor Rejuvenator promised to reverse aging with magnetism, radio waves, infrared and ultraviolet light. Presumably, this didn’t work. Sometimes products do work, but they don’t live up to their marketing hype. The Segway comes to mind. Despite the hype that it would revolutionize transportation, the scooter is now a vehicle for tourists and mall cops.

One of my favorite examples of an overhyped product comes from World War II: The Norden Bomb Sight. What makes the Norden especially interesting is that even today it has a reputation for being highly accurate. However, if you look into it, the Norden–although a marvel for its day–didn’t always live up to its press.

Continue reading “Misleading Tech: Kickstarter, Bomb Sights, And Medical Rejuvinators”

UV Laser Projector Shines With Glow-in-the-Dark Vinyl

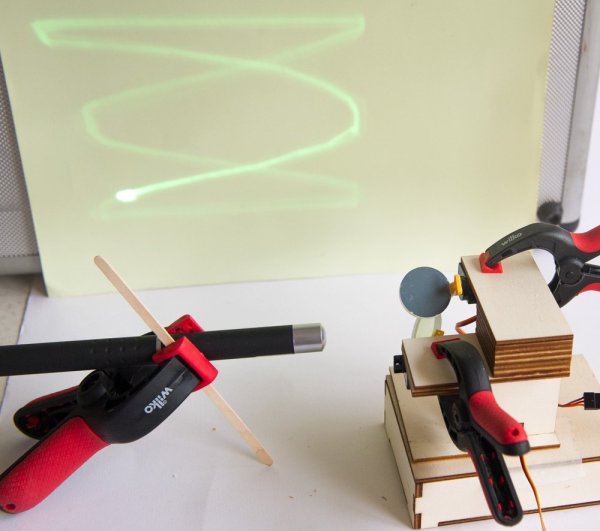
Mirror galvanometers were originally developed in the 17th century to precisely measure very small changes in current. Unlike other instruments of the day, a mirror galvanometer could clearly show minute current variations by translating tiny movements of the mirror into large movements of the light reflected off of the mirror. Before clean electrical amplification became possible, this was the best means of measuring tiny differences in current. True mirror galvanometers are very sensitive instruments, but hobby servos can be used as a low-fidelity alternative, like with this project on Hackaday.io created by [robives].

Using a mirror galvanometer is by far the most common technique for laser projection shows – it’s really the only way to move the laser’s beam quickly enough to create the visual illusion of a solid line in real time. A mirror galvanometer works by using coils to attract magnets attached to the mirror, allowing the angle of the mirror to change when current is applied to the coils. This movement is extremely small, but is amplified by the distance to the projection surface, meaning the laser’s beam can move huge distances in an instance. If you’ve ever seen a laser show, it almost certainly used this technique. But driving galvos requires a beefy DAC, so we can’t blame [robives] for wanting to keep it digital.

[robives’s] project side-steps the need for galvanometers by using glow-in-the-dark vinyl and a UV laser. The result is a laser beam trail which lasts much longer, which means that solid lines are visible without the need for high-speed galvos. A build like this lets you experiment with laser projections without dealing with sensitive mirror galvos, and instead use components that you probably already have sitting on your workbench.

Continue reading “UV Laser Projector Shines With Glow-in-the-Dark Vinyl”

An Exceptionally Small UV Sensor

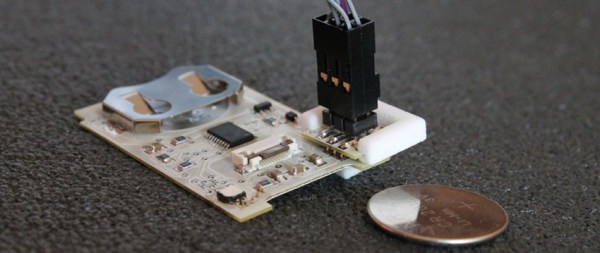
Most of the hacks we see hitting the tip line are exactly that – hacked up hardware projects held together with hot glue and duct tape. [x-labs]’ entry for the 2015 Hackaday Prize, the UV badge, is certainly not one of these projects. It’s a professional one-off, capable of displaying the UV index, temperature, humidity, and pressure in one tiny little enclosure.

The UV badge is designed to be used outdoors. This means any old display ripped from a Nokia phone won’t do; that will wash out in the sun. Instead, [x-labs] is using a very sunlight-readable Sharp Memory LCD. A nice choice, as it’s an exceptionally low-power device.

Inside the 54 x 34 x 7.1 mm 3D printed enclosure is a very thin PCB, and all surface-mount components. The device is powered by a single coin cell battery that should give months of run time.

With a product designed so well, we’re wondering if the UV badge will be in the running for the Best Product category of the Hackaday Prize this year. There aren’t many projects in the running, and the winner gets a enough funding, machinery, and experience to turn their project into a product.


The 2015 Hackaday Prize is sponsored by: