Build Your Own Programmable Logic Controller

[Q] is an Electrical Engineer who works in an industrial setting. He frequently uses Programmable Logic Controllers at work but had never built one himself. He decided to undertake the project at home and managed to build a PLC that outputs 120V AC or 12 V DC and has optoisolated inputs.

On the circuit board you’ll find an ATmega8 and an EEPROM for extra data storage. Six outputs are controlled by relays since they are able to output either alternating or direct current. There are eight inputs which use optical isolators as buffers to protect the microcontroller.

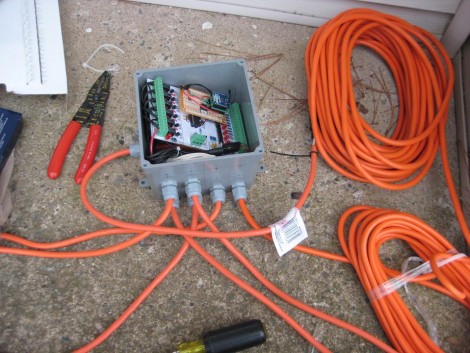
So what did he end up using this for? It was part of his Christmas light setup last year. The image above shows the PLC in a water-tight electrical box with extension cords running to each of the devices he wishes to control. The example code is what he used on the X-mas setup, but it should be enough of a guide to program this to work with just about any application.

Meet Mr. Clappidoo

mr_clappidoo

[Laurence] tinkers around the house quite a bit, making all sorts of fun interactive toys for his children to play with. Mr. Clappidoo is a toy that he finished a while back, which bears a striking resemblance to one of his projects we recently showed you, Papydoo. This is not a coincidence, as Papydoo was created after Mr. Clappidoo was built, borrowing many features from his predecessor.

Who is your daddy and what does he do?

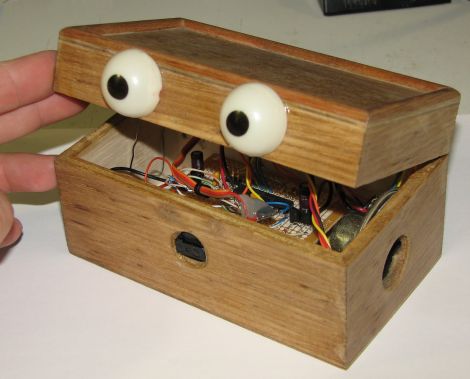
It’s a good thing you asked. Mr. Clappidoo uses an IR motion sensor to detect nearby objects, waking up and interacting with whatever crosses his path. He is capable of four different random moods ranging from angry to flirty. He projects these moods by changing the color of his LED-lit eyes as well as playing simple sounds. A balsa wood chest makes up Clappidoo’s body, and he repeatedly claps his lid mouth open and shut using a small servo, hence the name.

Like his other projects, [Lawrence] has focused his efforts to ensure that the three AA batteries used to power Clappidoo last as long as possible. He says that with moderate usage the device can run off the same set of batteries for a few months before needing replacement.

It’s a fun little contraption, sure to please the kids. Stick around for a quick video of Clappidoo in action.

Continue reading “Meet Mr. Clappidoo”

USB Keyboard Prankster

Being a long time prankster, [cyclonite] came up with this pretty clever hack in an old USB flash drive.

The drive was removed from its case, and the stock memory and controller was removed. On the back, an attiny 2313 is glued to the pcb, while resistors are swapped to work with the VUSB library. Wirewap wire is used to jumper all the needed points to the new micro controller on the back, and a temporary ICSP header was fitted on the end to load software.

What your’re left with is an innocent looking usb drive that, when plugged in, sets itself up as a keyboard then proceeds to toggle the caps lock on your victims computer every few minuets. Classic.

Join us after the break for a quick video.

Continue reading “USB Keyboard Prankster”

LED Matrix Helmits Inspiried By You-Know-Who

Here is a post from [John’s Projects]. For the insane, satirical, and incredible 2011 Omaha Groundhog Prom [John] and his buddy fabricated  helmets reminiscent of our favorite robot rockers.  [John] needed something harder, better, faster, stronger than the competition and wound up creating LED matrices that mount behind aerodynamic motorcycle helmet visors.

The helmets were constructed in about a weeks time and in a similar fashion to the real helmets. [John] sourced some cheap motorcycle headgear and mounted the LEDs, their driving transistors, and ballast resistors to a 1/32″ (flexible) plexiglass sheet that sits face to face with the wearer. [John] walks through the whole process starting with a half inch grid drawn onto a paper template. The template is cut from the plexi using tin snips, then LED holes are carefully drilled in the thin plastic using various bits up to 13/64″. The 90 some odd LEDs are, one more time, fitted then hot glued in place and soldered in vertical columns to simplify things and prevent any short circuit. An Arduino Pro (via common emitter 2n2222 on/off circuits) provides some digital love to the 18 LED columns and is connected to a Velleman Sound-to-light kit which modulates the brightness of the whole visor based on da funk. Two pots are also wired to provide sensitivity and pattern selection to the human after all.

We can’t imagine the technologic setup is fresh after being subjected to the steam machine, high life, and whatever else for too long. Oh yeah, Some brighter LEDs could give the helmets night vision and make the whole thing come alive with emotion. Something about us is burnin to know what powers the helmets. Nice work [John]!

If you are looking to do some homework on these high fidelity rock’n roll outfits in the prime time of your life check out this very detailed example, a helmet construction video,  or finish the costume off with some EL wire.

Check out some videos of these superheros rollin’ & scratchin’ after the jump!

Continue reading “LED Matrix Helmits Inspiried By You-Know-Who”

Real-time Robotic Arm Control With Blender

robotic_arm

Last year, [Justin Dailey] was coming down the home stretch of his senior year as a Computer Engineering student and needed to build a final design project. He always wanted to construct a robotic arm, and figured that there was no better way to legitimize such a project, than to claim that it was “homework”.

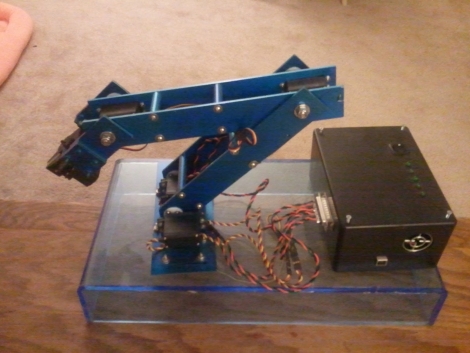
While he originally wanted to control the arm with a joystick, he had been messing with Blender quite a bit leading up to his final project, and thought it would be pretty cool to let Blender do the work. He started out by testing his ability to control a single servo with Blender, then slowly increased the complexity of the project. He prototyped the arm using cardboard, and satisfied with his progress thus far, began constructing the arm out of aluminum.

Once he had all six of his servos attached to the arm’s joints and wired to his Roboduino, he got busy constructing a 3D model in Blender. Using a few Python scripts, the movements inside Blender are translated to serial data in real-time, which is relayed to the Roboduino in order to control the arm.

Check out his site if you get a chance – there’s plenty of code to be had, as well as several videos of the arm in various stages of construction and testing.

A Weighted Companion Cube Worth Saving From The Incinerator

companion_cube

It’s honestly sad that Valve has not released any official Portal-related items to the masses, as a market for them clearly exists. As the saying goes, “necessity is the mother of invention”, and [Jamie] needed a Weighted Companion Cube in the worst way.

Actually he constructed his Companion Cube in order to test out some modifications and upgrades he performed on his homebrew CNC Mill. Judging by how the cube turned out, and the fact that he was able to keep tolerances within .005”, we would say that his mill is working just fine.

The cube was designed in Solidworks, and passed through the BobCAD plugin to generate the GCode for the mill. The base of the cube was machined out of a 3” solid block of aluminum, hollowed out on one side to give him access to the cube’s innards. He milled out heart shaped openings on each side, covering them with frosted Lexan.

He added a BlinkM to the mix, mounting it on the cover plate he milled for the open side of the cube. Once lit it cycles through several colors, including the pinkish tone anyone who has played Portal is quite familiar with.

We would say that it’s a great job, but it doesn’t do his work justice – it’s absolutely stunning. We’re not just saying that because we want one, though we do want one…badly.

3D Render Live With Kinect And Bubble Boy

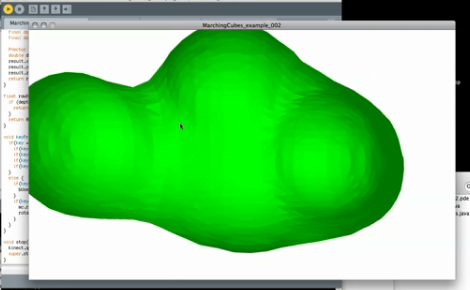
[Mike Newell] dropped us a line about his latest project, Bubble boy! Which uses the Kinect point cloud functionality to render polygonal meshes in real time.  In the video [Mike] goes through the entire process from installing the libraries to grabbing code off of his site. Currently the rendering looks like a clump of dough (nightmarishly clawing at us with its nubby arms).

[Mike] is looking for suggestions on more efficient mesh and point cloud code, as he is unable to run any higher resolution than what is in the video. You can hear his computer fan spool up after just a few moments rendering! Anyone good with point clouds?

Also, check out his video after the jump.

Continue reading “3D Render Live With Kinect And Bubble Boy”