Recycled Sound – An Art Installation Not Lacking Arduinos

[oakkar7] wrote in to show us [Ben Johansen] and [Jonathan Snow]’s  interactive art installation, Recycled Sound(Website has a virus). The exhibit will premiere  in the TWU Arts Triangle Walking Tour March 25th from 5-7pm.

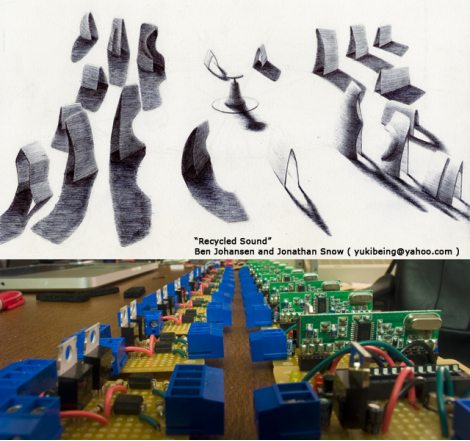
Currently a work in progress, the final plan is for the outdoor installation to feature a podium in the center with a rotating top, and various islands surrounding. As the podium’s top is rotated the surrounding islands come to life with a variety of light and sound displays which vary depending on how the podium is turned. While the electronics are not recycled, the actual sculptures and music making elements themselves consist of scrap yard parts and factory waste.

The whole display runs off of 12.. yes TWELVE Atmel 328s with Arduino boot loaders! The center podium houses a transmitting circuit consisting of two atmega 328s with Arduino boot loaders sharing a crystal, an hmc 6532 magnetometer breakout board and two RF transmitters.  The Islands each contain a receiving module with, obviously,  an Arduino and RF receiver. The receiving Arduinos connect to opto isolated switching modules for motors and lighting. Check out [Ben]’s blog for in progress shots, code, and build information.

If you are looking to control some 12V motors/lights with your 5V Arduino be sure to check out the pictures in the blog. While we here at Hackaday may be quick to jump into soldering [Ben] follows the proper development progression to the letter. Each aspect is bread boarded, then refined, then transferred to a soldered perf board.

update: His site has some kind of malware going on. None of us noticed it in Firefox, but after complaints we fired up ol IE. Yup, nastyness there. You can go there at the following link if you dare.

More after the jump:

Continue reading “Recycled Sound – An Art Installation Not Lacking Arduinos”
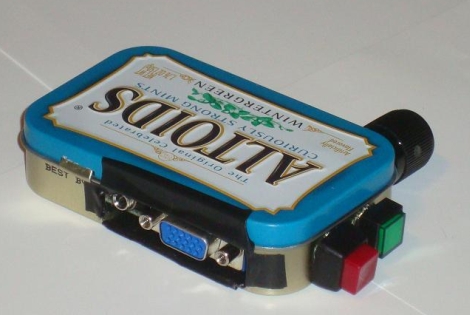
AV Test Box Meets The Incredible Shrink Ray

mini_avtester

[Chris] recently finished building a miniscule AV Test Box, capable of fitting inside a standard Altoids tin. It is a revision of a project he constructed a few years ago. His previous test box worked well, but was large and cumbersome – definitely not something you would want to carry around from place to place with any frequency.

The new test box does everything its predecessor is capable of, which includes displaying an 800×600 VGA test pattern as well as generating sound signals for testing audio systems. He updated the circuit design a bit, employing a newer PIC processor to run the show, otherwise most of the design details have remained the same, form factor aside.

His build log is full to the brim with details as usual. You will find thorough descriptions of all the components he used, schematics, source code, as well as the theory behind the build.

Be sure to check out the video embedded below of his new AV tester in action.

Continue reading “AV Test Box Meets The Incredible Shrink Ray”

Lego Minifig Multimeter Makes Resistor Sorting A Lot More Fun

lego_minifig_multimeter

While there’s typically not much room on our work bench for toys, [David] over at Robot Room has put together a pretty cool multimeter for which we would make an exception.

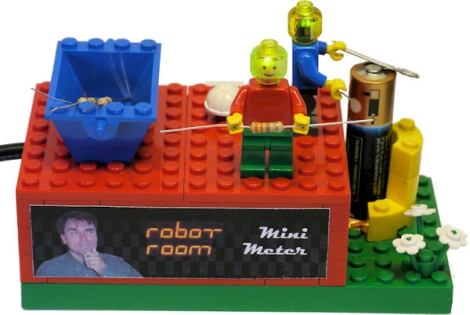
His Lego Minifig multimeter is constructed using mostly standard off-the-shelf Legos, and a pair of Minifigs he modified to suit his needs. Translucent Minifig heads were sourced online to allow the neck-mounted LEDs to shine through, and each of the bodies were drilled out in several places to accommodate the wires he uses to take measurements.

The multimeter will display the resistance of any item from 10 – 10,000,000 Ω, as well as measure the voltage of any battery you can manage to fit under the Minifig’s metal wrench. The multimeter takes measurements using an ATmega168, and relays that data through a serial to USB converter connected to a nearby computer. The computer is host to a .NET application he wrote which displays and speaks both the resistance and voltage values.

Keep reading to see a quick video walkthrough and a demonstration of the multimeter at work.

Continue reading “Lego Minifig Multimeter Makes Resistor Sorting A Lot More Fun”

N64Boy Advance

[Hailrazer] found a Game Boy Advance carrying case in his closet and thought he could pull off an N64Boy Advance in a few weekends. Despite the fast build time, [Hailrazer] built something that wouldn’t look out of place sitting on a shelf at a toy store.

This isn’t the first time we have covered an N64 Advance portable gaming system that uses a GBA carrying case, but this hack keeps the original styling of the Game Boy Advance without all the epoxy, bondo and sanding. Inside is a 4.3″ screen, GameCube joystick, N64 expansion pack, and enough Li-ion to get 5-6 hours of play time. The build doesn’t include a D-pad because [Hailrazer] doesn’t use that while playing. It also doesn’t have controller or A/V ports, because he doesn’t, “want to sit around with friends playing N64 on a 4.3″ screen.” A very pragmatic build, indeed.

We love seeing people re-purpose odd bits of plastic they have lying around, so we’re wondering when someone with an Original Game Boy Carrying Case will build an NESBoy. Video after the jump.

Continue reading “N64Boy Advance”

Quick And Dirty Film Dosimeter

With all the talk of radiation in the media today [freddysam] posted a quick Instructable about using standard camera film as a radiation dosimeter. Film is sensitive to other forms of radiation other than visible light, and high speed films are even more susceptible due to their chemistry, which has caused all sorts of headaches to travelers before most people went digital. This uses that headache as a simple way to see if you have been exposed to abnormal amounts of radiation in a  3 step process.

  1. Get some film. Yes they still sell it, it can still be found just about anywhere.
  2. In a dark room unroll a little out of the metal can and put it back in its black plastic container.
  3. Develop it if you think you have been exposed.

The idea is to let a few frames of film to be exposed to normal background radiation and develop it so you have something to compare with in the future, then you can unroll a bit more, and if you think your going into a hot area you can develop that newly exposed film to see roughly how much more radiation there was, maybe helping you sleep better at night.

LCD Twofer

Inexpensive character LCDs are a popular choice for outputting data on many projects. Easily controlled , often back lit, and compact. If you have not found a reason to get one yet, here are a couple.

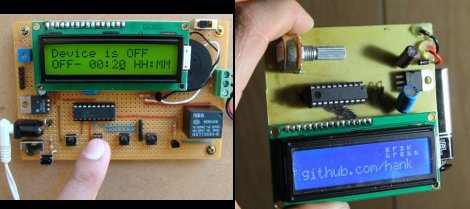
First up is a Programmable digital timer switch. Based around a PIC15f628A micro controller this handy little device allows you to set both on and off times to switch (light duty) devices through its relay. A standard 16×2 LCD , piezo buzzer, and 4 push buttons offer the device’s I / O. The four buttons are assigned to on / off time, select, enter, and start / stop making it easy for anyone to use. All this and sporting a clean perf-board layout which often goes out the window when using jumper wire.

Next for the AVR crowd is a LCD Name badge. Powered by a Attiny 2313 and using another 16×2 LCD, this time in blue this large, but functional name badge is ready to give out all the information people need on you while boasting your nerd credit.

Source and schematics are available for both, and yes we know these little gadgets are not exactly earth shattering so that is why we invite you to share your LCD projects on quite possibly the most awesome forum ever, the Hack A Day forums, we even have a little spot setup just for project logs.

But first join us after the break for a couple quick videos.

Continue reading “LCD Twofer”

Writing Python Drivers For Input Devices

[Stealth] put together a post explaining how he writes drivers for input peripherals. He’s using Python which makes the process fairly painless (we’ll get to that in a minute) but the value of his post is in the explanation surrounding how to interpret the data. Once you know how the communications are coming in from a device you can write the driver using any language you want. [Stealth] wrote in to let us know about this post after reading the PlayStation 3 Sixaxis controller sniffing hack. He’s pretty much doing the same thing but the background information is much more bountiful.

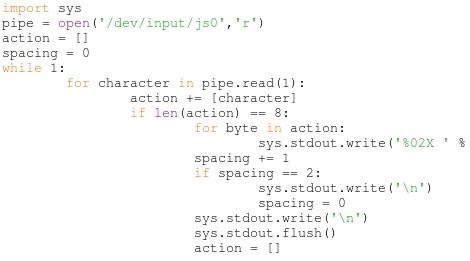
There are a couple of prerequisites to the process. First, [Stealth] is working in a Linux environment. That’s not to say you couldn’t do this on another OS, but you’re going to need to do some research to find out how to tap into the data stream from the device. Secondly, the input you are working with must already be set up and working on the machine. That means if there isn’t any support at all for the peripheral (in this case a USB joystick) you’re not going to be able to sniff the commands. That being said, a short Python snippet is all you need to dump the raw data coming in from the device. With data in hand it’s time to do some pattern hunting. As you start to figure out the size and scope of the incoming packets you can try out your own code to make sure you’ve got it right. Check out the demo video after the break which features a joystick button mapper written in Python.

Continue reading “Writing Python Drivers For Input Devices”