Robots Collaborate To Localize Themselves Precisely

Here’s the thing about robots. It’s hard for them to figure out where to go or what they should be doing if they don’t know where they are. Giving them some method of localization is key to their usefulness in almost any task you can imagine. To that end, [Guy Elmakis], [Matan Coronel] and [David Zarrouk] have been working on methods for pairs of robots to help each other in this regard.

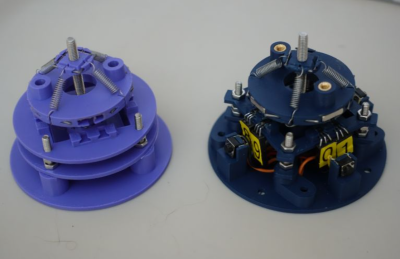
As per the research paper, the idea is to perform real-time 3D localization between two robots in a given location. The basic idea is that the robots take turns moving. While one robot moves, the other effectively acts as a landmark. The robots are equipped with inertial measurement units and cameras in a turret, which they use to track each other and their own movements. Each robot is equipped with a Raspberry Pi 4 for processing image data and computing positions, and the two robots communicate via Bluetooth to coordinate their efforts.

It’s an interesting technique that could have some real applications in swarm robotics, and in operations in areas where satellite navigation and other typical localization techniques are not practical. If you’re looking for more information, you can find the paper here. We’ve seen some other neat localization techniques for small robots before, too. Video after the break.

Continue reading “Robots Collaborate To Localize Themselves Precisely”

Fast 3D Printing With A Polar, Four Quadrant Custom Machine

3D printing is all well and good for making low numbers of units, so long as they’re small enough to print in a reasonable time, but what if you want to go really big? Does a 35-hour print time sound like a fun time? Would it even make it that long? [Nathan] from Nathan Build Robots didn’t fancy the wait, so they embarked on a project to build a huge parallel 3D printer with four independent print heads. Well, kind of. Continue reading “Fast 3D Printing With A Polar, Four Quadrant Custom Machine”

Setup of a small lightbulb passing light through a thin film

Experimenting With Interference On Thin Layers

[Stoppi] has taken on a fascinating project involving the interference of thin layers, a phenomenon often observed in everyday life but rarely explored in such depth. This project delves into the principles of interference, particularly focusing on how light waves interact with very thin films, like those seen in soap bubbles or oil slicks. The post is in German, but you can easily translate it using online tools.

Interference occurs when waves overlap, either reinforcing each other (constructive interference) or canceling each other out (destructive interference). In this project, [Stoppi] specifically examines how light behaves when passing through thin layers of air trapped between semi-transparent mirrors. When light waves reflect off these mirrors, the difference in path length leads to interference patterns that depend on the layer’s thickness and the wavelength of the light.

To visualize this, [Stoppi] used an interferometer made from semi-transparent mirrors and illuminated it with a bulb to ensure a continuous spectrum of light. By analyzing the transmitted light spectrum with a homemade spectrometer, he observed clear peaks corresponding to specific wavelengths that could pass through the interferometer. These experimental results align well with theoretical predictions, confirming the effectiveness of the setup.

If you like pretty patterns, soap bubbles are definitely good for several experiments. Don’t forget: pictures or it didn’t happen.

Continue reading “Experimenting With Interference On Thin Layers”

Illustrated Kristina with an IBM Model M keyboard floating between her hands.

Keebin’ With Kristina: The One With The Folding Typewriter

Have you built yourself a macro pad yet? They’re all sorts of programmable fun, whether you game, stream, or just plain work, and there are tons of ideas out there.

A DIY macro pad with key switches, dual linear pots, a rotary encoder, a screen, and a speaker.
Image by [CiferTech] via Hackaday.IO
But if you don’t want to re-invent the wheel, [CiferTech]’s MicroClick (or MacroClick — the jury is still out) might be just what you need to get started straight down the keyboard rabbit hole.

This baby runs on an ATmega32U4, which known for its Human Interface Device (HID) capabilities. [CiferTech] went with my own personal favorite, blue switches, but of course, the choice is yours.

There are not one but two linear potentiometers for volume, and these are integrated with WS2812 LEDs to show where you are, loudness-wise. For everything else, there’s an SSD1306 OLED display.

But that’s not all — there’s a secondary microcontroller, an ESP8266-07 module that in the current build serves as a packet monitor. There’s also a rotary encoder for navigating menus and such. Make it yours, and show us!

Continue reading “Keebin’ With Kristina: The One With The Folding Typewriter”

Hackaday Links Column Banner

Hackaday Links: August 25, 2024

The Sun has been remarkably active lately, so much so that it might have set a new sunspot record. According to the sun watchers at the Space Weather Prediction Center, on August 8, the Solar Dynamics Observatory snapped a picture that was positively bedazzled with sunspots. Counting methods vary, but one count put the sunspot number at a whopping 337 that day. That would be the largest number since 2001, during the peak of Solar Cycle 23. The sunspot number is highly correlated with solar storms and coronal mass ejections; more spots mean more magnetic activity and more chance for something to go very, very wrong. We’ve been pretty lucky so far with Solar Cycle 25; despite being much more active than the relatively lazy Cycle 24 and much stronger than predicted, most of this cycle’s outbursts have been directed away from Earth or only dealt us a glancing blow. Seeing all those spots, though, makes us think it’s only a matter of time before we get hit with something that does more than make pretty lights.

Continue reading “Hackaday Links: August 25, 2024”

3D Printed Electronics Breadboard

The printed breadboard cover, seen from the bottom. (Credit: CHEP, YouTube)
The printed breadboard cover as seen from the bottom. (Credit: CHEP, YouTube)

Does it make sense to make your own breadboards rather than purchasing off the shelf ones? As [Chuck Hellebuyck] notes in a recent video on DIY, 3D-printed breadboards, there’s a certain charm to making a breadboard exactly the size you need, which is hard to argue with. The inspiration came after seeing the metal breadboard spring clips on sale by [Kevin Santo Cappuccio], who also has a 3D printable breadboard shell project that they fit into. This means that you can take the CAD model (STEP file) and modify it to fit your specifications before printing it, which is what [Chuck] attempts in the video.

The models were exported from TinkerCAD to Bambu Lab Studio for printing on a Bambu Lab A1 Mini FDM printer. After a failed first print (which the A1 Mini, to its credit, did detect), a model was printed on a Creality K1 Max instead. Ultimately [Chuck] traced this back to the Bambu Lab Studio slicer failing to add the inner grid to the first layer, which the Creality slicer did add, caused by the ‘wall generator’ setting in the Bambu Lab slicer being set to ‘Classic’ rather than ‘Arachne,’ which can vary line width.

After this, the models printed fine and easily fit onto the spring clips that [Chuck] had soldered down on some prototyping board. A nice feature of these spring clips is that they have a bit of space underneath them where an SMD LED can fit, enabling functional (or just fancy) lighting effects when using a custom PCB underneath the contraption. As for whether it’s worth it depends on your needs. As [Chuck] demonstrates, it can be pretty convenient for a small breadboard on an add-on card (with or without custom lighting) like this, but it’s unlikely to replace generic breadboards for quick prototyping. We can, however, imagine a custom breadboard with mounting points for things like binding posts, switches, or potentiometers.

If we had that kind of custom breadboard, we wouldn’t need these. People were making custom breadboards back in 1974, but they didn’t look like these.

Continue reading “3D Printed Electronics Breadboard”

A Simple 6DOF Hall Effect ‘Space’ Mouse

The 3DConnexion Space mouse is an interesting device but heavily patent-protected, of course. This seems to just egg people on to reproduce it using other technologies than the optical pickup system the original device uses. [John Crombie] had a crack at building one using linear Hall effect sensors and magnets as the detection mechanism to good — well — effect.

Using the SS49E linear Hall effect sensor in pairs on four sides of a square, the setup proves quite straightforward. Above the fixed sensor plate is a moveable magnet plate centred by a set of springs.  The magnets are aligned equidistant between each sensor pair such that each sensor will report an equal mid-range signal with zero mechanical displacement. With some simple maths, inputs due to displacements in-plane (i.e., left-right or up-down) can be resolved by looking at how pairs compare to each other. Rotations around the vertical axis are also determined in this manner.

Tilting inputs or vertical movements are resolved by looking at the absolute values of groups or all sensors. You can read more about this by looking at the project’s GitHub page, which also shows how the to assemble the device, with all the CAD sources for those who want to modify it. There’s also a detour to using 3D-printed flexures instead of springs, although that has yet to prove functional.

On the electronics and interfacing side of things, [John] utilises the Arduino pro micro for its copious analog inputs and USB functionality. A nice feature of this board is that it’s based on the ATMega32U4, which can quickly implement USB client devices, such as game controllers, keyboards, and mice. The USB controller has been tweaked by adjusting the USB PID and VID values to identify it as a SpaceMouse Pro Wireless operating in cabled mode. This tricks the 3DConnexion drivers, allowing all the integrations into CAD tools to work out of the box.

We do like Space Mouse projects. Here’s a fun one from last year, an interesting one using PCB coils and flexures, and a simple hack to interface an old serial-connected unit.