RC car without a top, showing electronics inside.

Fast Indoor Robot Watches Ceiling Lights, Instead Of The Road

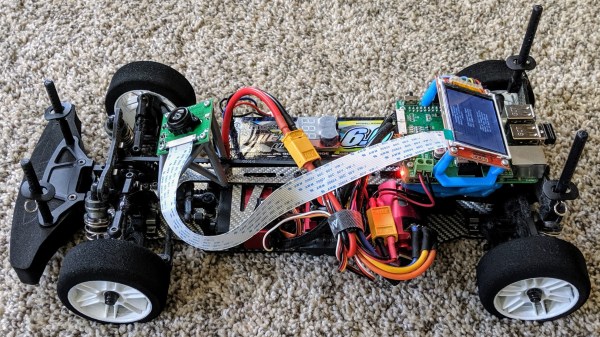
[Andy]’s robot is an autonomous RC car, and he shares the localization algorithm he developed to help the car keep track of itself while it zips crazily around an indoor racetrack. Since a robot like this is perfectly capable of driving faster than it can sense, his localization method is the secret to pouring on additional speed without worrying about the car losing itself.

The regular pattern of ceiling lights makes a good foundation for the system to localize itself.

To pull this off, [Andy] uses a camera with a fisheye lens aimed up towards the ceiling, and the video is processed on a Raspberry Pi 3. His implementation is slick enough that it only takes about 1 millisecond to do a localization update, netting a precision on the order of a few centimeters. It’s sort of like a fast indoor GPS, using math to infer position based on the movement of ceiling lights.

To be useful for racing, this localization method needs to be combined with a map of the racetrack itself, which [Andy] cleverly builds by manually driving the car around the track while building the localization data. Once that is in place, the car has all it needs to autonomously zip around.

Interested in the nitty-gritty details? You’re in luck, because all of the math behind [Andy]’s algorithm is explained on the project page linked above, and the GitHub repository for [Andy]’s autonomous car has all the implementation details.

The system is location-dependent, but it works so well that [Andy] considers track localization a solved problem. Watch the system in action in the two videos embedded below.

Continue reading “Fast Indoor Robot Watches Ceiling Lights, Instead Of The Road”

Making A Metal Hand Doorknob

Regular doorknobs are widely reviled for their bare simplicity, but by and large society has so many other problems that it never really comes up in day to day conversation. Fear not, however, for [Matthew] has created something altogether more special: a doorknob in the shape of his own outstretched hand.

The build was inspired by a similar doorknob at the WNDR museum in Chicago, and its one you can recreate yourself, too. It’s achieved through a multi-stage mold making process. [Matthew]’s first step was to make a flexible mold of his hand using Perfect Mold alginate material to do so.

Once solidified, [Matthew’s] hand was removed and the mold filled with wax. The wax duplicate of [Matthew]’s hand was then used to create an investment plaster mold for casting metal. Vents were added in the end of each fingertip in the mold to allow molten metal to effectively fill the entire cavity.

Once the investment mold was solid and dry, the wax was melted out and it was ready for casting. A propane furnace was used to melt the casting metal and fill the mold using a simple gravity casting method. [Matthew] ended up making two hands, one in aluminium and one in copper. Some cleanup with grinders and a wire wheel, and a replica of [Matthew]’s hand was in his hands!

The finished piece looks great attached to a door knob, and we’re sure it’s quite satisfying shaking hands with your hefty metal self every time you open the door. It bears noting that the same techniques can be used with 3D printing, too! If you pull off your own great home casting project, be sure to drop us a line. Video after the break.

Continue reading “Making A Metal Hand Doorknob”

Tesla Door Handle Improvements

Automotive engineer and former Tesla employee [SuperfastMatt] takes at look at the notorious Tesla door handle design and how it’s changed over the years (see the video below the break). The original handle design consisted of many moving parts, switches and wires which were prone to failure.  Strictly speaking, the door handle is located on the outside of the car’s interior. While it’s sheltered from direct exposure to the elements, it still experiences the extremes of temperature, humidity, and condensation. The handles were so prone to failure that a cottage industry sprang up to provide improved parts and replacements.

Tesla made various improvements over the years, culminating in the latest version which [Matt] reviews in this video. Nearly all the failure points have been eliminated, and the only moving parts, other than the handle itself, is a magnetic sensor to detect handle motion (previously this was sensed by microswitches). [Matt] indelicately opens up the control module, and discovers an NXP programmable angle sensor ( KMA215 ). This all-in-one sensor detects the angle of a magnetic field, and reports it over an automotive communications bus that’s become more and more common over the last ten years: Single Edge Nibble Transmission (SENT) aka SAE J2716. SENT is a low-cost, transmit-only protocol designed for sensors to send data to the ECU. Check out [Matt] decoding it on the oscilloscope and Raspberry Pi in the video — it looks pretty simple at first glance.

We agree with [Matt]’s conclusion that the door handle design has been significantly improved with this latest iteration, questions of whether one needs a retracting door handle aside. If you’d like to learn more about SENT, here is a tutorial written by IDT (now Renasas) applications engineer Tim White. This isn’t [Matt]’s first encounter with a Tesla door handle — back in 2012 we covered his project which used one to dispense beer. Thanks to [JohnU] for sending in this tip.

Continue reading “Tesla Door Handle Improvements”

Overengineering A Smart Doorbell

Fresh from the mediaeval splendour of the Belgian city of Gent, we bring you more from the Newline hacker conference organised by Hackerspace Gent. [Victor Sonck] works at the top of his house, and thus needed a doorbell notifier. His solution was unexpected, and as he admits over engineered, using machine learning on an audio stream from a microphone to detect the doorbell’s sound.

Having established that selling his soul to Amazon with a Ring doorbell wasn’t an appropriate solution, he next looked at his existing doorbell. Some of us might connect directly to its power to sense when the button was pressed, but we’re kinda glad he went for the overengineered route because it means we are treated to a run-down how machine learning works and how it can be applied to audio. The end result can sometimes be triggered by a spoon hitting a cereal plate, but since he was able to demonstrate it working we think it can be called a success. Should you wish to dive in further you can find more in his GitHub repository.

How would you overengineer a doorbell? Use GNU radio and filters? Or maybe a Rube Goldberg machine involving string and pulleys? As always, the comments are open.

Continue reading “Overengineering A Smart Doorbell”

RevK_NFC-Reader_v2-Photo

NFC Who’s At The Door

RevK_NFC_v1-Prototype-Photo
An early prototype that worked on the first try, except for one LED

[RevK] wanted to learn about NFC readers, and we agree that the best way to do so is to dive in and build one yourself.

There are readers available from multiple sources, but [RevK] found them either compact but with no prototyping space or plenty of prototyping space and a large footprint. High-speed UART (HSU) was selected over I2C for communication with an ESP32 as testing showed it was just as fast and more reliable over long distances at the cost of only one additional wire.

After a few versions, the resulting PN532 based NFC reader has just enough GPIO for a doorbell and tamper switch and three status LEDs, with board files and a 3D-printed case design included in the open source project on GitHub. When looking into the project, we appreciated learning about tamper switches that can include closed or open contact status when an NFC is read, most often used in the packaging of high-value and collectible products. If you have worked with this tamper feature of NFCs, let us know about it.

Thanks for the tip, [Simon]

Evan Doorbell’s Telephone World

Ah, phone phreaking. Some of us are just old enough to remember the ubiquity of land lines, but just young enough to have missed out on the golden years of phreaking. There’s something nostalgic about the analog sounds of the telephone, and doubly so when you understand what each click and chunk sound means. If this wistful feeling sounds familiar, then you too will appreciate [Evan Doorbell] and his recordings of 1970s telephone sounds. He’s been slowly working through his old recordings, and compiling them into a series of narrated tours of the phreak subculture.

[Evan]’s introduction to exploring the phone system started from a misdialed number, and an odd message. He describes that recorded “wrong number” message as being very different from the normal Ma Bell messages — this one was almost sultry. What number did he have to dial to hear that unique recording again? What follows is a youth spent in pursuit of playing with the phone system, though it would be more accurate to say the “phone systems”, as discovering the differences between the various local phone exchanges is a big part of the collection. Check out the first tape in the series after the break.
Continue reading “Evan Doorbell’s Telephone World”

USB Power Bank’s Auto-Off Becomes Useful Feature In Garage Door Remote

For devices that are destined for momentary and infrequent use as well as battery power, some kind of power saving is pretty much a required feature. For example, when [PJ Allen] turned two ESP8266-based NodeMCU development boards into a replacement wireless remote garage door opener, a handy USB power bank ended up serving as a bit of a cheat when migrating the remote away from the workbench. Instead of moving the board from USB to battery power and implementing some kind of sleep mode or auto-off, [PJ Allen] simply plugged in a USB power bank and let it do all the work.

This is how the feature works: some USB power banks turn themselves off unless they detect a meaningful current draw. That means that if the power bank is charging a phone, it stays on, but if it’s only lighting up a few LEDs, it’ll turn itself off. This feature can be a frustrating one, but [PJ Allen] realized that it could actually be useful for a device like his garage door remote. Turning on the power bank delivers 5 V to the NodeMCU board and allows it to work, but after about fifteen seconds, the power bank turns itself off. Sure, strapping a power bank to the remote makes the whole thing bigger than it needs to be, but it’s a pretty clever use of the minimum load as an effortless auto-off feature.

The NodeMCU boards in [PJ Allen]’s DIY remote use ESP-NOW for their wireless communications, a nifty connectionless protocol from Espressif that we’ve seen used in other projects as well, such as this ESP32-based walkie-talkie.