Robot Arm Adds Freedom To 3D Printer

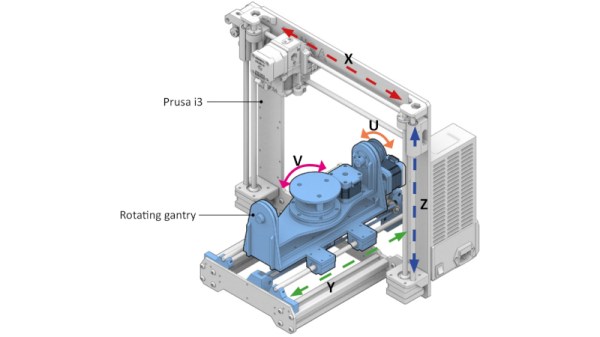
3D printers are an excellent tool to have on hand, largely because they can print other tools and parts rapidly without needing to have them machined or custom-ordered. 3D printers have dropped in price as well, so it’s possible to have a fairly capable machine in your own home for only a few hundred dollars. With that being said, there are some limitations to their function but some of them can be mitigated by placing the printer head on a robot arm rather than on a traditional fixed frame.

The experimental 3D printer at the University of Nottingham adds a six-axis robotic arm to their printer head, which allows for a few interesting enhancements. Since the printer head can print in any direction, it allows material to be laid down in ways which enhance the strength of the material by ensuring the printed surface is always correctly positioned with respect to new material from the printer head. Compared to traditional 3D printers which can only print on a single plane, this method also allows for carbon fiber-reinforced prints since the printer head can follow non-planar paths.

Of course, the control of this printer is much more complicated than a traditional three-axis printer, but it is still within the realm of possibility with readily-available robotics and microcontrollers. And this is a hot topic right now: we’ve seen five-axis 3D printers, four-axis 3D printers, and even some clever slicer hacks that do much the same thing. Things are finally heating up in non-planar 3D printing!

Thanks to [Feinfinger] for the tip!

Continue reading “Robot Arm Adds Freedom To 3D Printer”

Getting Started With Aluminum Extrusions

T-slot extrusions used to be somewhat mysterious, but today they are quite common thanks to their use in many 3D printers. However, it is one thing to assemble a kit with some extrusions and another thing to design your own creations with the material. If you ever had a Play-Doh Fun Factory as a kid, then you know about extrusions. You push some material out through a die to make a shape. Of course, aluminum extrusions aren’t made from modeling clay, but usually 6105-T5 aluminum. Oddly, there doesn’t seem to be an official standard, but it is so common that there’s usually not much variation between different vendors.

We use extrusions to create frames for 3D printers, laser cutters, and CNC machines. But you can use it anywhere you need a sturdy and versatile frame. There seems to be a lot of people using them, for example, to build custom fixtures inside vans. If you need a custom workbench, a light fixture, or even a picture frame, you can build anything you like using extrusions. Continue reading “Getting Started With Aluminum Extrusions”

3D Printed Earth Clock Is Cute Replica Of Our Delicate Planet

Plenty of clocks around us are useful for telling us the precise hour, minute, and second of the day. However, few can give us an intuitive sense of how far away we are from the enveloping cloak of night. This 3D printed Earth clock built by [Simon Rob] promises to do just that.

The build consists of an Arduino Nano driving a stepper motor, which turns a 3D printed model of the Earth through 360 degrees each day. The Earth is rotated within a black shroud such that the current portion of the Earth seeing sunlight is the visible section on the clock, while the rest is hidden from view. There’s a three-stage planetary gear reduction which turns a date wheel connected to the black shroud so that the clock remains accurate throughout the year. The gear ratio isn’t perfect — [Simon] calculates its drift to be 20 hours over a year -but it’s close enough for the clock’s given purpose of being a cool thing.

The clock looks great, and a lot of that is down to [Simon]’s careful work painting the Earth to match the real thing based on Google’s satellite maps. Incidentally it’s not the first Earth clock we’ve seen, either. We might just have to get building one for our own coffee table at home. Video after the break.

Continue reading “3D Printed Earth Clock Is Cute Replica Of Our Delicate Planet”

Lithophane Lamp Has Us Over The Moon

Lithophanes are artistic creations which rely on the varying thickness of a material that is then backlit to reveal an image. While these were often made in porcelain in the past, these days we have the benefit of 3D printing on our side. The principle can be deftly applied to everything from flat planes to spheres, with [Tiffany Lo] demonstrating a great application of the latter with her 3D printed moon lamp.

The basic concept is to take a 2D image of the lunar surface, and then use it to generate a height mapped sphere for 3D printing. When lit from within, the sphere will appear as per the surface of the moon. The sphere geometry was generated with the Lithophane Sphere Maker online tool combined with NASA data of the moon intended for computer graphics purposes. The sphere was then printed on a typical FDM printer before being assembled upon a base with LEDs inside for backlighting.

The result is an attractive moon lamp that both recalls the heavy rock that follows us in a tidally-locked orbit, and yet can be switched off at night to make it easier to sleep. Unfortunately, it’s impractical to turn off the shine from the real moon, and we suspect nobody is working on the problem.

We’ve seen other moon lamps before; they’re a great starting point because the moon’s greyscale tones work well as a lithograph. More advanced techniques are likely necessary for those eager to create lamps of the gas giants; if you’ve done so, be sure to drop us a line.

3D Printing Omni-Balls For Robot Locomotion

Wheels are all well and good for getting around, but they only tend to rotate about a single axis. Omni-wheels exist, but they’re still a little too pedestrian for [James Bruton]. His latest project involved 3D printing custom omni-balls which roll in all directions. (Video, embedded below.)

The omniball concept comes from earlier work by Osaka University, which also produced a treaded tank-like vehicle by the name OmniCrawler as well. The spherical design, fitted with an axle and casters as well, allows rotation in multiple directions, allowing for a platform fitted with such omni-balls to easily rotate and translate in all directions.

[James] set about creating his own version of the design, which relies on grippy TPU filament for grip pads to give the 3D printed hemispheres some much needed grip. There’s also bearings inside to allow for the relative rotation between the hemispheres and the internal castor, necessary to allow the wheels to move smoothly when sitting on either pole of the hemispheres. Skate bearings were then used to assemble three of the omni-balls onto a single platform, which demonstrated the ability of the balls to roll smoothly in all directions.

While it’s just a demonstration of the basic idea for now, we can imagine these balls being used to great effect for a robot platform that needs to navigate in tight spaces on smooth surfaces with ease. The mechanical complexity of the omni-balls probably negates their effective use in dirtier offroad contexts, however.

We’ve seen [James]’s work before too – such as his compliant leg design for walking robots, and his active gyroscope balancer last week. When does [James] sleep?

Continue reading “3D Printing Omni-Balls For Robot Locomotion”

Toolchanging Printers Get A Nozzle Hanky Like No Other

When it comes to toolchanging 3D printers, idle nozzles tend to drool. Cleaning out that nozzle goo, though, is critical before switching them into use. And since switching nozzles can happen hundreds of times per print, having a rock-solid cleaning solution is key to making crisp clean parts. [Kevin Mardirossian] wasn’t too thrilled with the existing solutions for cleaning, so he developed the Pebble Wiper, a production worthy nozzle wicking widget that’s wicked away nozzles thousands of times flawlessly.

With a little inspiration from [BigBrain3D’s] retractable purge mechanism, [Kevin] is first purging tools onto a brass brad. Rather than have filament extrude into free space, it collects into a small bloblike “pebble” that cools quickly into a controlled shape. From here, after one quick flick with a servo arm and a small wipe with a silicone basting brush, the nozzle is ready to use. The setup might sound simple, but it’s the result of thousands and thousands of tests with the goal of letting no residual ooze attach itself to the actual part being printed. And that’s after [Kevin] put the time into scratch-building his own toolchanging 3D printer to test it on first. Finally, he’s kindly made the files available online on Github for other hackers’ tinkering and mischief.

So how well does it work? Judging by the results he’s shared, we think spectacularly. Since adopting it, he’s dropped any sacrificial printing artefacts on the bed entirely and been able to consistently pull off stunning multimaterial prints flawlessly with no signs of residual nozzle drool. While toolchanging systems have been great platforms for hacking and exploration, [Kevin’s] Pebble Wiper takes these machines one step closer at hitting “production-level” of reliability that minimizes waste. And who knows? Maybe all those pebbles can be sized to be ground up, remade into filament, and respooled back into usable filament?

Continue reading “Toolchanging Printers Get A Nozzle Hanky Like No Other”

Putting 3D Printed Chain Through Its Paces

One of the more frustrating things facing makers in decades past was the problem of power transmission. Finding things like belts, pulleys, sprockets, and chain for your projects could be difficult, particularly if you lived far from the shipping radius of suppliers like McMaster-Carr. These days, there’s no need to fuss, because you can simply 3D print whatever you need,  as [Let’s Print] demonstrates by whipping up some chains.

The chains are a mixed design, combining plastic inner and outer links with bolts and nuts to fasten them together. [Let’s Print] tries out several combinations of ABS, PLA, and PETG, running them on 3D printed sprockets and determining that they are all functional, albeit at minimum load. The chains are also put through tensile testing by attaching a heavy brake disc to a length of chain and dropping the weight to see at which point the chains snap.

We’d love to see more 3D-printed chains; all-plastic snap-together designs, or even those that print pre-assembled are particularly tantalizing ideas. We’d also enjoy more testing done with the chain under some proper torque loads, rather than just spinning freely.

We’ve seen work from [Let’s Print] before, too – in the case of this awesome water pump. Video after the break.

Continue reading “Putting 3D Printed Chain Through Its Paces”