Talking To A Texas Instruments Calculator

Texas Instruments is a world-class semiconductors company, but unfortunately what they are best known for among the general public is dated consumer-grade calculators thanks to entrenched standardized testing. These testing standards are so entrenched, in fact, that TI has not had to update the hardware in these calculators since the early 90s. They still run their code on a Z80 microcontroller, but [Ben Heck] found himself in possession of one which has a modern ARM coprocessor in it and thus can run Python.

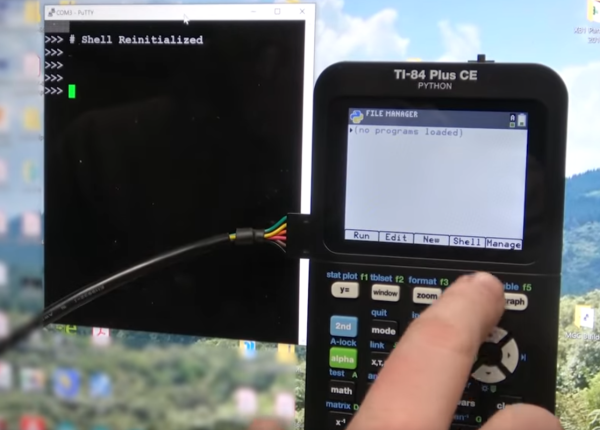
While he’s not sure exactly what implementation of Python the calculator is running, he did tear it apart to try and figure out as much as he could about what this machine is doing. The immediately noticeable difference is the ARM coprocessor that is not present in other graphing calculators. After some investigation of test points, [Ben] found that the Z80 and ARM chips are communicating with each other over twin serial lines using a very “janky” interface. Jankiness aside, eventually [Ben] was able to wire up a port to the side of the calculator which lets him use his computer to send Python commands to the device when it is in its Python programming mode.

While there are probably limited use cases for 1980s calculators to run Python programs, we can at least commend TI for attempting to modernize within its self-built standardized testing prison. Perhaps this is the starting point for someone else to figure out something more useful to put these machines to work with beyond the classroom too. We’ve already seen some TI-84s that have been modified to connect to the Internet, for example.

Thanks to [Nikša] for the tip!

Continue reading “Talking To A Texas Instruments Calculator”

Open-Source Farming Robot Now Includes Simulations

Farming is a challenge under even the best of circumstances. Almost all conventional farmers use some combination of tillers, combines, seeders and plows to help get the difficult job done, but for those like [Taylor] who do not farm large industrial monocultures, more specialized tools are needed. While we’ve featured the Acorn open source farming robot before, it’s back now with new and improved features and a simulation mode to help rapidly improve the platform’s software.

The first of the two new physical features includes a fail-safe braking system. Since the robot uses electric geared hub motors for propulsion, the braking system consists of two normally closed relays which short the motor leads in emergency situations. This makes the motors see an extremely high load and stops them from turning. The robot also has been given advanced navigation facilities so that it can follow custom complex routes. And finally, [Taylor] created a simulation mode so that the robot’s entire software stack can be run in Docker and tested inside a simulation without using the actual robot.

For farmers who are looking to buck unsustainable modern agricultural practices while maintaining profitable farms, a platform like Acorn could be invaluable. With the ability to survey, seed, harvest, and even weed, it could perform every task of larger agricultural machinery. Of course, if you want to learn more about it, you can check out our earlier feature on this futuristic farming machine.

Giant PC fan

3D-Printed Parts Let You Assemble Your Own Biggest Fan

It’s getting close to the time of year when we need to start carefully vetting projects here at Hackaday. After all, nobody likes to get punked by an early April Fool’s joke. But as silly as this outsized PC fan looks, it sure seems like a legit build, if a bit on the pointless side.

Then again, perhaps pointless is too harsh a word to use. This 500-mm fan is by [Angus] over at Maker’s Muse, and it represents a lot of design work to make it buildable, as well as workable and (mostly) safe. Using both CNC-cut MDF and printed parts, the fan is an embiggened replica of a normal-sized case fan. The fan’s frame had to be printed in four parts, which lock together with clever interlocking joints. Each of the nine blades locks into a central hub with sturdy-looking dovetails.

And sturdy is important, as the fan is powered by a 1,500 Watt brushless DC motor. With a 4:1 reduction thanks to a printed gear train, the fan spins at around 3,300 RPM, which makes a terrifying noise. There’s a little bit of “speed-wobble” evident, but [Angus] managed to survive testing. The fan, however, did not — the 3D-printed gears self-destructed after a full-speed test, but not before the fan did its best wind tunnel imitation. And the RGB LEDs looked great.

This one reminds up of something we might see [Ivan Miranda] come up with. In fact, his super-sized 3D printer might have been just the thing to shorten [Angus]’ print times.

Continue reading “3D-Printed Parts Let You Assemble Your Own Biggest Fan”

Tracked RC Vehicle Is (Mostly) 3D Printed

While wheels might seem like a foundational technology, they do have one major flaw: they typically need maintained roads in order to work. Anyone who has experience driving a Jeep or truck off-road likely knows this first-hand. For those with extreme off-road needs the track is often employed. [Let’s Print] is working on perfecting his RC tracked vehicle to take advantage of these perks using little more than 3D printed parts and aluminum stock.

This vehicle doesn’t just include the 3D printed tracks, but an entire 3D printed gearbox and drivetrain to drive them. Each track is driven by its own DC motor coupled to a planetary gearbox to give each plenty of torque to operate in snow or mud. The gearbox is mated to a differential which currently shares a shaft, which means that steering is currently not possible. The original plan was to have each motor drive the tracks independently but a small mistake in the build meant that the shaft needed to be tied together. [Let’s Print] has several options to eventually include steering, including an articulating body or redesigning the drivetrain to be able to separate the shaft.

While this vehicle currently has no wheels in order to improve traction, [Let’s Print] does point out that a pair of wheels could complement this vehicle when he finished the back half of it since wheels have a major advantage over tracks when it comes to steering. A vehicle with both could have the advantages of both, so we’re interested to see where this build eventually goes.

Thanks to [Joonas] for the tip!

Continue reading “Tracked RC Vehicle Is (Mostly) 3D Printed”

3D Printed Molds For Casting Rose’s Metal

Have you ever played with Rose’s metal? It’s a fusible alloy of bismuth, lead, and tin with a low melting point of around 100 °C. Historically, it’s been used as a solder for cast iron railings and things, and as a malleable pipe filler material to prevent crimping while a pipe is bent.

[Ben Healey] has been playing around with Rose’s metal and some PETG printed molds, making everything from Star Wars Imperial credits to chess pieces to leather stamping tools. In the video after the break, [Ben] takes us through the process, beginning with mold-making from STLs — something he picked up from another YouTuber.

He recommends adding registration marks to multi-part molds in order to keep everything lined up, and adding a small recess in the seam for easy separation with a flat-head screwdriver. So far, the molds have held up to multiple pours, though [Ben] did print them rather thick and is glad he did.

As far as making liquid metal, [Ben] used a cast iron pot with a convenient pour spout, and a blowtorch. He added graphite powder to the molds in an effort to make them give up the goods more easily. To finish the pieces, [Ben] cut the flashing with tin snips and used sandpaper and a Dremel to smooth the edges. Copper plating didn’t work out, but [Ben] is going to try it again because he thinks he screwed something up in the process. He’s also going to try printing with TPU, which we were just about to recommend for its flexibility.

There are many ways to cast metal on the (relatively) cheap. Have you considered Kinetic Sand?

Continue reading “3D Printed Molds For Casting Rose’s Metal”

Remoticon 2021 // Arsenijs Tears Apart Your Laptop

Hackaday’s own [Arsenijs Picugins] has been rather busy hacking old laptops apart and learning what can and cannot be easily reused, and presents for the 2021 Hackaday Remoticon, a heavily meme-loaded presentation with some very practical advice.

Full HD, IPS LCD display with touch support, reused with the help of a dedicated driver board

What parts inside a dead laptop are worth keeping? Aside from removable items like RAM stick and hard drives, the most obvious first target is the LCD panel. These are surprisingly easy to use, with driver boards available on the usual marketplaces, so long as you make sure to check the exact model number of your panel is supported.

Many components inside laptops are actually USB devices, things like touch screen controllers, webcams and the like are usually separate modules, which simply take power and USB. This makes sense, since laptops already have a fair amount of external USB connectivity, why not use it internally too? Other items are a bit trickier: trackpads seem to be either PS/2 or I2C and need a bit more hardware support. Digital microphones mostly talk I2S, which means some microcontroller coding.

Some items need a little more care, however, so maybe avoid older Dell batteries, with their ‘spicy pillow’ tendencies. As [Arsenijs] says, take them when they are ripe for the picking, but not too ripe. Batteries need a little care and feeding, make sure you’ve got some cell protection, if you pull raw cells! Charging electronics are always on the motherboard, so that’s something you’ll need to arrange yourself if you take a battery module, but it isn’t difficult, so long as you can find your way around SMBus protocol.

These batteries are too ripe. Leave them alone.

Older laptops were much more modular and some even designed for upgrade or modification, and this miniaturization-driven trend of shrinking everything — where a laptop now needs to be thin enough to shave with — is causing some manufacturers to move in a much more proprietary direction regarding hardware design.

This progression conflicts with our concerns of privacy, repairability and waste elimination, resulting in closed boxes filled with unrepairable, non-reusable black boxes. We think it’s time to take back some of the hardware, so three cheers to those taking upon themselves the task to reverse engineer and publish reusability information, and long may it be possible to continue.

Continue reading “Remoticon 2021 // Arsenijs Tears Apart Your Laptop”

Doubled Up 3D Printer Upgrade Doubles The Fun

[Nathan] from Nathan Builds Robots on YouTube is no stranger to modding 3D printers, whether it’s a good idea or not, it’s just fun to find out sometimes. His latest escapade he calls the Double Ender (video, embedded below), where he not only doubles up the hotend, but the doubles up a few other bits too. The aim was to achieve dual material printing, with his specific goal to combine plain nylon and carbon fiber-loaded nylon in the same print, to get the best properties of both materials.

Perfects results on the first try!

Taking a stock Ender 3 v2, [Nathan] first installs a dual Z axis kit, doubling up the Z axis screw and associated stepper motors. Likely this was needed to compensate for the additional weight of subsequent mods. Since the stock Ender mainboard has only one Z axis port, the less obvious solution was to just install a second mainboard! By leveraging the immense hackability of the Klipper printer firmware/software stack,he was able to get this weird configuration to work.

Next the main part of the build; the Phaetus Tai Chi dual hot end installation. For some reason, initially, it was decided to combine the stock bowden injector/extruder with a direct drive second unit, which we guess keeps the reciprocating weight down a bit and does let you directly compare bowden and direct drive print results on the same machine. Anyway, the first dual material prints came out pretty good after a few (quickly glossed over) fails, and did work well enough that dual-nylon printing could now be an option. After switching the build to a dual direct-drive setup, [Nathan] found it easier to get the machine to switch filaments more reliably, which makes sense when you think about the impact of all that extra filament in the bowden tube.

[Nathan] clearly has been burned (haven’t we all?) possibly literally, by the curious habit of some Chinese suppliers, of randomly assigning power supply polarity to red/black wire pairs. The solution, somewhat belt-and-braces, was to simply make up custom power cables with an embedded rectifier. Well, we guess that’s one less thing to worry about, but do look away when those PSU hacks are being shown!

Multi-material or multi-color FDM printer options are plenty, here’s a cool way of using a servo to swing a pair of hotends to the same point, and we also saw a while back, a way of using a sprung-loaded rocker to flip the unused hotend up out the way when not needed.

Continue reading “Doubled Up 3D Printer Upgrade Doubles The Fun”