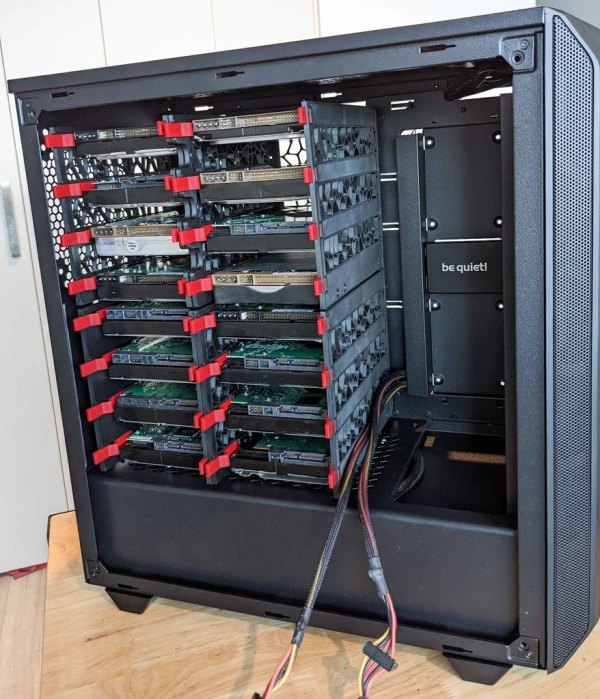
3D Printed Gesture-Controlled Robot Arm Is A Ton Of Tutorials

Ever wanted your own gesture-controlled robot arm? [EbenKouao]’s DIY Arduino Robot Arm project covers all the bases involved, but even if a robot arm isn’t your jam, his project has plenty to learn from. Every part is carefully explained, complete with source code and a list of required hardware. This approach to documenting a project is great because it not only makes it easy to replicate the results, but it makes it simple to remix, modify, and reuse separate pieces as a reference for other work.

[EbenKouao] uses a 3D-printable robotic gripper, base, and arm design as the foundation of his build. Hobby servos and a single NEMA 17 stepper take care of the moving, and the wiring and motor driving is all carefully explained. Gesture control is done by wearing an articulated glove upon which is mounted flex sensors and MPU6050 accelerometers. These sensors detect the wearer’s movements and turn them into motion commands, which in turn get sent wirelessly from the glove to the robotic arm with HC-05 Bluetooth modules. We really dig [EbenKouao]’s idea of mounting the glove sensors to this slick 3D-printed articulated gauntlet frame, but using a regular glove would work, too. The latest version of the Arduino code can be found on the project’s GitHub repository.

Most of the parts can be 3D printed, how every part works together is carefully explained, and all of the hardware is easily sourced online, making this a very accessible project. Check out the full tutorial video and demonstration, embedded below.

Continue reading “3D Printed Gesture-Controlled Robot Arm Is A Ton Of Tutorials”

Cura Plugin Offers Custom Support

[Chuck] likes the ability of Simplify3D to add support to parts of a model manually. However, not everyone wants to spend $150 for a slicer, so he’s shared how to install a plugin that allows you to do the same trick in Cura.

The plugin is “Cylindric Custom Support.” That doesn’t sound very exciting, but you get five choices of shapes you can create custom supports easily. There are also size and angle parameters you can use to customize the effect.

Continue reading “Cura Plugin Offers Custom Support”

3D Printing Without Support Material Thanks To An Additional Axis

Fused Deposition Modelling (FDM) 3D printers which squirt out molten plastic layer by layer are by far the most popular type in general use. Most machines extrude plastic through a nozzle above print bed, and struggle to produce parts with overhangs without using support material. However, a German team of researchers have recently come up with a solution.

In a prototype built by researchers at the Zurich University of Applied Sciences (ZHAW), a standard Cartesian printer has a third rotary axis added, upon which the nozzle can rotate. Additionally, the nozzle is angled at 45 degrees to the print bed, rather than the usual perpendicular setup. This allows layers of a print to be built up in such a way that support material is not needed for the vast majority of typical overhangs. This is particularly useful for hollow parts, where removing support material can be particularly difficult.

The team believes that such technology could be implemented on existing printers by way of a simple upgrade kit, and we can imagine a few experimenters will be champing at the bit to try it out. If you do, be sure to drop us a line. Alternatively, consider using a marker to make removing supports easier. Video after the break.

Continue reading “3D Printing Without Support Material Thanks To An Additional Axis”

Programmable Filament For Multicolor Printing

A recent research paper shows a way to create multicolor 3D prints using a single extruder if you are too lazy to babysit the machine and switch filament. The concept: print your own “programmable” filament that has the right colors in the right place. This is the same idea as manually splicing filament but presumably is more efficient since the process works with one color at a time and doesn’t repeat. In other words, to print the 64 squares of a chessboard you’d swap filament at least 64 times on each layer. Using programmable filament, you’d load one spool, print half of the filament, load another spool, print the other half, and then finally load the newly created filament and print the chessboard. Notice that the first two operations aren’t printing the chessboard. They are printing the spool of filament you feed through on the third pass.

There are machines made to do this, of course, although they generally just splice lengths of filament together for you automatically. Using one filament solves the problems of keeping multiple heads in alignment as well as the added cost and complexity. However, you now have different problems such as the transition between materials and knowing exactly how much material will be at each point in the print.

Continue reading “Programmable Filament For Multicolor Printing”

3D Printing Air Filter System Does A Lot

We know we aren’t supposed to eat a lot of sugar, but we still have ice cream. We also know we probably shouldn’t be inhaling solder smoke and 3D printer fumes, but we do that too. Not [Mike Buss]. His 3D printer has a major exhaust system.

We can sympathize with his process. He mentions he started out just wanting a fan running with some filters. Then he decided to add a way to turn the fan on and off when printing. Then he added sensors to detect fumes and fire. Data collection was almost an afterhthought.

Continue reading “3D Printing Air Filter System Does A Lot”

Hacking A 3D Pen For Better Performance

When 3D pens first became available, many assumed them to be gimmicky or part of a general fad that would eventually die out. Like most revolutionary technologies, though, they’ve found a firm foothold, especially in the art community where the ability to 3D print in freehand is incredibly valuable. There are still some shortcomings with the technology, though, but [tterev3] recently tore into a 3doodler pen to make some necessary upgrades.

First, this pen has some design choices that are curious, to say the least. The cooling fan runs regardless of temperature, and it has pushbuttons for start and stop rather than a momentary button that controls the extrusion. To fix these issues, as well as change the filament size, improve the cooling, and provide greater control over the extrusion speed, [tterev3] completely rewrote the firmware, changed the microcontroller on the PCB, and made several hardware upgrades to accommodate these changes. He also went ahead and installed a USB-C port for charging, which should be standard practice on all low-voltage consumer electronics by now anyway.

The detail work on this project is impressive, given the small size of the pen itself and the amount of precision hardware needed to make the changes. Especially regarding the replacement of the microcontroller on the board itself, which is an impressive feat even without the incredibly small dimensions. The firmware upgrade is available on his GitHub page as well if you have your own 3doodler that needs modifications, and if you’re still struggling to find uses for these handy devices, we’ve seen them used with interesting effect to build drones.

Sand Plotter Built With 3D Printer Parts

Sand plotters are beautiful machines. They can make endless patterns, over and over again, only to wipe away their own creation with each new pass. Having seen the famous Sisyphus sand sculpture online, [Simon] decided to make his own.

The build came together quickly, thanks to [Simon]’s well-stocked workshop and experience with CNC motion platforms. The frame was built out of wood, with a combination of hand-cut and lasercut parts. After fabric-wrapping the outer rim turned out poorly, rope was substituted instead for a stylish, organic look. LEDs were installed inside to light the sand for attractive effect. The metal ball is moved through the sand via a magnet attached to an XY platform mounted on the back of the table. The platform is built out of old 3D printer parts, with a Creality CR10S Pro chosen for its ultra-quiet stepper drivers. Initial attempts to make the system near-silent were hung up by the crunching sound of the ball rolling over the sand; this was fixed by instead mounting the ball on a foam pad. While the ball is now dragged instead of rolling, the effect is one of blissful quiet instead of crunching aggravation.

The final build is incredibly attractive, and something we’d love to have as a coffee table as a conversation piece. We’ve seen [Simon]’s work around here before, too – with the water-walking RC car a particular highlight. Video after the break.

Continue reading “Sand Plotter Built With 3D Printer Parts”